Friday, January 27, 2023

Stampin Friends January 2023 Blog Hop - Life's Special Occasions


Welcome to the Stampin Friends

Blog Hop!

Happy NEW Year!!!!  Welcome all to 2023!!  How are your new year’s resolutions going??  I don’t “do” resolutions, but I do mentally tell myself every year I will not procrastinate on my projects like I have in the past.  Yeah, you see where I am going with this, lol. 


Any hoot let’s get to the real reason for this blog post…it’s time to get our Stampin’ on!  We are starting this year’s blog hop with “Life’s Celebrations”.  This is a perfect topic to start with because we all know there will be all types of Celebrations throughout the year.  With this post you will have endless ideas for all your Occasions!!

If you are following along the hop, you have arrived from Stephanie’s blog. Be sure to read through my blog, comment below and continue to Jo’s blog.

If you get lost along the way, no worries, you can find a list of Blog Hoppers at the end of each Blog. ENJOY!


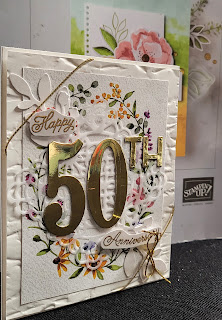
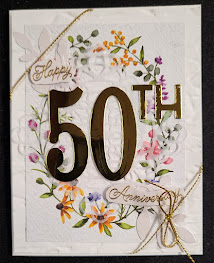
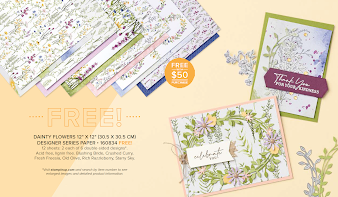
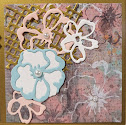
The Life’s Celebration I chose to focus on for this blog post is a 50th Anniversary!!  My Aunt and Uncle are celebrating 50 years of marriage this weekend and what a better way to present them their gift, than with a handmade greeting card.  Please accept my apologies in advance, I have used some retired products for this but the focus of the card does use NEW, beautiful designer series paper from Stampin’ Up!’s Sale-A-Bration Catalog.  I have been trying to be “good” by not buying EVERYTHING all at once from Stampin’ Up!’s new catalog.

MATERIALS NEEDED

Stamp Set: Always in my Heart (R)

Paper: Basic White CS (8 ½”x5 ½”, 4 1/8” x 5 3/8”); Shimmer White CS (scraps); Dainty Flowers DSP (Oval Image portion)

Ink: Versa Mark, Gold Embossing Powder

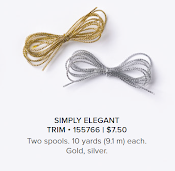
Tools/Accessories: Gold Simply Elegant twine, Square Vellum Dollies (R), Bough Punch, Old World 3D Embossing Folder (R), Large Numbers Dies (R)   

I tried my hand at lots of layering with different pieces.  I find these cards so impressive.  I think I did OK with it, but believe I still need to work on a few things.

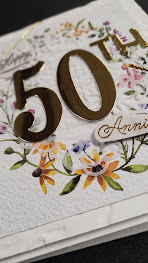
  1. My card base is Basic white, I then layered another piece of basic white cardstock embossed with Old World 3D folder.
  2. On top of this I place the beautiful oval design of Dainty Flowers DSP. 
  3. For my next layer, I punched out some pieces using the Bough punch out of shimmer white paper, followed by a vellum dollie.
  4. Next , I used a piece of gold simply elegant twine around the edges of the card and finished it off with a small bow.
  5. The sentiment which is the cards focal point “Happy 50th Anniversary”, was using gold accents.  The 50 is die cut out of gold foil paper and the sentiment was made using gold embossing powder on shimmer white cardstock.


I hope you enjoyed my first project of year!  I am looking forward to sharing a lot more with you this coming year!!  Comments of any kind (well hopefully nice ones, lol) are greatly appreciated, of any kind and then when you are done be sure to hop on over to the next blogger on the list!


See you next month!


Blog Hop Index

__________________________________________________________________ 

Below are some of the products used in my card design.


Friday, November 25, 2022

Stampin Friends November 2022 Blog Hop - Tags, Boxes & Bags!

Welcome to Stampin Friends Blog Hop! Can you believe we’ve been on this Hop journey for a whole year!!!  Yes, this is the last one for 2022, but don’t you fret none, we will be back in 2023!  For our final Blog Hop we are going the festive route with Tags, Boxes and Bags, since December is such a festive month throughout the world.


If you are following along the hop, you have arrived from Jo’s blog. Be sure to read through my blog, comment below and continue to Teri’s blog. If you get lost along the way, you can find a list of Blog Hoppers at the end of each Blog.
ENJOY!

This year I tried to do as many Hops as possible geared towards masculine and kids…so today’s no different.  This month I made a greeting card along with a “Filing” box that will hold gift tags.  The box is super easy to make and hold just about anything, not just gift tags!  Check it all out below.


Here is a quick list of materials that used to make all the projects:


Yeti to Party (bundle)
North Pole Mischief
Layering Diorama Dies
Story Book Gnomes Designer Series Paper
Basic Grey Card Stock
Smoky Slate Card Stock
Basic White Card Stock
3/16” Iridescent Trim
Snowfall Accents Puff Paint
Momento Black Ink
Balmy Blue Ink

The card is a simple design, I gave the layering diagram a whirl and am pretty happy how it turned out.

Greeting Card:

Card Base: basic white card stock, 8 1/2 x 5 1/2 scored at 4 1/2”
Inside Layer: basic white 4 1/8’ X 5 5/8”
Scraps: basic white

I used one of the layering diaroma dies to cut a whole in the front of the card.  I outlined this with the snowfall accents puff paint. I then took a piece of 4 1/8” x 5 3/8” basic white card stock and stamped some snowflakes and added the mountains.  I also used the snowfall accents puff paint on the mountain tops.

I then stamped a yeti and a tree, colored and trimmed them out and added them to the card front.
Lastly, I die cut a scarf for the yeti out Story Book Gnomes DSP.  I also used this DSP for the sentiment.


Files Box and Tags

The tags are 2” x 4 1/4” card stock (basic grey and smoky slate) with a layer of the Story Book Gnomes DSP the size of 1 3/4” x 3 3/8”.

To decorate the tags I used the Yeti image, along with the two images from the North Pole Mischief. (SHHH it is one of my favorites sets).  Aren’t they just so freakin’ cute!


The File Box I used the directions on splitcoaststampers.com.  You can find them here: https://www.splitcoaststampers.com/resources/tutorials/minifilebox/  It was super simple to make especially if you have the envelope punch board.  I wrapped the iridescent trim around the box two times and stapled the ends to the box front.  The trim edges were covered with the Yeti, mountains and presents.

I hope you enjoyed all of my projects for 2022, can’t wait to be back next year!  Don’t forget, comments of any kind (well hopefully nice ones, lol) are greatly appreciated. When you are done here be sure to hop on over to Teri’s Blog.

See you next year!
______________________________________________________________________


Friday, October 28, 2022

Stampin Friends October 2022 Blog Hop - Thankful for You!


Welcome to Stampin Friends Blog Hop! This month is we are creating for being "Thankful for You". First, I am thankful for all of you and happy I can share my creativity with you all! Second, I am thankful for all medical research facilities looking for cures!  One in particular is the Leukemia & Lymphoma Society.  I am raising much needed funds, so please be sure to visit my "other" page after the hop.

If you are following along the hop, you have arrived from Jean’s blog. Be sure to read through my blog, comment below and continue to Steph’s blog. If you get lost along the way, you can find a list of Blog Hoppers at the end of each Blog.  ENJOY!

I know I said in previous posts, but I am still trying to make more masculine cards and gifts.  So this month was no different!  Shouldn't we be "Thankful" for our men in our lives?  I also included one of my favorite things this month, pens.  If you know me, you know I LOVE pens and kind of collect them.  The one featured in the box I made was purchased this Summer in New Orleans!  Now onto my items!


I found this fun card idea somewhere on Pinterest, please forgive for not knowing who it was.  Since I found this, I have made sure to include in a class, for a birthday card and now this blog.

Products used: Brewed For You Bundle; Color & Contour; Very Vanilla Card Stock (CS); Basic White CS; Early Espresso, Slate  & Crushed Curry Ink; Twine; Rustic Metallic Adhesive Backed Dots; He's the Man Designer Series Paper (DSP).


The card is a normal A2 (4 1/4" x 5 1/2") size, however you cut 2 inches off the front flap.  Then you take a piece of 3" x 5 1/2" acetate to fill in where you cut away. Lastly, I added a border to the right edge of the acetate to finish off the "window".  Inside the card I stamped my sentiment, but heck you can stamp anything you want to see through the window.  Below is a card I created for one of my recent classes where we made Fall cards.It was a big hit!


Now for the really fun part!  We always seem to make cute packaging to hold sweets.  Well this time I thought I would something to hold a "fancy" pen.  Wouldn't you love to be gifted a nice pen?  I know I would.

The bottom of the box is made with He's the Man DSP and cover (which is hard to see in the picture) is made with a piece of acetate.  The finished box is 6" long, by 3/4" high and wide. I wanted a clear cover so the pen would be visible.  The measurement for the base is 9" x 3 3/4". At the 9" side, score at 3/4", 1 1/2", 7 1/2" and 8 1/4". On the 3 3/4" side, score at 3/4", 1 1/2", 2 1/3" and 3".  Then you will trim away the pieces as soon in the picture below.
 
 
I put the base together similar to the boxes Stampin' Up! often has up for sale or in their Paper Pumpkin kits.  Mine did need a little adhesive. I didn't think to add a picture as to how it went together so I may update this post to include it over the weekend.  
 
I'll admit, the acetate cover was not easy to put together, due to the fact you cannot see the score lines and it is super thick.  The cover's measurement is 7 1/2" by 2 1/5".  On the 7 1/2" side score at 13/16" on each end and 7/8" on each side of the 2 1/2".  I did not cut away any pieces for the cover. All you need to do is on the 2 1/2" side, cut on the score lines to the score line going the other way.


I ties some twine around the base so it really holds its shape and then the cover tucks nicely inside the box.
I also created an insert for the box the hold the pen.  This piece is 3/4" x 8 1/4". I made some score lines and then punched out a three quarter circle at the peaks of the scores to create a cradle for the pen.


Here is the final box, along with a tag to go with it.  I hope you enjoyed my “thankful for you” projects! Don’t forget, comments of any kind (well hopefully nice ones, lol) are greatly appreciated. When you are done here be sure to hop on over to Steph’s Blog.
 

 ______________________________________________________________________

______________________________________________________________________ 


Friday, August 26, 2022

Stampin Friends August 2022 Blog Hop - All About the Paper!


Welcome to Stampin Friends Blog Hop! This month is “all about paper”.  As paper crafters, where would we be without paper, lol. The point of this months blog is to showcase all the wonderful that is out, especially my favorite Designer Series paper from Stampin’ Up!  

If you are following along the hop, you have arrived from Jo’s blog. Be sure to read through my blog, comment below and continue to Jean’s blog. If you get lost along the way, you can find a list of Blog Hoppers at the end of each Blog.  ENJOY!

I am always amazed (not sure why though) at the product selection Stampin’ Up! has to offer.  My greeting card and 3D project was made using only one of their Designer Series Paper pack and a bunch of coordinating card stock, along with one product bundle.  Below are all the supplies used to make my projects.

MATERIALS:

Season of Chic Bundle
Texture Chic Specialty Designer Series Paper
Gold Foil Sheets
Soft Succulent Card Stock
Petal Pink Card Stock
Melody Mango Card Stock
Soft Suede Card Stock
Basic White Card Stock
Very Vanilla Card Stock
Basic Pearls
Basic Rhinestones
Momento Black Ink

What better way to showcase the beautiful paper this DSP has to offer, then by using just about all the different sheets on one card?  Below is my card along with some simple instructions.

CARD MEASUREMENTS:
Card Base: basic white card stock, 8 1/2 x 5 1/2 scored at 4 1/2”
Second Layer: gold foil 4” x 5 1/4”
Third Layer: 5 pieces of DSP, 15/16” x 3 3/4”
Scraps: soft succulent, petal pink, soft suede and basic white

I do like cards that come together very easily and this is definitely one of them.  The majority of the card is adhered together with adhesive.  The sentiment panel is adhered with dimensional, to make it pop up a little.  Then I embellished it with basic pearls. (These are still my favorite go to embellishments, along with the basic rhinestones).


Another great way to showcase DSP is by making a sampler frame.  When I first noticed the bundle, Season of Chic, in the catalog (I’ll admit, it was just about two weeks ago) I fell in love and thought it would be the perfect bundle for a seasonal frame.  My original plan was to use it in my frame class, but unfortunately, it didn’t come in in time. But  I am excited that I got to use for my blog. Normally, I would make an insert for each season, this is what I did form my class.  However, to be able to use the different sheets of DSP in one frame, I made this one to reflect all four seasons.


FRAME
Frame size: 11 x 11, it the mats opening was 4 1/2” x 4 1/2”.  by I enlarged it to be 6” x 6”.
Background stock: Gail Foil 7” x 7”
Squares: 4 pieces of DSP  3 16/17” x 3 16”/17”
Scraps: 5 1/2” x 8 1/2” in petal pink, pool party, mango melody, soft suede, basic white and very vanilla. 1/4” sheet of gold foil


Each square showcases a different season, so I only used the dies for this.  The hardest part for me is always color coordination.  This is how I solved the problem.  I die cut ALL THE PIECES from the dies set (except the background die) in just about all the coordinating colors.  Then I just played around with what I thought worked best.  Here is the final result and of course I used basic rhinestones and pearls to embellish each panel.

To show how fun and versatile you can make these frames, here are the inserts I made for me class.  My apologies for using many retired products.


I hope you enjoyed my “all about paper” projects!  Don’t forget, comments of any kind (well hopefully nice ones, lol) are greatly appreciated. When you are done here be sure to hop on over to Jean’s Blog.

See you next month!

_____________________________________________ 

Blog Hop Index

 _____________________________________________