Showing posts with label Gold. Show all posts

Friday, October 27, 2023

Stampin Friends October 2023 Blog Hop - Thankful for You

Welcome to the Stampin Friends Blog Hop!

So sad that there is only one more month of hoping after this month!  I’ve had an incredible journey and hope you have too.  With that said, this month is about being Thankful and I am especially Thankful for You!

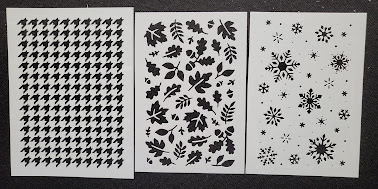
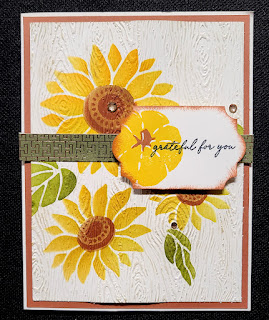
For my project this month I decided to work out of the box.  Every month I select a stamp set or bundle (sometimes the same bundle) as my focus, this month I went with the Abundant Beauty Decorative Masks and September’s Paper Pumpkin.

So…if you are following along the hop, you have arrived from Steph’s Blog. Be sure to read through my Blog, comment below and continue to Barb’s Blog. If you get lost along the way, no worries, you can find a list of Blog Hoppers at the end of each Blog. ENJOY!
 

MATERIALS NEEDED

Stamp Sets: September Paper Pumpkin

Paper: Very Vanilla: 5 ½” x 8 ¼”, scored at 4 ¼”, card base; 3 7/8 x 5 1/8”; scraps

Copper Clay: 4 1/8” x 5 3/8”

All About Autumn Designer Series Paper (DSP): 4 ¼” x 1/2”

Ink: Daffodil Delight, Crushed Curry, Pumpkin Pie, Old Olive, Mossy Meadow, Pecan Pie, Copper Clay, Crumb Cake, Momento Black

Tools/Accessories: Abundant Beauty Decorative Masks, Timber 3D Embossing Folder, Blending Brushes. The Gems and Punch used are retired, but can be substituted with Natural Adhesived Back Sequins and Lasting Label Punch.

I am not sure how many people have tried using Stampin’ Up!’s decorative masks, but if YOU haven’t boy are you missing out!!  I tried these in a current class and my guests were amazed by their versatility and ease of use!  In my class we made a total of three cards, using different techniques.  The first technique used one mask and a couple of color inks.  The second technique was also using one mask but with shimmer paste.  Lastly, the final technique and the one I will showcase on this blog, used four layering masks.  With this, each mask adds another layer to make a complete image. I will add pictures to the end of the blog of the other two cards.

INSTRUCTIONS:
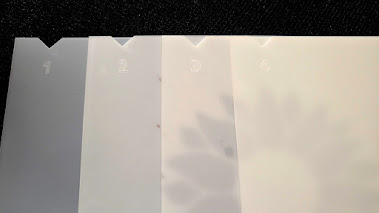
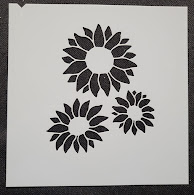
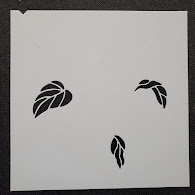
In the Abundant Beauty Decorative Masks, there are four mask that make up sunflowers.  Each mask is numbered and should be used in order.  The cool thing about these masks, there is also a notch where the number is.  The mask is made this way so that you know how to align all the masks as you are building the image.


Just an FYI, the other three masks do not have notches, these are meant to be used by themselves.
 

  1. For the first mask, I put a piece repositionable tape on my grid paper and placed my 3 7/8” x 5 3/8” very vanilla card stock down.  I then layed mask #1 down and found the position I liked best.  When the mask is down, I traced the notch next to the number on the grid paper.  Now I will line up the other mask in the same position (easy peasy). For this mask, using a blending brush, pick up some of the daffodil delight colored ink and rub in the open spaces of the masks.  The more times you go over the same spot, the darker the color gets.  So with one ink you can achieve different shades.
  2. The second mask was the leaves.  Using the same technique as the previous step fill in the open spaces first with old olive ink and then I gave it some shading with mossy meadow.
  3. The thirds mask is the center of the sunflower.  I used pecan pie ink for this.
  4. The fourth mask is also the center of the sunflower, but it has more detail.  For this, I used copper clay ink.
  5. I then ran this piece of card stock through the Stampin and Emboss machine using the timber 3D embossing folder. To bring out more of the detail, I used a dauber and brumb cake ink and lightly ran it over the entire card.
  6. I added a thin strip of All About Autumn DSP above the middle mark of the card.
  7. My sentiment and pumpkin image came from September’s Paper Pumpkin.  For this I used memento black ink, along with crushed curry for the pumpkin and copper clay for the stem.
  8. The card gets put together by first adding the layer of copper clay with adhesive.  I also attached the sunflower piece and strip of DSP with adhesive.  The sentiment however, is added to the card front with dimensionals.
  9. Lastly, I added some gems.

So, there you have it, my “Thankful for You” card!  I hope you enjoyed this month’s blog post!!  Comments of any kind (well hopefully nice ones, lol) are greatly appreciated.  When you are done be sure to hop on over to the next blogger, Barb, on the list!

See you next month!     


Friday, June 23, 2023

Stampin Friends June 2023 Blog Hop - Lots of Layers

Welcome to the Stampin Friends Blog Hop!


I spoke to soon last month…where is the warmth?? Here in New England our weekends have been gloomy and rainy, yuck!  It is almost July and I believe we hit 80 degrees just a hand full of times.  For someone who is ALWAYS cold this is NOT GOOD.  But if there is to be a brite side, it gives me more time to create, lol!

This month our card feature is all about layers…hey, I know about layers all too well, clothing and paper. Let’s get to my card now, shall we.  My idea came from a card sketch that Steph supplied us with during COVID.  I did use most of the sketches but found some I still need to try out.

If you are following along the hop, you have arrived from Steph’s blog. Be sure to read through my blog, comment below and continue to Maureen’s blog. If you get lost along the way, no worries, you can find a list of Blog Hoppers at the end of each Blog. ENJOY!


MATERIALS NEEDED


Stamp Set: Let’s Go Shopping

Paper:  

  • Basic White CS (5 ½” x 8 ¼”, scored at 4 ¼”; scraps) (card base)
  • Les Shoppes Designer Series Paper (DSP) (4” x 5 ¼”)
  • Les Shoppes DSP (1 ¾” x 5 ¼”)
  • Daffodil Delight CS 2- (3” x 2 ½”)
  • Les Shoppes DSP 2- (2 ¾” x 2 ¼”)

Ink:  Momento Black, Pecan Pie


Tools/Accessories:   Let’s Go Shopping Dies; Adhesive-Backed Solid Gems

INSTRUCTIONS

  1. Did someone say layers?? I am pretty sure I succeeded with the requirements…
  2. My card base is a 8 ½” x 5 ½” basic white CS, scored and folded down to a 4 ¼” x 5 ½”.
  3. My first layer is a piece of Les Shoppes DSP (everything used   is from the Les Shoppes Suite Collection).  This is adhered with snail.
  4. The second layer is the “banner” piece that measures 1 ¾” x 5 ¼’ cut from a piece of Les Shoppes DSP paper.  I adhered this to the left-hand side of the card base, leaving about a half inch to the left of the card.
  5. The third layer consists of another piece of DSP adhered to a piece of daffodil delight.  (the sketch works with squares but I made mine into rectangle due to the stamp set used).  I also added the small sign frame to this piece with the words Happy Birthday on it. 
  6. The fourth layer is similar to the previous one, but with this one I stamped the store front image and also added the food in the window.  This was colored using the Stampin’ Blends markers.  To give it added dimension I adhered the store front to the DSP with dimensionals.
  7.  Lastly, I used the Adhesive-backed solid gems to embellish the front.


I hope you enjoyed this month’s blog post and found a fun way to use up some of your DSP!!  Comments of any kind (well hopefully nice ones, lol) are greatly appreciated.  When you are done be sure to hop on over to the next blogger, Maureen on the list!

See you next month!
 

Friday, January 27, 2023

Stampin Friends January 2023 Blog Hop - Life's Special Occasions


Welcome to the Stampin Friends

Blog Hop!

Happy NEW Year!!!!  Welcome all to 2023!!  How are your new year’s resolutions going??  I don’t “do” resolutions, but I do mentally tell myself every year I will not procrastinate on my projects like I have in the past.  Yeah, you see where I am going with this, lol. 


Any hoot let’s get to the real reason for this blog post…it’s time to get our Stampin’ on!  We are starting this year’s blog hop with “Life’s Celebrations”.  This is a perfect topic to start with because we all know there will be all types of Celebrations throughout the year.  With this post you will have endless ideas for all your Occasions!!

If you are following along the hop, you have arrived from Stephanie’s blog. Be sure to read through my blog, comment below and continue to Jo’s blog.

If you get lost along the way, no worries, you can find a list of Blog Hoppers at the end of each Blog. ENJOY!


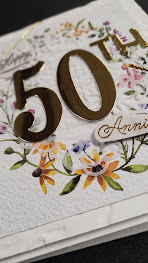
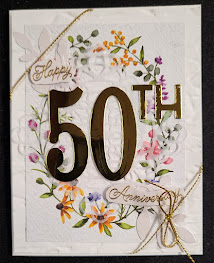
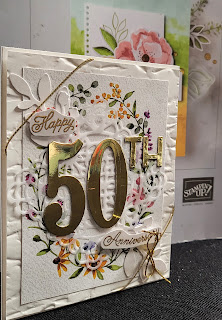
The Life’s Celebration I chose to focus on for this blog post is a 50th Anniversary!!  My Aunt and Uncle are celebrating 50 years of marriage this weekend and what a better way to present them their gift, than with a handmade greeting card.  Please accept my apologies in advance, I have used some retired products for this but the focus of the card does use NEW, beautiful designer series paper from Stampin’ Up!’s Sale-A-Bration Catalog.  I have been trying to be “good” by not buying EVERYTHING all at once from Stampin’ Up!’s new catalog.

MATERIALS NEEDED

Stamp Set: Always in my Heart (R)

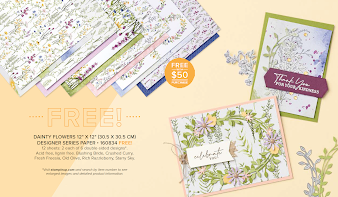
Paper: Basic White CS (8 ½”x5 ½”, 4 1/8” x 5 3/8”); Shimmer White CS (scraps); Dainty Flowers DSP (Oval Image portion)

Ink: Versa Mark, Gold Embossing Powder

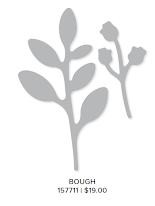
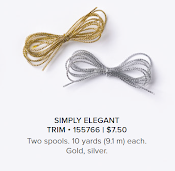
Tools/Accessories: Gold Simply Elegant twine, Square Vellum Dollies (R), Bough Punch, Old World 3D Embossing Folder (R), Large Numbers Dies (R)   

I tried my hand at lots of layering with different pieces.  I find these cards so impressive.  I think I did OK with it, but believe I still need to work on a few things.

  1. My card base is Basic white, I then layered another piece of basic white cardstock embossed with Old World 3D folder.
  2. On top of this I place the beautiful oval design of Dainty Flowers DSP. 
  3. For my next layer, I punched out some pieces using the Bough punch out of shimmer white paper, followed by a vellum dollie.
  4. Next , I used a piece of gold simply elegant twine around the edges of the card and finished it off with a small bow.
  5. The sentiment which is the cards focal point “Happy 50th Anniversary”, was using gold accents.  The 50 is die cut out of gold foil paper and the sentiment was made using gold embossing powder on shimmer white cardstock.


I hope you enjoyed my first project of year!  I am looking forward to sharing a lot more with you this coming year!!  Comments of any kind (well hopefully nice ones, lol) are greatly appreciated, of any kind and then when you are done be sure to hop on over to the next blogger on the list!


See you next month!


Blog Hop Index

__________________________________________________________________ 

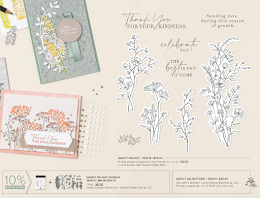
Below are some of the products used in my card design.