Showing posts with label Celebrate Sunflowers. Show all posts

Saturday, May 11, 2024

Stampin’ w/Tiziana MAY 2024 New

 Stampin’ w/Tiziana MAY 2024 News


April has come and gone and not one of my bday cards has been sent out.  I do have a plan for my April birthdays…just need to sit and focus.  And....now I can’t believe we are already a little more than a week into May, Summer will fly by and then back to the Wonder Holiday Season!

May HOSTESS CODE - F3WKYH7P
Here is May's Hostess Code, F3WKYH7P! Use this code on orders under $150
https://www.stampinup.com/?hostcode=F3WKYH7P

If your order is over $150 please take advantage of all the freebies you are entitled too by placing your order using this link instead https://www.stampinup.com/?demoid=2020232.

With this new catalog, I am sure you will find a ton of things to add to your collection!


______________________________


NEW ONLINE EXCLUSIVES! 
 

Flowering Zinnias Suite is back in stock, check out this quick video showcasing everything you get in the Suite!
163485  |  FLOWERING ZINNIAS SUITE COLLECTION  |$83.00
163480  |  Bundled Savings  |  SIMPLY ZINNIA BUNDLE  |  $52.00


______________________________
_________
IT’S HERE!!!
 
The new Idea Book and Catalog has arrived!!  
Please reach out if you would like one!

So many of you have expressed your love for the new layout. Although at first, I was on the fence, I am now in love as well.  It is the biggest change they have made with the catalog but one for the better.  I always felt their Idea Book and Catalog was overwhelming for new customers, you just didn’t know where to look for things to make a project  unless you knew what you were doing. With this new layout everything you need to replicate a project is right there, woo hoo.
With that said, I would love to know what your favorite thing about the new layout is.
https://issuu.com/stampinup/docs/ac24_en_us?fr=xKAE9_zU1NQ

_______________________________________
NEW KITS RELEASED
Holy crud, I just don’t know how they do it.  Two new kits this month and they are amazing!
 
CITY SIGHTS KIT  |  $21.00
HELLO HOLLYHOCKS KIT  |  $14.00


______________________________
_________
NOW IS THE TIME TO JOIN MY TEAM!!
 
First, let’s welcome Janet Valentine to my Creative Paws team.  She has taken advantage of this wonder promotion and I think you should too!
Between May 1 - 31st, anyone who joins my Stampin’ Up! team Creative Paws as a demonstrator, will receive four 2024–2026 In Color products in their Starter Kit for FREE!  New demonstrators will receive the following products in their Starter Kit at no additional cost:
2024–2026 In Color Classic Stampin’ Pad Bundle
2024–2026 In Color 8-1/2" x 11" (21.6 x 27.9 cm) Cardstock
2024–2026 In Color 6" x 6" (15.2 x 15.2 cm) Designer Series Paper
2024–2026 In Color Stampin’ Write Markers
In addition to the In Color products, new demonstrators will pick $125 USD | $165 CAD worth of products of your choice. You will also receive free business supplies with your order and free shipping. Not to mention all the fun that comes with being a part of my amazing team and our wonderful crafting community!

______________________________
_________
PAPER PUMPKIN MONTHLY SUBSCRIPTION
 
May 11 to June 10th | Sign up for June’s Paper Pumpkin – Life is Sweet

ADD-ON DETAILS
: This exclusive add-on (item 164397) coordinates with the April, May, and June kits! Reminder the add-on is available only while supplies last!
SIGN UP HERE!
______________________________
_________
May 2024 CLASSES
______________________________
_________

MAY 5 | SUNDAY | 10:00 AM – 7:00PM
MAY DAY CRAFT CELEBRATION

YAHOOO!!! Thank you everyone for coming to my May Day Craft Celebration! 

It was a fun-filled day for all with some yummy food and lots of space and projects to die for!

Here are just a couple of pictures from the day along with the projects made in class.


______________________________
_________
MAY 12th | MONDAY | 7:30 PM – 8:30PM 
(date change, after May Day I needed a break)
APRIL PAPER PUMPKIN FUN DAY

Tonight I will be sharing April's Paper Pumpkin Project along with some fun alternatives! This will be a pre-recorded event that will be posted on Facebook @Stampin' w/Tiziana and also on my blog stampinwtiziana.blogspot.com.

______________________________
_________
MAY 19 | SUNDAY | 4:00 PM – 7:00PM
S.O.S CARD CLASS: ALL OCCASIONS - RSVP MAY 15TH

In my S.O.S (Stamp Out Stress) Card Class you will make 9 cards, three of three designs. Your class fee includes all materials to make your cards along with envelopes.

In this months class all products used will be from the NEW catalog. There will be something for everyone!
Class Cost: $28.00
“TO GO”: $34.00

********************
PLEASE NOTE: Please pay ahead to guarantee your spot. You are not registered for this class until I receive payment.
********************
Following payment options accepted:

PayPal: stampintiz@gmail.com (friends and family please)

Venmo: @stampintiz (friends and family please)

********************
Please bring your SNAIL or doublesided tape:

*If you need a SNAIL for class please add $10 to the class fee. This is yours to keep.

**If you need a refill please add $5 to the class fee. This is yours to keep.

***If you come without one there will be a $3 fee to rent one.

______________________________
_________
SAVE THE DATE
JUNE 2024 CLASSES

______________________________
_________

JUNE 9 | FRIDAY | 6:30 PM – 9:30PM
SCRAPBOOK 101
***************************
JUNE 19 | WEDNESDAY | 7:00 PM – 8:40PM
POP-IN ZOOM CLASS
***************************
JUNE 23 | WEDNESDAY | 5:00 PM – 8:00PM
POP-IN ZOOM CLASS

Friday, October 27, 2023

Stampin Friends October 2023 Blog Hop - Thankful for You

Welcome to the Stampin Friends Blog Hop!

So sad that there is only one more month of hoping after this month!  I’ve had an incredible journey and hope you have too.  With that said, this month is about being Thankful and I am especially Thankful for You!

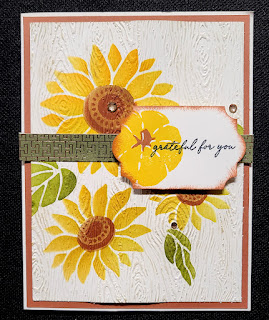
For my project this month I decided to work out of the box.  Every month I select a stamp set or bundle (sometimes the same bundle) as my focus, this month I went with the Abundant Beauty Decorative Masks and September’s Paper Pumpkin.

So…if you are following along the hop, you have arrived from Steph’s Blog. Be sure to read through my Blog, comment below and continue to Barb’s Blog. If you get lost along the way, no worries, you can find a list of Blog Hoppers at the end of each Blog. ENJOY!


MATERIALS NEEDED

Stamp Sets: September Paper Pumpkin

Paper: Very Vanilla: 5 ½” x 8 ¼”, scored at 4 ¼”, card base; 3 7/8 x 5 1/8”; scraps

Copper Clay: 4 1/8” x 5 3/8”

All About Autumn Designer Series Paper (DSP): 4 ¼” x 1/2”

Ink: Daffodil Delight, Crushed Curry, Pumpkin Pie, Old Olive, Mossy Meadow, Pecan Pie, Copper Clay, Crumb Cake, Momento Black

Tools/Accessories: Abundant Beauty Decorative Masks, Timber 3D Embossing Folder, Blending Brushes. The Gems and Punch used are retired, but can be substituted with Natural Adhesived Back Sequins and Lasting Label Punch.

I am not sure how many people have tried using Stampin’ Up!’s decorative masks, but if YOU haven’t boy are you missing out!!  I tried these in a current class and my guests were amazed by their versatility and ease of use!  In my class we made a total of three cards, using different techniques.  The first technique used one mask and a couple of color inks.  The second technique was also using one mask but with shimmer paste.  Lastly, the final technique and the one I will showcase on this blog, used four layering masks.  With this, each mask adds another layer to make a complete image. I will add pictures to the end of the blog of the other two cards.

INSTRUCTIONS:

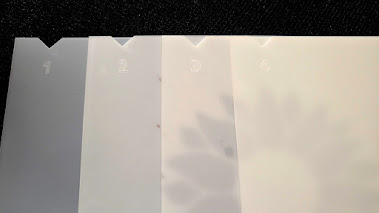
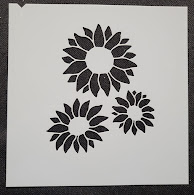
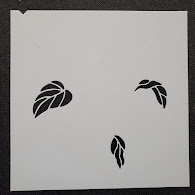
In the Abundant Beauty Decorative Masks, there are four mask that make up sunflowers.  Each mask is numbered and should be used in order.  The cool thing about these masks, there is also a notch where the number is.  The mask is made this way so that you know how to align all the masks as you are building the image.


Just an FYI, the other three masks do not have notches, these are meant to be used by themselves.
 

  1. For the first mask, I put a piece repositionable tape on my grid paper and placed my 3 7/8” x 5 3/8” very vanilla card stock down.  I then layed mask #1 down and found the position I liked best.  When the mask is down, I traced the notch next to the number on the grid paper.  Now I will line up the other mask in the same position (easy peasy). For this mask, using a blending brush, pick up some of the daffodil delight colored ink and rub in the open spaces of the masks.  The more times you go over the same spot, the darker the color gets.  So with one ink you can achieve different shades.
  2. The second mask was the leaves.  Using the same technique as the previous step fill in the open spaces first with old olive ink and then I gave it some shading with mossy meadow.
  3. The thirds mask is the center of the sunflower.  I used pecan pie ink for this.
  4. The fourth mask is also the center of the sunflower, but it has more detail.  For this, I used copper clay ink.
  5. I then ran this piece of card stock through the Stampin and Emboss machine using the timber 3D embossing folder. To bring out more of the detail, I used a dauber and brumb cake ink and lightly ran it over the entire card.
  6. I added a thin strip of All About Autumn DSP above the middle mark of the card.
  7. My sentiment and pumpkin image came from September’s Paper Pumpkin.  For this I used memento black ink, along with crushed curry for the pumpkin and copper clay for the stem.
  8. The card gets put together by first adding the layer of copper clay with adhesive.  I also attached the sunflower piece and strip of DSP with adhesive.  The sentiment however, is added to the card front with dimensionals.
  9. Lastly, I added some gems.

So, there you have it, my “Thankful for You” card!  I hope you enjoyed this month’s blog post!!  Comments of any kind (well hopefully nice ones, lol) are greatly appreciated.  When you are done be sure to hop on over to the next blogger, Barb, on the list!

See you next month!     


Tuesday, August 9, 2022

Stampin’ w/Tiziana August 2022 News

 Hi all!!!  Are you enjoying this heat as much as I am?  Seriously, I love this heat and feel we do not get enough of it!  Just curious, what do you do in this weather?  Me, I like to play in my craft room with the door cracked open to let some of the hot air in, lol. Good thing we do not have air conditioning in my craft room.


August Code.jpg
August's Hostess Code!!  4JTA424D
Always looking for the hostess code?? Here’s a quicker way to be sure you are using the Hostesses code all the time when you want to place an order.   Just click this link https://www.stampinup.com?hostcode=4JTA424D and it will automatically have you shopping under me with the Hostess Code for August.  So, as usual, be sure to use this code (4JTA424D) in August at check out if your order is less than $150. This will put you in the Hostess Rewards Raffle at the end of the month!

Also, be sure to plan all your shopping on August 13 and 14th!! TAX FREE weekend is back (orders must be shipped to a MA address)! And as an added bonus, orders that are placed that weekend, will receive a credit on your next order in the amount of your shipping charges!! Win - Win!

BTW no hostess points for June. Hopefully August will be a better month!
Happy Shopping!


SAB_Image.jpg

SALE-A-Brate Good times…Come On!
July 2022 to August 2022
https://issuu.com/stampinup/docs/jasab22_en-us?fr=sNjA5NzQ3MjczOTE
Only one month left for our Sale-A-Bration!!  There are a few items that have sold out, however, Stampin’ Up! has added catalog items to the list!  I have attached a pdf showing what items are redeemable as a Sale-A-Bration item.  Here is a digital version of the pamphlet, if you have not received yours in the mail.
Thinking of becoming a Stampin’ Up! demonstrator??? Well, now is the time, besides your demonstrator kit, Stampin’ Up! is also adding on the Making Plans Collection!!!
Ask me how easy it is join today!
https://issuu.com/stampinup/docs/jasab22_en-us?fr=sNjA5NzQ3MjczOTE


2022_JD_BACK_COVER.jpg
 HOLIDAY MINI CATALOG! July 2022 to December 2022
On a scale of 1 to 10…how do you rate this mini catalog?  Me…I am at 11, lol!!  I am trying so hard not to purchase everything…but it is becoming more and more difficult as the time goes on.  I am amazed at all the awesome thing’s crafters are sharing using the products in this new mini!  Check out the Mini Catalog here: https://issuu.com/stampinup/docs/jd2022_en-us?fr=sYTMwMTQ5NjA3MTI 
If you rather have a paper copy, please let me know and I will get one out to you.  The same goes for the Sale-A-Bration pamphlet.


PaperPumpkin.jpg
Last Call to sign up for Paper Pumpkin August 10th
August 10th is the last day to sign up for the “Sweet Sunflowers Pumpkin Kit!  Here comes the sun(flower) for a crafting experience you won’t forget! The Sweet Sunflowers Paper Pumpkin Kit has so much in store—elegant watercolor designs hand-crafted by our in-house artists, TWO Classic Stampin’ Spots for a Two-Step stamping experience, and the all-new twist technique to make your floral designs come alive with depth and detail! 
And the August Paper Pumpkin Kit includes the Gold Foil Honeycomb Sheets as a FREE gift that will add the perfect golden accent to any card or project. We can’t wait to see the bee-utiful projects you’ll create! 

This kit includes:
All the supplies you need to create 9 cards: 3 each of 3 designs; and coordinating envelopes.
An all-occasion stamp set to express words of gratitude, friendship, greetings and beautiful wildflower designed images.
Specialty Vellum honeycomb shape pre-cut pieces.
2 Classic Stampin’ Spots (Crushed Curry and Soft Suede) for a Two-Step stamping experience with a twist!
Paper pieces and embellishments with watercolor designs and images.
Mini Stampin’ Dimensionals.
FREE GIFT: 8 Gold Foil Honeycomb Sheets

Completed card size: 5-1/2" x 4-1/4" (14 x 10.8 cm)
Coordinating Stampin’ Up! colors: Blackberry Bliss, Crushed Curry, Evening Evergreen, Melon Mambo, Mossy Meadow, Night of Navy, Pumpkin Pie, Soft Suede
 SIGN UP HERE!


Hodge Podge of Holiday Cards - RSVP Aug 12th
 SUNDAY, AUGUST 14 2022 AT 5 PM
(Disclaimer: Date may change unexpectedly, we are planning a hot air balloon ride)
If you’ve been flipping through the “Mini” catalog, you know there are a lot of awesome Holiday items in it!  In this class we will be making cards that will reflect those pesky Holidays that will suddenly creep up upon us!
In this class you will make 9 cards, three of three designs. Your class fee includes all materials to make your cards along with envelopes. Stay tuned for samples!
CLASS FEE $25
PLEASE NOTE: Please pay ahead to guarantee your spot. You are not registered for this class until I receive payment.
Following payment options accepted:
Paypal: stampintiz@gmail.com (friends and family please)
Venmo: @stampintiz
Check: (Ask for information)


Please bring your SNAIL or double sided tape.
************************************************************************************
If you need a SNAIL for class please add $10 to class fee. This is yours to keep.
If you need a refill please add $5 to class fee. This is yours to keep.
If you come without one there will be a $3 fee to rent one.
   

SAMPLER FRAME - RSVP August 19th
SUNDAY, August 21, 2022 AT 5:00 PM
(Disclaimer: Date may change unexpectedly, we are planning a hot air balloon ride )
What is a sampler frame??? A sampler frame is a lovely piece of home decor that has interchangeable inserts coordinating with the four seasons.
Frame Size: 10”x10” Inserts will reflect Summer, Fall, Winter and Spring.

Class Cost: $40.00
Class Size Limited to 10

PLEASE NOTE: Please pay ahead to guarantee your spot. You are not registered for this class until I receive payment.

Following payment options accepted:
Paypal: stampintiz@gmail.com (friends and family please
Venmo: @stampintiz
Check: (Ask for information)

Please bring your SNAIL or double sided tape.
************************************************************************************
If you need a SNAIL for class please add $10 to class fee. This is yours to keep.
If you need a refill please add $5 to class fee. This is yours to keep.
If you come without one there will be a $3 fee to rent one.

PerfectPartners.jpg
PERFECT PARTNERS!
Some things are great on their own but become epic when they are paired with something else: cereal and milk, toast and butter, Fred Astaire and Ginger Rogers. We may be biased, but our favorite combo is our stamp sets and dies—and that’s what the Perfect Partners promotion is all about! 
Stampin’ Up! has created six new dies that coordinate with stamp sets in the 2022–2023 Annual Catalog and the July–December 2022 Mini Catalog. These coordinating dies will only be available during this promotion and will not be offered in any catalog.  
These stamp sets and dies are available separately or as a bundle. By buying the bundle, you will save 10% off the retail price. 
Put these wonderful stamp sets and dies together for more paper crafting fun!  Attached you will find a pdf of these awesome new “bundles” that will be available for purchase starting September 1st.


DEMO_MKTL_SQR2_NA_0822_COZY_BRIGHT.jpg
Latest Kit Addition - Cozy & Bright Kit
Kit Includes:
Cozy & Bright Photopolymer Stamp Set
Acrylic Stamp Block
Classic Stampin’ Spot: Poppy Parade
Predesigned projects 
Step-by-step instructions
Precut pieces (No prep work! Get right to crafting). Including printed die-cut sheets: sticker adhesive sheets & non-adhesive sheets
Makes 12 cards of 1 design
Gold foil accents
Folded card size: 5-1/2" x 4-1/4" (14 x 10.8 cm)
12 preprinted envelopes
Enough adhesive to complete projects
Linen thread
A 9-7/8" x 6-1/2" x 2-3/4" (25.1 x 16.5 x 7 cm) printed designer box for storage or crafting on the go
Product colors: Cajun Craze, Early Espresso, Evening Evergreen, Garden Green, Poppy Parade, Pumpkin Pie

demo_ldpg_nka_1_na_0822_cozy_bright.jpg  demo_ldpg_nka_2_na_0822_cozy_bright.jpg  demo_ldpg_nka_3_na_0822_cozu_bright.jpg
______________________________________________________________________

First, thank you, thank you, thank you, to those that have already donated...day by day I am getting closer to my fundraising goal!


Leukemia & Lymphoma Society - Team In Training

On a side note, I am raising funds for the Leukemia & Lymphoma Society!  In doing so, I will be part of their Team In Training Program and will be participating in the Disney World Marathon Weekend events. My fundraising goal is $8,000! Yes, that is the correct number and I need your help!
  • One way that I am raising funds is by donating a percentage of sales from all of my retired stamp sets.  My first sale of them occurred on June 12th.  That day, even with just a few sales I was able to raise $12.75.  I will be posting all available stamp sets and bundles on my Facebook page and I will also be posting them on my Stampin’ w/Tiziana Blog.  https://stampinwtiziana.blogspot.com I know I had this in last months email, but this is taking longer than I thought to organize and upload, please bare with me on this :-)
  • I will also be hosting a “Pasta for Cause” Dinner on October 2nd (please save the date).  Attached is more information  At this event there will be a ton of raffle baskets, along with 50/50 and other fun things to do! 
  • Also, in October, I will be hosting another Pampered Chef Party.  All my Hostess Benefits will go to the Leukemia Lymphoma Society.  I had one in May (thank you to all those that purchased) and I was able to raise $363!  Here is my shopping link (it is actually open now) if you need something sooner than later. pamperedchef.com/go/tizianamilano1003
Stay tuned for more fun and creative events I will be hosting to raise much needed funds! Shares are also greatly appreciated. 

To learn more about my "why" for fundraising for the Leukemia Lymphoma Society or if you rather just make a donation (any amount is greatly appreciated), please visit my fundraising page here.  https://pages.lls.org/tnt/neri/wdw23/TMilano

--
If you're not stampin', you should be!
Tiziana
Tiziana Milano - Stampin' Up! Independent Demonstrator 

Thursday, October 15, 2020

Stampin Friends October Blog Hop - Thanks/Thankful


Welcome to the Stampin Friends Blog Hop!

This month’s theme is about being thankful and giving thanks! If you are following along the hop, you have arrived from Kim Quade’s blog. Be sure to read through my blog, comment below and continue to Sue Vine’s blog. If you get lost along the way, you can find a list of Blog Hoppers at the end of each Blog. ENJOY!


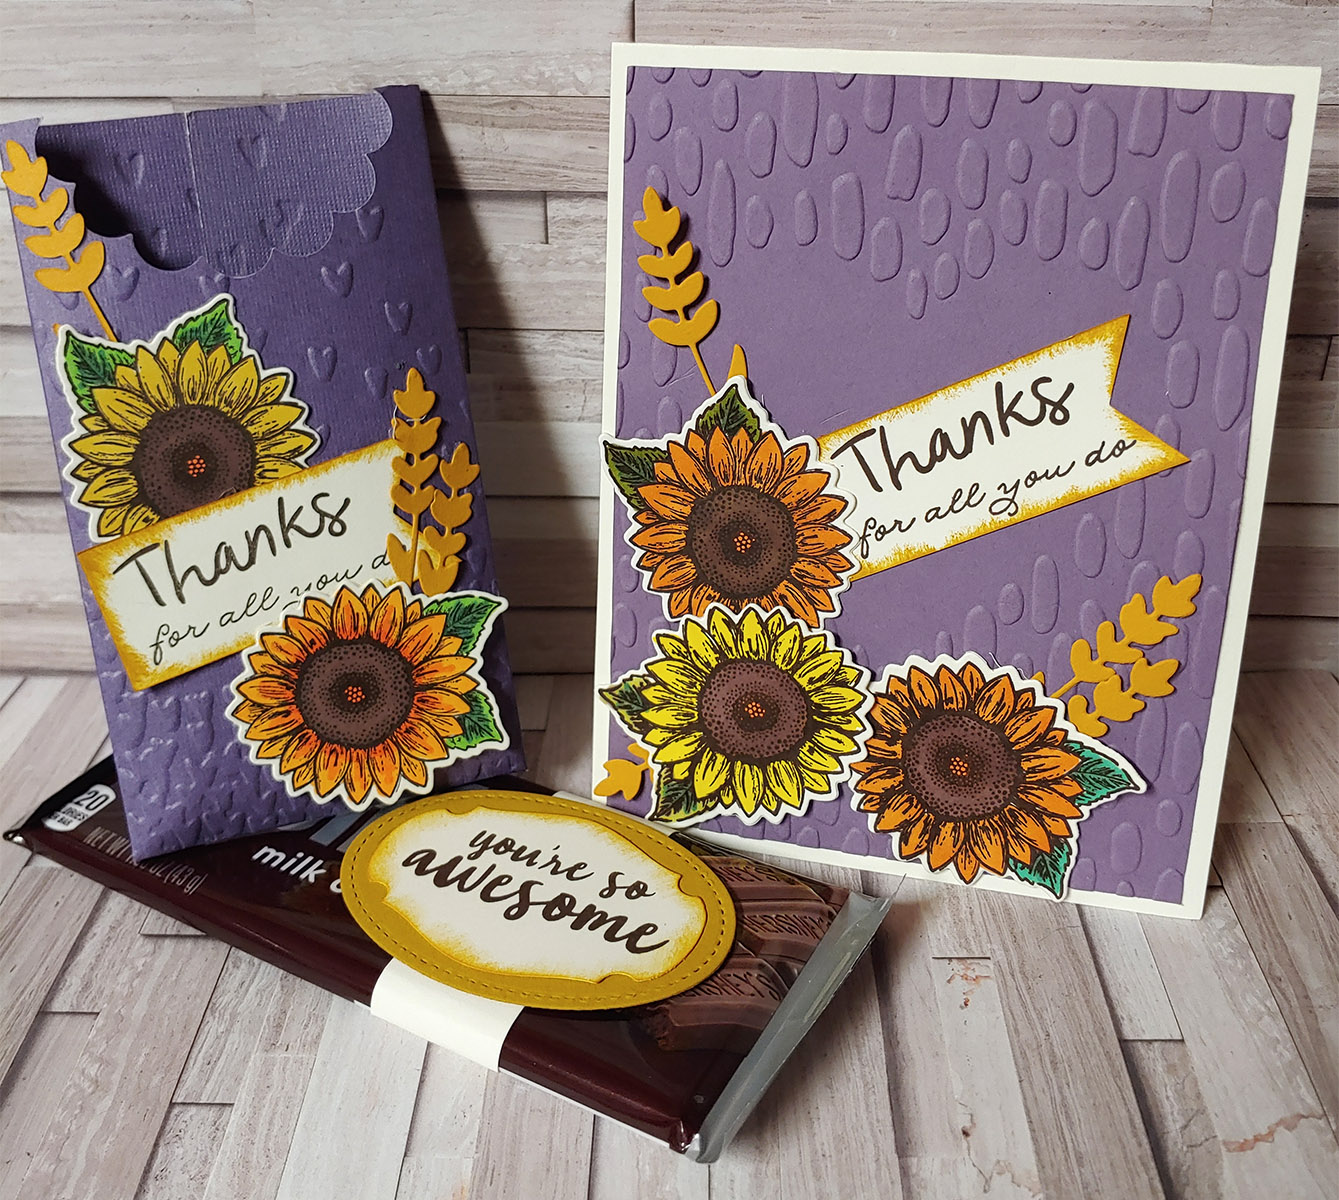
Next month, here in the States we celebrate Thanksgiving, a wonderful time of year to reflect about all the things we are Thankful for.  For my projects, I actually used to thank some very important people, NICU Nurses.  September was NICU Awareness Month and it just so happens my cousin gave birth to her first ever child over 2 months early.  As a thank you to all the wonderful nurses (142 of them) that took care of her baby around the clock, she asked if I could make something for them.  I came up with a pouch that holds a full size Hershey Bar.  I had a very short turn around time because my cousin wanted to get these to the nurses by the end of the month and also the same day she got to bring her baby girl home!  I then made a card to go along with the pouch (these the nurses did not get). 


So let’s start with the card, since that was quick and easy.  I think I used this bundle in another month of this hop, but as you can see, it is such a versatile stamp set and bundle.


Thanks for All You Do Card


INGREDIENTS:


Stamp Set: Celebrate Sunflowers; Ornate Thanks; Thankful Thoughts (r)

Paper: Very Vanilla (4 ¼”x11”, 1”x2 ½”, scraps); Highland Heather (4”x5 ¼”); Bumble Bee (scraps)

Ink: Early Espresso and Bumble Bee

Tools/Accessories: Assorted Blendibles; Sunflowers Dies; Banner Triple Punch, Sweetheart Textured Embossing Folder (r) 


INSTRUCTIONS:

  1. Score in fold in half the very vanilla cardstock.  This is the base of your card.
  2. Emboss the highland heather cardstock using the sweetheart textured embossing folder.  Adhere this to the card base with Stampin’ Seal.  Set this aside so you can work on the details of the card. 
  3. Stamp three of the smaller sunflower images on very vanilla cardstock.  I colored them using Stampin’ Up!’s Blendibles.  After you are done coloring them, die cut them out and set aside.
  4. Die cut two of the single sprigs and one double sprigs out of bumble bee cardstock, set aside.
  5. On the piece of 1”x2 ½” very vanilla card stock, stamp the word “thanks” from the Thankful Thoughts stamp set in early espresso ink. Then under that stamp the words “for all you do” from the Ornate Thanks stamp set also in early espresso ink.  Then punch the right side to create a banner using the Banner Triple Punch.  I then sponged the edges with bumble bee ink.
  6. Adhere the pieces onto the card base as shown in the sample.  Please note, the center flower is adhered with dimensionals.


“Thanks” Hershey Pouch and Belly Band


As mentioned in the beginning I had to make 142 of these within a week and a half time frame.  Here are some of the pictures from that experience.  When I have to make things in bulk like this I like to work on all the prepping one step at a time.  Then I assemble also one step at a time.


At first, I had a banner on the chocolate bar, but then I decided on a belly ban. To me it resembled a cigar, and isn’t that what they used to give out when someone had a baby (oh gosh, I am showing my age!).


INGREDIENTS:


Stamp Set: Celebrate Sunflowers; Ornate Thanks; Thankful Thoughts (r); Flowering Desert

(r)

Paper: Highland Heather (6”x5 1/2”); Very Vanilla (1”x2 ½”, 1”x5 ½”scraps); Bumble Bee (scraps)

Ink: Early Espresso

Tools/Accessories: Assorted Blendibles; Sunflowers Dies; Banner Triple Punch; Falling Petals Embossing Folder; Story Label Punch; 2 ¼” Scallop Circle Punch; Stitched Shapes Dies 


INSTRUCTIONS:


Belly Band

  1. Wrap the 1”x5 ½” very vanilla cardstock around the right hand side of the chocolate bar. Set this aside.
  2. Die cut a 2 ¾”x 1 7/8” oval out of bumble bee cardstock using the stitched shapes dies.  Adhere this to the very vanilla cardstock on the chocolate bar.
  3. Stamp the words “You’re So Awesome” in early espresso ink onto very vanilla cardstock and punch out using the Story Label Punch.  Sponge the edges with bumble bee ink. Then adhere this to the bumble bee oval. 


“Thanks” Pouch


I thought the pouch would be hard to put together, but it actually went together quite easily.  Out of one 12”x12” paper, you can actually get four pouches!  Here’s what you do. 


  1. Lay your piece of cardstock on the score so it is 6” wide.  Score it at 1 5/8” and 4 3/8”.  Then rotate it 90 degrees and score it at 5”.
  2. Next, snip first going across from the side (5 ½” side) to the score line at 1 5/8”.  Do the same on the other side.  Then come up so you are only snipping off ½” until you reach the other score line. Do this on both sides also.  Then the small flap that is left, I cut at an angle.  
  3. Now on the same panel where we left the flap, on the other end, I came down half way and used the scallop circle punch to make an opening.
  4. To put this together, be sure to use a strong adhesive, such as tear tape or Stampin Seal +, to be sure it doesn’t open.  I ran some of the adhesive on the small flap and then down one side close to the edge.
  5. I folded up the flap first, then over lapped the panels. You now have your pouch, easy peasy.
  6. I then decorated the front panel, this time using two small sunflower images and some of the sprigs as in the card, along with the “Thanks, for all you do” saying as in the card. 

Phew, there you have it, 142 pouches later and I was done…can you believe, I didn’t even eat one chocolate bar!  Oh the insanity!!!


I hope you enjoyed my projects and story this month!  I had a lot of fun (although tiring) putting them together and sharing them with you!  I would really appreciate a comment of any kind (well hopefully a nice one, lol) and then when you are done be sure to hop on over to Sue's blog!


Jo Blackman

Teri Pocock

Kim Quade (US)

Tiziana Milano (US) – You are here!

Sue Vine (Australia)

Jean Beaulieu (US)

Steph Jandrow (US)

Anne Marie Hile (US)

Lisa Ann Bernard (US)

Heidi Collins (US)