Friday, February 25, 2022

Stampin Friends February 2022 Blog Hop - Fabulous Fun Folds & 3D Projects!


Welcome to another month of Stampin Friends Blog Hop! This month we are focusing on fun fold cards and 3D projects! If you are following along the hop, you have arrived from Jean’s blog. Be sure to read through my blog, comment below and continue to Melissa’s blog. If you get lost along the way, you can find a list of Blog Hoppers at the end of each Blog.
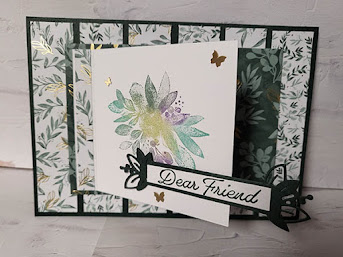


I thought I would challenge myself by combining the two and oh my word…I really love how it came out!  My fun fold card and 3D project includes the Pyramid Card by Kristeen Gill.  Full color instructions with pictures can be found on SplitcoastStampers.com.  I did tweak it a little, so my instructions are listed below.  And just an FYI, this you can also be made as two separate items.  Let’s get started, shall we.

MATERIALS NEEDED:

  • Evening Evergreen Cardstock and Ink
  • Soft Succulent Cardstock
  • Basic White Cardstock
  • Scraps of Basic White and Evening Evergreen Cardstock
  • Eden’s Garden DSP (I thought this was still available, so and DSP will work for this card)
  • Eden Die Set
  • Eden’s Garden Stamp Set
  • Brushed Brass Butterflies
  • Polished Dots

As I was making this project I decided to personalize it so I can give it as a gift after the blog hop goes live. So now it is a 3D luminaire, fun fold, scrapbook card. Enjoy.

The card itself is larger than a standard letter half  folded to 4 1/4” x 5 1/2”. This card 5”x7” folded.  It began as regular card but as I went along added some fun features.

Card Front
Here are the measurements for the card:

  • Base: Evening Evergreen:10” x 7”: Scored at 5”.
  • First Layer: Eden’s Garden DSP - 6 pieces of 4 3/4” x 1” (two designs)
  • Second Layer: Eden’s Garden DSP - 1 piece of 5 1/4” x 3 3/4”
  • Third Layer: Basic White Cardstock 4” x 3 1/2” (scored at 3/8”); Eden’s Garden DSP - 1 piece go 3/8” x 3 1/2”
Instructions
  1. Fold the evening evergreen in half to create the card base.
  2. The first layer will be the 6 pieces of DSP adhered at equal distance between each piece.
  3. The second layer is the larger rectangle piece adhered to the center of the card front with dimensionals.
  4. I used a fun technique to add color to the larger floral stamp from Eden’s Garden stamp set.  Instead of just using one ink, I used sponge daubers to add a couple of colors to the stamp.  I then huffed on the stamp, to reactivate the ink and stamped!  I am pretty impressed as to how it came out.  This idea came from Anna Helman.
  5. Here comes the fun part, with the third layer, I scored the basic white cardstock at 3/8” and adhered just the flap to the third layer leaving an even margin at the top, bottom and left hand side.  This way it will flip open to reveal a hidden picture and a sentiment (which I have not added yet).  I then adhered the strip of DSP to the left hand side.
  6. Using scraps of evening evergreen die cut a banner from the Eden Die set. Adhered this to the flap with dimensionals.  My sentiment “Dear Friend” is stamped in evening evergreen ink onto a piece of basic white card stock measuring 3/8” x 2 3/4”.
  7. Lastly, I embellished the front with brushed brass butterflies and polished dots.

Card Inside & 3D Luminaire
Here are the measurements for the inside of the card:
  • Left side: Soft Succulent 4 1/4” x 6 1/4” (used for the picture mat)
  • Right side: Eden’s Garden DSP - 5 1/4” x 4”; 8” x 4”; 4” x 4”, tiny strip of matching DSP.

The left side of the inside card is pretty simple, I just matted a picture onto the soft succulent cardstock and adhered it with snail. 
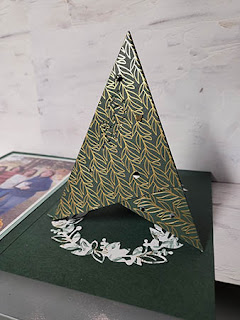


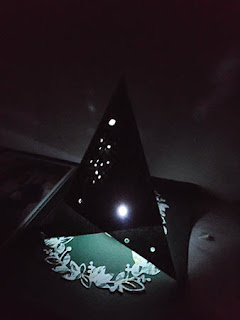
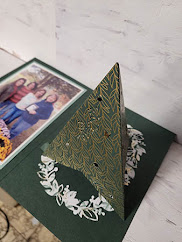
The right side is where the 3D project comes to life.  I used the pyramid card design to create my luminaire but the catch is, it stays attached in the card.  The recipient just folds it into a pyramid and it adheres together with a mini velcro circle.  Below are some simple instructions, but you can find more detailed instructions on the pyramid card on Splitcoaststampers under tutorials. My version uses one 8” x 4” and one 4” x 4” piece of DSP, versus 3 pieces of 3 3/4” pieces.

Instructions

  1. Score the 8” x 4” at 4”, then at a diagonal from the 4” score to the outside corner.  Do this on both sides going from the center.  Then, score the 4” x 4” on a diagonal.
  2. Next adhere the 4” square to the middle of the 8” x 4”, so the scored point lines up with the 4” score line.
  3. Then, I randomly punched holes on this DSP so light from an electric tea light will show through, once the pyramid is built.
  4. Fold all the score lines to create a three sided pyramid, one side will overlap, this is where I added the velcro.  Towards the corner.
  5. When the pyramid is folded up, there will be three points, at one of the points I scored a then strip of matching DSP. I adhered half to the inside of the card and the other half to the inside of the pyramid, be sure the score is not directly at the point.
  6. When you undo the velcro, the pyramid will fold down into almost a square, so the card is mailable.  The only catch is this should be mailed in a padded envelope if you are including the battery operated tea light.
  7. To cover up the small strip of DSP, I die cut the 5 1/4” x 4” DSP using the largest frame and adhered it to the left hand side of the card. 

These instructions seem very confusing, but hopefully the pictures will help.  If not feel free to ask any and all questions and I will try to explain it further.

I hope you enjoyed my Fun Fold, 3D project!  Don’t forget, comments of any kind (well hopefully nice ones, lol) are greatly appreciated. When you are done here be sure to hop on over to Melissa’s Blog.
See you next month!


______________________________________________________________________
Evening Evergreen Cardstock (155574 | $8.75) and Ink (155576 | $7.50)
Soft Succulent Cardstock (155776 | $8.75)
Basic White Cardstock (159276 | $9.75)
Eden’s Garden Stamp Set (157823 | $23.00)
Eden Dies (157831 | $35.00)
Brushed Brass Butterflies (158136 | $10.00)
Polished Dots (158134 | $7.50)

Monday, February 7, 2022

Stampin w/Tiziana February 2022 News


Stampin w/Tiziana February 2022 News
Love is in the air…..
Well the love for stampin’, creatin’ and sharin’!!!
I don’t know about you, but boy January was one for the record in this house hold!  I do not ever want a repeat of it, lol.  I am hoping for a better February with lots more stampin’, creatin’ and of course sharin’!  How about you?

Feb Hostess Code.jpg

February's Hostess Code!!
Always looking for the hostess code?? Here’s a quicker way to be sure you are using the Hostesses code all the time when you want to place an order.  Just click this link https://www.stampinup.com?hostcode=CRNYF62D and it will automatically have you shopping under me with February’s Hostess Code.
 Be sure to use this code at checkout if your order is less than $150.
This will put you in the Hostess Rewards Raffle at the end of the month!
Speaking of Hostess Winner, Congratulations to Kris R for being January’s Hostess Code Winner!!
Happy Shopping!

Screen Shot 2022-01-31 at 10.37.32 PM.png

All Together early release Suite!
Loving hands and heartfelt words are the best way to show you care. With hand designs that illustrate coming together in friendship and solidarity, the All Together Collection will help you create cardmaking and paper crafting projects that reflect the people you know and love. 
The All Together Collection includes early-release products from the 2022–2023 Annual Catalog—an exciting new range of natural Stampin’ Blends—and exclusive products you can’t get anywhere else! Come together to create projects inspired by you.  
See attached PDF for all products included in this Suite.

Screen Shot 2022-01-31 at 10.34.36 PM.png

January-June 2022 Mini Catalog!
If you haven’t received your copy of the Mini catalog or the Sale-A-Bration brochure, please let me know and I will get one out to you ASAP. If you are new to me and would like one, send me a request and I will get one in the mail to you.


20220130_202713.jpg     20220130_222531.jpg

Sunday, February 6th @ 2pm
Home Decor & Card Class - RSVP February 4th
Come and make a lovely Valentine wall decor, along with 4 greeting cards!
For this class the cards will be made using the In The Moment Stamp Set.

Class Cost: $25.00

PLEASE NOTE: Please pay ahead to guarantee your spot. You are not registered for this class until I receive payment.
Following payment options accepted:
Paypal: stampintiz@gmail.com (friends and family please)
Venmo: @stampintiz
Check: (I can pm you the information)
Please bring your SNAIL or double sided tape.
**************************************************************************************
If you need a SNAIL for class please add $10 to class fee. This is yours to keep.
If you need a refill please add $5 to class fee. This is yours to keep.
If you come without one there will be a $3 fee to rent one.


Feb PaperPumpkin_0222_safcel.jpg

February 10th - Last Call to sign up for Paper Pumpkin
February 10th is the last day to sign up for the Kisses & Hugs Kit!
Did you see that? It’s a mischievous monkey swinging from tree to tree! What about that elephant marching through the mud? Can you catch an antelope galloping in the grass? Grab your binoculars, buckle up, and hop into our off-road truck—there’s so much to see on this safari!
Answer the call of the wild—and your creativity—with the Safari Celebration Paper Pumpkin Kit. This playful, party-themed kit includes all the goodies and gear you need to create nine cards and coordinating envelopes in safari-inspired shapes and patterns you’ll go wild for! Make every occasion a celebration with this month’s amusing animals, beautiful botanicals, and celebratory sentiments.
Don’t monkey around and miss this amazing adventure! Unleash your creativity with February’s wildly fun kit. To explore what’s inside, keep reading!

Details:
  • This month’s kit contains enough elements to create 9 cards—3 each of 3 designs—and 9 coordinating envelopes. This all-inclusive kit includes printed card bases, die-cut paper pieces, embellishments, adhesive, and more!
  • The Safari Celebration Paper Pumpkin Kit includes a Rich Razzleberry Classic Stampin’ Spot!
  • This kit’s stamp set is an uplifting one! Make every occasion a celebration with sentiments that say “yay!”, “fantastic!”, and other fun phrases.
  • Explore each of our current In Color collections with this colorful kit! Discover designs and paper pieces in Bumblebee (a 2020–2022 In Color), Fresh Freesia (a 2021–2023 In Color), and Soft Succulent (a 2021–2023 In Color).
  • Card size: 4-1/4" x 5-1/2" (10.8 x 14 cm)
  • Envelope size: 4-1/2" x 5-3/4" (11.4 x 14.6 cm)
  • Coordinating colors: Bumblebee, Fresh Freesia, Pear Pizzazz, Rich Razzleberry, Soft Succulent, Soft Suede
Sign up here!
************************************************************

Sunday, February 20th @ 2pm
S.O.S. (stamp out stress) Christmas Card Class - RSVP February 18th
In my S.O.S Christmas Card Class we will be getting a jump on our Christmas Cards! Yes, you are seeing this correctly! You will make 9 cards, three of three designs. These cards will make wonderful Christmas Cards or cards with a winter theme to them to use for any occasion. Your class fee includes all materials to make your cards along with envelopes.

Class Cost: $25.00

PLEASE NOTE: Please pay ahead to guarantee your spot. You are not registered for this class until I receive payment.
Following payment options accepted:
Paypal: stampintiz@gmail.com (friends and family please)
Venmo: @stampintiz
Check: (I can pm you the information)
Please bring your SNAIL or double sided tape.
**************************************************************************************
If you need a SNAIL for class please add $10 to class fee. This is yours to keep.
If you need a refill please add $5 to the class fee. This is yours to keep.
If you come without one there will be a $3 fee to rent one.


Screen Shot 2022-01-31 at 10.44.36 PM.png

Light the CANDLES
Kits Collection by Stampin’ Up! is the perfect program for new customers and beginner crafters with its variety and all-inclusive projects. They will continue to strengthen that variety by regularly adding new kits to the offering. With that, they are excited to announce the latest Kits Collection addition, Light the Candles kit. A birthday card kit you’ll be using all year! This kit features bright colors, sparkly embellishments, and a simple peek-through technique that will make you want to party. These cards are perfect for wishing the happiest of birthdays, or to use as invitations to an exciting birthday bash! Now is the perfect time to stock up on birthday cards to use throughout the year.  Available Now!


Details
  • Kit contains enough supplies to create 8 cards—4 each of 2 designs—and 8 coordinating envelopes.
  • Includes printed card bases, printed die cuts, adhesive, embellishments, and a clear block.
  • Includes an exclusive stamp set and a Coastal Cabana Classic Stampin’ Spot.
  • Finished card size: 5-1/2" x 4-1/4" (14 x 10.8 cm)
  • Coordinating colors: Coastal Cabana, Daffodil Delight, Magenta Madness, Mango Melody, Night of Navy

You can find me kits here, https://www.stampinup.com?demoid=2020232

_________________________________________________________________________________________

Let me know what types of classes you are looking for!
This year I would love to expand my class offerings.  If you are looking for particular classes, please let me know.  Things I do have in mind are the following:
Christmas Cards every other month (great way to get them all done way before December)
Seasonal Sampler Class
Smash Books
Scrapbook Layouts
Another idea, is to do more large group events.  What are your thoughts?  Would you love to do full day events or weekend events, or both?
Your input is greatly appreciated!

Welcome to February!
Tiziana