Showing posts with label succulents. Show all posts

Friday, August 25, 2023

Stampin Friends August 2023 Blog Hop - All About the Paper

Welcome to the Stampin Friends Blog Hop!

It is mid-August which means Christmas is ONLY four months away, just thought you needed a heads up, lol.  Although I did not make any Holiday projects for this hop, you can easily substitute Holiday paper for the projects.  

Our August blog hop is “All About the Paper”.  With so many paper designs Stampin’ Up! releases it is very difficult to not become a paper hoarder!  Raise your hand if you have stacks and stacks of patterned paper still wrapped tightly in their packaging!  Yup, guilty here as well.  It is just so pretty that I don’t want to “waste” it!  You’ll notice I used similar paper in a previous Blog Hop, that is because I have made it a rule to use what I do have and haven’t purchased to many ‘NEW” papers with this new catalog.  This was also a great way to show how versatile our papers are

If you are following along the hop, you have arrived from Steph’s Blog. Be sure to read through my Blog, comment below and continue to Jo’s Blog. If you get lost along the way, no worries, you can find a list of Blog Hoppers at the end of each Blog. ENJOY! 

MATERIALS NEEDEDStamp Sets: Crafting with You
Paper:
CARD: Petal Pink (5 ½” x 8 ¼”), scored at 4 ¼”)(card base)
CARD: Les Shoppes Designer Series Paper (DSP) - (3: 1 ¾” x 1 ¾”); (2: 1 ½” x 1 ½”)
CARD: All Together DSP (retired) (1: 1 ½” x 1 ½”)
ORIGAMI: (7 ½” x 7 ½”)
CARD: Basic White (3 ¾” x 5”); (Scraps for stamping)
CARD: Basic Black (4” x 5 ¼”);
Ink:
Momento Black and Basic Gray
Tools/Accessories: Crafting with you Dies; Timeworn Type 3D Embossing Folder

INSTRUCTIONS


1.   Today’s card I started with a base of petal pink cardstock, layered with a 4” x 5 ¼ ” piece of basic black cardstock.

2.   The next layer is a piece of 3 ¾” x 5” piece of basic white cardstock.  I stamped the sentimate randomly in momento black ink and then embossed it with Timeworn Type 3D embossing folder.

3.   I cut three, 1 ¾” squares out of Les Shoppes DSP paper and three more 1 ½” squares out of a different pattern.  I adhered them on top of each other and placed them on the card with dimensionals.

4.   To finish off the card, I stamp the image of the Stampin’ Cut & Embossing Machine along with the artist tools on basic white cardstock.  I used colored pencil to color them in with.  These were die cut out and adhered to the card front.


 For my 3D project I made an origami “box” to hold a succulent plant.  All you need for this a piece of 7 ½” x 7 ½” piece of DSP. We learned how to make these at my May Day Craft Celebration.  After I made the box, I placed a small dessert plate that I found at the Dollar Tree in the center.  This way you can water your succulent without ruining your holder. You can find a very helpful video here https://youtu.be/QOBgDGevpos, however below are screen shots from the video that shows how to fold your paper.

1     2  
 
3   4   
 
5      6  

7      8  
 
9      10  

11

PS: In case you didn't notice, check out the shrinky dink I made to accessories my succulent.

 So there you have it, my All About Paper projects!  I hope you enjoyed this month’s blog post and maybe you found a new papercraft to pursue!!  Comments of any kind (well hopefully nice ones, lol) are greatly appreciated.  When you are done be sure to hop on over to the next blogger, Jo on the list!

See you next month!

_____________________________________________________

Friday, July 28, 2023

Stampin Friends July 2023 Blog Hop - Perfectly Punched

Welcome to the Stampin Friends Blog Hop!

I hope your Summer is going wonderfully, that is if it is Summer where you are.  We, in New England have finally got the heat and Humidity.  Most people hate this weather, but not me!  It doesn’t last long here, so I will take all that days of it that is given to me.

Our July blog hop is all about “Perfectly Punched”.  What I am gathering from this topic is that it can be anything that uses a hand help punch.  It seems lately, there are not too many of them, with the cricket and metal dies.  I however, prefer punches over the others.  They are easy to use, and people share them very well in a class setting, lol.  I was also happy that this was a topic for the hops because I have a few of them that have never been used.  So today, I am using Happy Hedgehog stamp set and coordinating punch. Check it out below!

If you are following along the hop, you have arrived from Maureen’s blog. Be sure to read through my blog, comment below and continue to Barb’s blog. If you get lost along the way, no worries, you can find a list of Blog Hoppers at the end of each Blog. ENJOY!


MATERIALS NEEDED

Stamp Sets: Happy Hedgehog Bundle; Color & Contour; Petal Park Bundle

Paper:  Copper Clay CS (5 ½” x 8 ¼”), scored at 4 ¼”)

Fresh As a Daisy Designer Series Paper (DSP) (4” x 5 ¼”)

Basic White (3 ¾” x 5”); ( 5 1/4” x 4”); (Scraps for stamping and punching)

Ink:  Basic Grey; Pecan Pie, Colypso Coral; Petal Pink; Momento Black

Tools/Accessories:   Picture This Dies (R); Adhesive Backed Solid Gems; Liquid Enamel Dots

INSTRUCTIONS:

1.    Today’s card I started with a base of copper clay cardstock, layered with a 3 ¾” x 5” piece of very vanilla cardstock.  I stamped the speckled image from Color & Contour in Old Olive ink and used the stamp off method to lighten the color a little.

2.    The next layer is a piece of 4” x 5 ¼” Fresh as a Daisy DSP.  I die cut the circles in the DSP using the Picture This die.  We can set this aside and work on the rest of the card.

3.    On basic white cardstock, stamp all the images needed.  I stamped two sets of flowers from Petal Park.  I used the colors calypso coral for the outlines and petal pick for the fill.  I stamped three mushrooms, two small hedgehogs and one big hedgehog from the stamp set Happy Hedgehogs.  I also stamped my sentiment in basic black.

4.    I used the stampin blends for most of my coloring.  (Sadly, I have not mastered the shading techniques with these markers.  I really need to practice that).

5.    All the pieces were fussy cut except for the large hedgehog.  The one thing I did want to note about punching out the hedgehog, is if you stamp the image twice you can make him 3-D with the punch!  I seen this technique from Tracy Elsom.  What you do is punch a full hedgehog and then just the top part.  Using the tool with the ball at the end you roll it around the smaller piece to create a pocket.  Fill this pocket with a small piece cotton balls.  Then attach it to the full punched hedgehog.  Isn’t it the cutest?


6.    When all of my pieces were completed, I then placed them onto the card base.  All the hedgehogs and the sentiment were adhered with dimensionals and the other pieces with double sided adhesive.

7.    Lastly, I embellished the flowers with adhesive backed solid gems and dotted the mushrooms with enamel dots.  (These are so easy and fun to use!  I am so happy Stampin’ Up! isn’t coming out with more colors)

So there you have it, my Perfectly Punched card!  I hope you enjoyed this month’s blog post and found a fun way to use your punches!!  Comments of any kind (well hopefully nice ones, lol) are greatly appreciated.  When you are done be sure to hop on over to the next blogger, Barb on the list!

See you next month!                

Blog Hop Index

___________________________________________________________________ 


Friday, February 25, 2022

Stampin Friends February 2022 Blog Hop - Fabulous Fun Folds & 3D Projects!


Welcome to another month of Stampin Friends Blog Hop! This month we are focusing on fun fold cards and 3D projects! If you are following along the hop, you have arrived from Jean’s blog. Be sure to read through my blog, comment below and continue to Melissa’s blog. If you get lost along the way, you can find a list of Blog Hoppers at the end of each Blog.


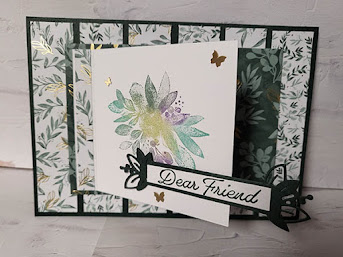
I thought I would challenge myself by combining the two and oh my word…I really love how it came out!  My fun fold card and 3D project includes the Pyramid Card by Kristeen Gill.  Full color instructions with pictures can be found on SplitcoastStampers.com.  I did tweak it a little, so my instructions are listed below.  And just an FYI, this you can also be made as two separate items.  Let’s get started, shall we.

MATERIALS NEEDED:

  • Evening Evergreen Cardstock and Ink
  • Soft Succulent Cardstock
  • Basic White Cardstock
  • Scraps of Basic White and Evening Evergreen Cardstock
  • Eden’s Garden DSP (I thought this was still available, so and DSP will work for this card)
  • Eden Die Set
  • Eden’s Garden Stamp Set
  • Brushed Brass Butterflies
  • Polished Dots

As I was making this project I decided to personalize it so I can give it as a gift after the blog hop goes live. So now it is a 3D luminaire, fun fold, scrapbook card. Enjoy.

The card itself is larger than a standard letter half  folded to 4 1/4” x 5 1/2”. This card 5”x7” folded.  It began as regular card but as I went along added some fun features.

Card Front
Here are the measurements for the card:

  • Base: Evening Evergreen:10” x 7”: Scored at 5”.
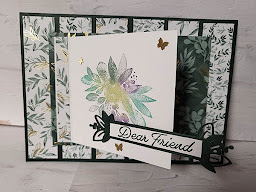
  • First Layer: Eden’s Garden DSP - 6 pieces of 4 3/4” x 1” (two designs)
  • Second Layer: Eden’s Garden DSP - 1 piece of 5 1/4” x 3 3/4”
  • Third Layer: Basic White Cardstock 4” x 3 1/2” (scored at 3/8”); Eden’s Garden DSP - 1 piece go 3/8” x 3 1/2”
Instructions
  1. Fold the evening evergreen in half to create the card base.
  2. The first layer will be the 6 pieces of DSP adhered at equal distance between each piece.
  3. The second layer is the larger rectangle piece adhered to the center of the card front with dimensionals.
  4. I used a fun technique to add color to the larger floral stamp from Eden’s Garden stamp set.  Instead of just using one ink, I used sponge daubers to add a couple of colors to the stamp.  I then huffed on the stamp, to reactivate the ink and stamped!  I am pretty impressed as to how it came out.  This idea came from Anna Helman.
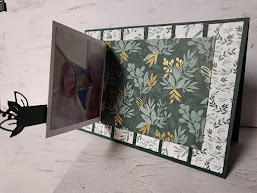
  5. Here comes the fun part, with the third layer, I scored the basic white cardstock at 3/8” and adhered just the flap to the third layer leaving an even margin at the top, bottom and left hand side.  This way it will flip open to reveal a hidden picture and a sentiment (which I have not added yet).  I then adhered the strip of DSP to the left hand side.
  6. Using scraps of evening evergreen die cut a banner from the Eden Die set. Adhered this to the flap with dimensionals.  My sentiment “Dear Friend” is stamped in evening evergreen ink onto a piece of basic white card stock measuring 3/8” x 2 3/4”.
  7. Lastly, I embellished the front with brushed brass butterflies and polished dots.

Card Inside & 3D Luminaire
Here are the measurements for the inside of the card:
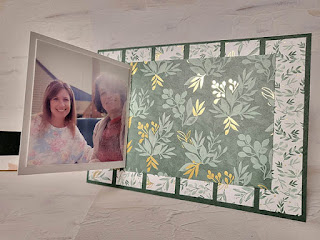
  • Left side: Soft Succulent 4 1/4” x 6 1/4” (used for the picture mat)
  • Right side: Eden’s Garden DSP - 5 1/4” x 4”; 8” x 4”; 4” x 4”, tiny strip of matching DSP.

The left side of the inside card is pretty simple, I just matted a picture onto the soft succulent cardstock and adhered it with snail. 


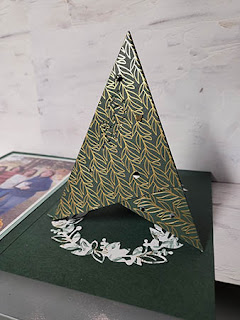
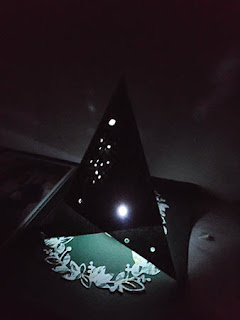
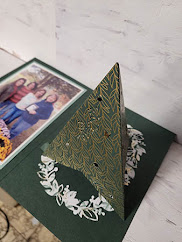
The right side is where the 3D project comes to life.  I used the pyramid card design to create my luminaire but the catch is, it stays attached in the card.  The recipient just folds it into a pyramid and it adheres together with a mini velcro circle.  Below are some simple instructions, but you can find more detailed instructions on the pyramid card on Splitcoaststampers under tutorials. My version uses one 8” x 4” and one 4” x 4” piece of DSP, versus 3 pieces of 3 3/4” pieces.

Instructions

  1. Score the 8” x 4” at 4”, then at a diagonal from the 4” score to the outside corner.  Do this on both sides going from the center.  Then, score the 4” x 4” on a diagonal.
  2. Next adhere the 4” square to the middle of the 8” x 4”, so the scored point lines up with the 4” score line.
  3. Then, I randomly punched holes on this DSP so light from an electric tea light will show through, once the pyramid is built.
  4. Fold all the score lines to create a three sided pyramid, one side will overlap, this is where I added the velcro.  Towards the corner.
  5. When the pyramid is folded up, there will be three points, at one of the points I scored a then strip of matching DSP. I adhered half to the inside of the card and the other half to the inside of the pyramid, be sure the score is not directly at the point.
  6. When you undo the velcro, the pyramid will fold down into almost a square, so the card is mailable.  The only catch is this should be mailed in a padded envelope if you are including the battery operated tea light.
  7. To cover up the small strip of DSP, I die cut the 5 1/4” x 4” DSP using the largest frame and adhered it to the left hand side of the card. 

These instructions seem very confusing, but hopefully the pictures will help.  If not feel free to ask any and all questions and I will try to explain it further.

I hope you enjoyed my Fun Fold, 3D project!  Don’t forget, comments of any kind (well hopefully nice ones, lol) are greatly appreciated. When you are done here be sure to hop on over to Melissa’s Blog.
See you next month!


______________________________________________________________________
Evening Evergreen Cardstock (155574 | $8.75) and Ink (155576 | $7.50)
Soft Succulent Cardstock (155776 | $8.75)
Basic White Cardstock (159276 | $9.75)
Eden’s Garden Stamp Set (157823 | $23.00)
Eden Dies (157831 | $35.00)
Brushed Brass Butterflies (158136 | $10.00)
Polished Dots (158134 | $7.50)


Thursday, July 16, 2020

Stampin Friends July Blog Hop - Anything Goes!


Welcome to the Stampin Friends Blog Hop!


This month’s theme is Anything Goes! If you are following along the hop, you have arrived from Barbara Welsch's blog. 

Be sure to read through my blog, comment below and continue to Anne Marie Hile's blog. If you get lost along the way, you can find a list of Blog Hoppers at the end of each Blog. ENJOY!


So what does this months theme, Anything Goes, mean??? It means we get to pick anything we want to show you!! Yippee, whoo hooo!  I love this idea because I am going to bring a blast from the past back to showcase.  When this stamp set and dies were originally released, I wasn’t really blogging much. So with the topic Anyhing Goes, I now can showcase one of my most favorite bundles Stampin’ Up! has ever offered, Oh, So Succulent!!!


Succulents continue to be all the rave still!  I think this because it is very hard to kill these plants.  All you need to do is water them once a month or so and keep them in the sunlight.  How hard is that…..uhem…apparently very hard because I have managed to kill a few, lol. Any hoot, this brings me to my projects today.


All non-green thumbs PLEASE SEE/READ THIS!!!  Now is your chance to have a succulent plant that will NEVER die no matter how much you neglect it!


I’ll start with my fun 3D project first. In case you couldn’t tell by my name, I am Italian.  And the one thing Italians have way too much of is espresso cups.  They are given for just about every type of occasion!  With this said, I have a stockpile of these. So, I thought I would thin out my supply and make them useful!  I thought they would make lovely planters for my paper succulents and cactus.  What do you think?  Can I pass this off as a real plant??


Here is what I used to make the Succulent filled espresso cup with saucer. 

Ingredients

Paper:  Two or three different shades of green cardstock; rosy red cardstock

Ink: Rich Razzleberry; Pretty Peacock; Mossy Meadow, 

Accessories: Medium size brads; metal rimmed pearls; basic pearls; espresso cup with saucer; floral moss; Spanish moss

Tools: Succulent framelits dies; Oval dies, bone folder


Instructions 

  1. I made the cactus by die cutting two ovals; I then cut a slit in the middle half up the oval.  I did this for both ovals then I slid them into each other.  (see photos for a visual).  Before assembling I also spritzed them with a darker shade of green ink.
  2. I adhered this inside the espresso cup with a glue gun.  I then filled in the gaps with some floral moss.  I also adhered with the glue gun, the espresso cup to the saucer. I filled in the section between the espresso cup and saucer with Spanish moss.
  3. I made the succulents with the dies from Succulent framelits dies.  Each flower is made with the three larger dies and some were made using all the dies.  The flower on top of the cactus is made with just the three smaller dies.  
  4. To give them the “real” floral look be sure to sponge the edges of all the petal pieces.  Then adhere them together with adhesive and secure them with a medium brad.  For some, I just used a metal rimmed pearl for the center.  You also want to curl up the petals using a bone folder.
  5. Once you have your succulents made, adhere them to the espresso cup with a glue gun.
  6. Tada….now you have your succulent plant that will last forever and there is no watering involved.

Here's a cheat sheet in colors when making paper succulents, I borrowed it from laurascreativemoment. 


Another great thing about this 3D project….it makes for a wonderful teacher, neighbor, birthday gift!  And when you give a gift, it must be accompanied by a greeting card!  


Here is what I used to make the greeting card.


Ingredients

Paper: Whisper White cardstock (8 ½”x5 ½” and 3 ¾”x5 ½”); Blooms & Bliss DSP (1”x5 ½”)

Ink: Mint Macaron; Daffodil Delight; Cajun Craze, Sweet Sugarplum and Momento Black

Stamp Set: Oh So Succulent and Dragonfly Dreams

Accessories: Basic pearls

Tools: Succulent framelit dies


Instructions

  1.  Fold you whisper white card base in half and set aside.
  2. On the 3 ¾”x5 ½” whisper white cardstock, randomly stamp the outline image of the larger succulent in mint macaron.  I also used a splatter image in the same color ink.  I then stamped the centers of the succulents with the medium “fill” image in the stamp set by stamping off first with daffodil delight ink.  Then in full color, I randomly stamped one of the smaller flower images randomly.  Lastly, to fill in any open spaces, I stamped the tiny burst of flowers image in crushed curry. 
  3. On a piece of scrap paper, I stamped the “fill” image of the large succulent in mint macaron (3) and Sweet Sugarplum (1).  I used the framelit die to cut these out.  
  4. I used the sentiment “Enjoy Your Special Day” from the Dragonfly Dreams stamp set.  This I stamped in momento black ink towards the top. Now we can go ahead and assemble the card.
  5. First, I adhered the DSP to the right hand side of the card front.  Then the stamped piece is adhered to the card front towards the left, so a little bit of the DSP shows on the right.
  6. I snailed the mint macaron die cut succulents towards the bottom left and adhered the Sweet Sugarplum succulent with dimensionals.
  7. Lastly, I embellished the centers of the succulents with basic pearls.


That’s all I have for this month and I hope you didn’t mind seeing some retired Stampin’ Up! products.  If you do have this bundle, I hope I encouraged you to dig it out again and play around with it!


Don’t forget to hop on along with the others on this blog hop, I guarantee you will not be disappointed!


Teri Pocock

Jean Beaulieu

Jo Blackman

Katja Ettig

Barbara Lash

Kim Quade

Kim Lamos

Heidi Collins 

Maureen Rauchfuss

Melissa Thomas

Steph Jandrow

Barbara Welch

Tiziana Milano *You Are Here*

Anne Marie Hile

Lisa Ann Bernard