

Welcome to the Stampin Friends Blog Hop!
So sad that there is only one more month of hoping after this month! I’ve had an incredible journey and hope you have too. With that said, this month is about being Thankful and I am especially Thankful for You!
For my project this month I decided to work out of the box. Every month I select a stamp set or bundle (sometimes the same bundle) as my focus, this month I went with the Abundant Beauty Decorative Masks and September’s Paper Pumpkin.
So…if you are following along the hop, you have arrived from Steph’s Blog. Be sure to read through my Blog, comment below and continue to Barb’s Blog. If you get lost along the way, no worries, you can find a list of Blog Hoppers at the end of each Blog. ENJOY!
MATERIALS NEEDED
Stamp Sets: September Paper Pumpkin
Paper: Very Vanilla: 5 ½” x 8 ¼”, scored at 4 ¼”, card base; 3 7/8 x 5 1/8”; scraps
Copper Clay: 4 1/8” x 5 3/8”
All About Autumn Designer Series Paper (DSP): 4 ¼” x 1/2”
Ink: Daffodil Delight, Crushed Curry, Pumpkin Pie, Old Olive, Mossy Meadow, Pecan Pie, Copper Clay, Crumb Cake, Momento Black
Tools/Accessories: Abundant Beauty Decorative Masks, Timber 3D Embossing Folder, Blending Brushes. The Gems and Punch used are retired, but can be substituted with Natural Adhesived Back Sequins and Lasting Label Punch.
I am not sure how many people have tried using
Stampin’ Up!’s decorative masks, but if YOU haven’t boy are you missing
out!! I tried these in a current class
and my guests were amazed by their versatility and ease of use! In my class we made a total of three cards,
using different techniques. The first
technique used one mask and a couple of color inks. The second technique was also using one mask
but with shimmer paste. Lastly, the final
technique and the one I will showcase on this blog, used four layering
masks. With this, each mask adds another
layer to make a complete image. I will add pictures to the end of the blog of
the other two cards.
INSTRUCTIONS:
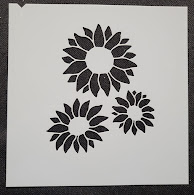
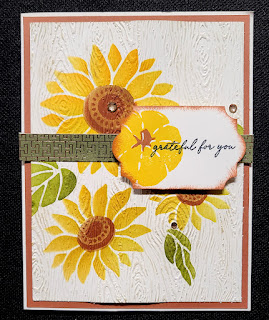
- For the first mask, I put a piece repositionable tape on my grid paper and placed my 3 7/8” x 5 3/8” very vanilla card stock down. I then layed mask #1 down and found the position I liked best. When the mask is down, I traced the notch next to the number on the grid paper. Now I will line up the other mask in the same position (easy peasy). For this mask, using a blending brush, pick up some of the daffodil delight colored ink and rub in the open spaces of the masks. The more times you go over the same spot, the darker the color gets. So with one ink you can achieve different shades.
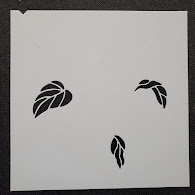
- The second mask was the leaves. Using the same technique as the previous step fill in the open spaces first with old olive ink and then I gave it some shading with mossy meadow.
- The thirds mask is the center of the sunflower. I used pecan pie ink for this.
-
The fourth mask is also the center of the
 sunflower, but it has more detail. For
this, I used copper clay ink.
sunflower, but it has more detail. For
this, I used copper clay ink. - I then ran this piece of card stock through the Stampin and Emboss machine using the timber 3D embossing folder. To bring out more of the detail, I used a dauber and brumb cake ink and lightly ran it over the entire card.
- I added a thin strip of All About Autumn DSP above the middle mark of the card.
-
My sentiment and pumpkin image came from
 September’s Paper Pumpkin. For this I
used memento black ink, along with crushed curry for the pumpkin and copper
clay for the stem.
September’s Paper Pumpkin. For this I
used memento black ink, along with crushed curry for the pumpkin and copper
clay for the stem. - The card gets put together by first adding the layer of copper clay with adhesive. I also attached the sunflower piece and strip of DSP with adhesive. The sentiment however, is added to the card front with dimensionals.
- Lastly, I added some gems.
So, there you have it, my “Thankful for You” card! I hope you enjoyed this month’s blog post!! Comments of any kind (well hopefully nice ones, lol) are greatly appreciated. When you are done be sure to hop on over to the next blogger, Barb, on the list!
See you next month!

