

Welcome to another month of Stampin Friends Blog Hop! This month we are focusing on fun fold cards and 3D projects! If you are following along the hop, you have arrived from Jean’s blog. Be sure to read through my blog, comment below and continue to Melissa’s blog. If you get lost along the way, you can find a list of Blog Hoppers at the end of each Blog.
I thought I would challenge myself by combining the two and oh my word…I really love how it came out! My fun fold card and 3D project includes the Pyramid Card by Kristeen Gill. Full color instructions with pictures can be found on SplitcoastStampers.com. I did tweak it a little, so my instructions are listed below. And just an FYI, this you can also be made as two separate items. Let’s get started, shall we.
MATERIALS NEEDED:
- Evening Evergreen Cardstock and Ink
- Soft Succulent Cardstock
- Basic White Cardstock
- Scraps of Basic White and Evening Evergreen Cardstock
- Eden’s Garden DSP (I thought this was still available, so and DSP will work for this card)
- Eden Die Set
- Eden’s Garden Stamp Set
- Brushed Brass Butterflies
- Polished Dots
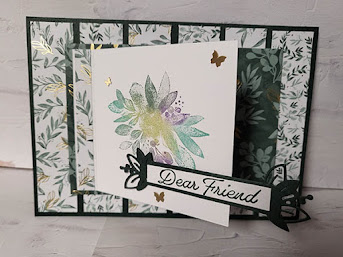
The card itself is larger than a standard letter half folded to 4 1/4” x 5 1/2”. This card 5”x7” folded. It began as regular card but as I went along added some fun features.
Card Front
Here are the measurements for the card:
- Base: Evening Evergreen:10” x 7”: Scored at 5”.
- First Layer: Eden’s Garden DSP - 6 pieces of 4 3/4” x 1” (two designs)
- Second Layer: Eden’s Garden DSP - 1 piece of 5 1/4” x 3 3/4”
- Third Layer: Basic White Cardstock 4” x 3 1/2” (scored at 3/8”); Eden’s Garden DSP - 1 piece go 3/8” x 3 1/2”
- Fold the evening evergreen in half to create the card base.
- The first layer will be the 6 pieces of DSP adhered at equal distance between each piece.
- The second layer is the larger rectangle piece adhered to the center of the card front with dimensionals.
- I used a fun technique to add color to the larger floral stamp from Eden’s Garden stamp set. Instead of just using one ink, I used sponge daubers to add a couple of colors to the stamp. I then huffed on the stamp, to reactivate the ink and stamped! I am pretty impressed as to how it came out. This idea came from Anna Helman.
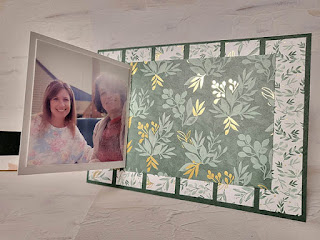
- Here comes the fun part, with the third layer, I scored the basic white cardstock at 3/8” and adhered just the flap to the third layer leaving an even margin at the top, bottom and left hand side. This way it will flip open to reveal a hidden picture and a sentiment (which I have not added yet). I then adhered the strip of DSP to the left hand side.
- Using scraps of evening evergreen die cut a banner from the Eden Die set. Adhered this to the flap with dimensionals. My sentiment “Dear Friend” is stamped in evening evergreen ink onto a piece of basic white card stock measuring 3/8” x 2 3/4”.
- Lastly, I embellished the front with brushed brass butterflies and polished dots.
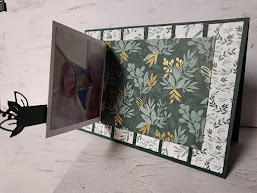
Here are the measurements for the inside of the card:
- Left side: Soft Succulent 4 1/4” x 6 1/4” (used for the picture mat)
- Right side: Eden’s Garden DSP - 5 1/4” x 4”; 8” x 4”; 4” x 4”, tiny strip of matching DSP.

The left side of the inside card is pretty simple, I just matted a picture onto the soft succulent cardstock and adhered it with snail.
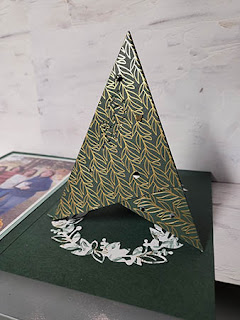
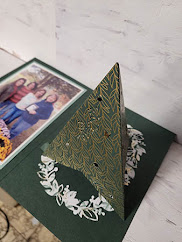
The right side is where the 3D project comes to life. I used the pyramid card design to create my luminaire but the catch is, it stays attached in the card. The recipient just folds it into a pyramid and it adheres together with a mini velcro circle. Below are some simple instructions, but you can find more detailed instructions on the pyramid card on Splitcoaststampers under tutorials. My version uses one 8” x 4” and one 4” x 4” piece of DSP, versus 3 pieces of 3 3/4” pieces.
Instructions
- Score the 8” x 4” at 4”, then at a diagonal from the 4” score to the outside corner. Do this on both sides going from the center. Then, score the 4” x 4” on a diagonal.
- Next adhere the 4” square to the middle of the 8” x 4”, so the scored point lines up with the 4” score line.
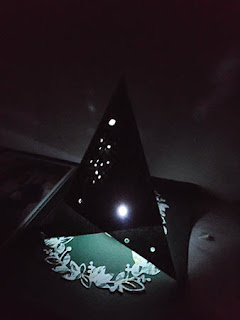
- Then, I randomly punched holes on this DSP so light from an electric tea light will show through, once the pyramid is built.
- Fold all the score lines to create a three sided pyramid, one side will overlap, this is where I added the velcro. Towards the corner.
- When the pyramid is folded up, there will be three points, at one of the points I scored a then strip of matching DSP. I adhered half to the inside of the card and the other half to the inside of the pyramid, be sure the score is not directly at the point.
- When you undo the velcro, the pyramid will fold down into almost a square, so the card is mailable. The only catch is this should be mailed in a padded envelope if you are including the battery operated tea light.
- To cover up the small strip of DSP, I die cut the 5 1/4” x 4” DSP using the largest frame and adhered it to the left hand side of the card.

See you next month!

______________________________________________________________________
Evening Evergreen Cardstock (155574 | $8.75) and Ink (155576 | $7.50)
Soft Succulent Cardstock (155776 | $8.75)
Basic White Cardstock (159276 | $9.75)
Eden’s Garden Stamp Set (157823 | $23.00)
Eden Dies (157831 | $35.00)
Brushed Brass Butterflies (158136 | $10.00)
Polished Dots (158134 | $7.50)
Stunning! Thanks for sharing. The luminiere is a definite addition to my idea folder!
ReplyDeleteNeat projects!
ReplyDeleteAn absolutely stunning project ... just beautiful!
ReplyDeleteWhat gorgeous projects, will have to try the pyramid one, thanks for sharing x
ReplyDelete