Showing posts with label Winter. Show all posts

Friday, November 24, 2023

Stampin Friends November 2023 Blog Hop - Tags, Boxes and Bags!


Welcome to the Stampin Friends Blog Hop!

If you are in the U.S.A, Happy Thanksgiving!!  Yesterday, we stuffed ourselves until we couldn’t move and had to unbutton our pants, lol.  (Did you?) And today we are at our end of this years Blog Hop!  It’s always a sad day, but even it went into December, I would be too busy to contribute!


This month’s Blog Hop is all about tags, bags and boxes, just in time for all the December Holidays where most of us will be giving lots of gifts. I can’t wait to share with you the Pop-In Zoom Class I just had on this exact topic.  The class was called Tags & More and we made 4 different giftcard holders and 10 tags using to of the Christmas Tag kits available through Stampin’ Up!

So…if you are following along the hop, you have arrived from Maureen’s Blog. Be sure to read through my Blog, comment below and continue to Jo’s Blog. If you get lost along the way, no worries, you can find a list of Blog Hoppers at the end of each Blog. ENJOY!


MATERIALS USED – Giftcard Holders

Kit: Love, Santa Tag Kit  |  158375  |  $22.00 

Cardbase: Basic White 7” x 5”

DSP Layer: 3.5” x 5”

Envelope: 2 5/8” x 3 5/8”

Cardstock Layer: 2 5/8” x 3 1/4”

Tools/Accessories: Baker Twine and Ribbon, Rhinestones, etc

Ink: Polished Pink, Bumblebee, Just Jade, Poppy Parade, Night of Navy, Momento Black


INSTRUCTIONS:

1.  Adhere the 3.5” x 5” DSP to the cardbase front.

2.  Trim the long edge of the envelopes to 3 1/4” and seal them. This will be the pocket for the giftcard.

3.  You can run them through with an embossing folder (see GC 1 and 3) or cover with cardstock (see GC 2). Adhere to card front.

4.  Place tag piece over the envelope and accessorize.

5.  For image 4, I cut a slit towards the top of the tag.  I then used strips of foam tape around the edge of the tag and adhered it to the cardbase.  This enables the tag to pop off the card front and a giftcard can slide through the slit but not fall out the sides or bottom.  For this card I also used gold accent pieces that did not come from the kit but it is/was a Stampin’ UP! product.


MATERIALS USED – Tags

Kit: Festive Tags Kit  |  162485  |  $13.00

Ink: Polished Pink, Lost Lagoon, Just Jade, Real Red, Poppy Parade, Flirty             Flamingo, Night of Navy

Dies: Celebrate with Tags and Bonanza Dies


INSTRUCTIONS:

1.  These tags are designed to have three layers.  To show you how to extend these amazing kits and get a better bang for your buck, I separated most of the two base layers. I then created the second layer out of coordinating cardstock, velum and DSP.


2.  Here are all the tags I created.  There are a total of 10 different tags. So, with this kit and some cardstock or DSP you have laying around, you can triple the kit and make 30 tags!!!  You do not need to buy new things achieve this, any holiday stamp set, and paper will do! 


3.  The following images, show the pieces that each tag used.


So, this ends our Blog Hop for the year!  Get ready for new and exciting things to come in 2024!  And of course thanks for taking this Blog Hop journey with me!  Comments of any kind (well hopefully nice ones, lol) are greatly appreciated.  When you are done be sure to hop on over to the next blogger, Jo, on the list!

See you in 2024!


Friday, August 26, 2022

Stampin Friends August 2022 Blog Hop - All About the Paper!


Welcome to Stampin Friends Blog Hop! This month is “all about paper”.  As paper crafters, where would we be without paper, lol. The point of this months blog is to showcase all the wonderful that is out, especially my favorite Designer Series paper from Stampin’ Up!  

If you are following along the hop, you have arrived from Jo’s blog. Be sure to read through my blog, comment below and continue to Jean’s blog. If you get lost along the way, you can find a list of Blog Hoppers at the end of each Blog.  ENJOY!

I am always amazed (not sure why though) at the product selection Stampin’ Up! has to offer.  My greeting card and 3D project was made using only one of their Designer Series Paper pack and a bunch of coordinating card stock, along with one product bundle.  Below are all the supplies used to make my projects.

MATERIALS:

Season of Chic Bundle
Texture Chic Specialty Designer Series Paper
Gold Foil Sheets
Soft Succulent Card Stock
Petal Pink Card Stock
Melody Mango Card Stock
Soft Suede Card Stock
Basic White Card Stock
Very Vanilla Card Stock
Basic Pearls
Basic Rhinestones
Momento Black Ink

What better way to showcase the beautiful paper this DSP has to offer, then by using just about all the different sheets on one card?  Below is my card along with some simple instructions.

CARD MEASUREMENTS:
Card Base: basic white card stock, 8 1/2 x 5 1/2 scored at 4 1/2”
Second Layer: gold foil 4” x 5 1/4”
Third Layer: 5 pieces of DSP, 15/16” x 3 3/4”
Scraps: soft succulent, petal pink, soft suede and basic white

I do like cards that come together very easily and this is definitely one of them.  The majority of the card is adhered together with adhesive.  The sentiment panel is adhered with dimensional, to make it pop up a little.  Then I embellished it with basic pearls. (These are still my favorite go to embellishments, along with the basic rhinestones).


Another great way to showcase DSP is by making a sampler frame.  When I first noticed the bundle, Season of Chic, in the catalog (I’ll admit, it was just about two weeks ago) I fell in love and thought it would be the perfect bundle for a seasonal frame.  My original plan was to use it in my frame class, but unfortunately, it didn’t come in in time. But  I am excited that I got to use for my blog. Normally, I would make an insert for each season, this is what I did form my class.  However, to be able to use the different sheets of DSP in one frame, I made this one to reflect all four seasons.


FRAME
Frame size: 11 x 11, it the mats opening was 4 1/2” x 4 1/2”.  by I enlarged it to be 6” x 6”.
Background stock: Gail Foil 7” x 7”
Squares: 4 pieces of DSP  3 16/17” x 3 16”/17”
Scraps: 5 1/2” x 8 1/2” in petal pink, pool party, mango melody, soft suede, basic white and very vanilla. 1/4” sheet of gold foil


Each square showcases a different season, so I only used the dies for this.  The hardest part for me is always color coordination.  This is how I solved the problem.  I die cut ALL THE PIECES from the dies set (except the background die) in just about all the coordinating colors.  Then I just played around with what I thought worked best.  Here is the final result and of course I used basic rhinestones and pearls to embellish each panel.

To show how fun and versatile you can make these frames, here are the inserts I made for me class.  My apologies for using many retired products.


I hope you enjoyed my “all about paper” projects!  Don’t forget, comments of any kind (well hopefully nice ones, lol) are greatly appreciated. When you are done here be sure to hop on over to Jean’s Blog.

See you next month!

_____________________________________________ 

Blog Hop Index

 _____________________________________________


Friday, November 26, 2021

Stampin Friends November Blog Hop - Celebrate the Season

WELCOME to Stampin' Friends November Blog Hop!!  It's been such a fun year being part of this Hop! If you are following along the hop, you have arrived from Jo’s blog. Be sure to read through my blog, comment below and continue on to Teri’s blog. If you get lost along the way, no worries, you can find a list of Blog Hoppers at the end of each Blog.

For our last month of hopping our theme is all about Celebrating the Season!  This can be anything you celebrate at this time of year.  One Celebration I learned about this year is Diwali which is celebrated in India. Diwali is a festival of lights and one of the major festivals celebrated by Hindus, Jains, Sikhs and some Buddhists, notably Newar Buddhists. The festival usually lasts five days and is celebrated during the Hindu lunisolar month Kartika. Although my projects do not include this Holiday, I just thought I would share what I learned. And you never know, my next project just might focus on this, the festival of lights!

Unto my projects, my projects do showcase one of the biggest Holiday's that is celebrated here in the States...Christmas!! My Stampin' Up! products get the most use at this time of year.  From July to December at least one of my craft classes has to do with making Christmas cards.  I send out about 150 holiday cards to all my family and friends. Lastly, I also participate in about 5 craft fairs from October to December selling all the cool things I make! Phew...that's a lot of Christmas.

Let's get started, shall we!  It was hard for me to use just one stamp set or bundle for this blog so I used a couple, lol.

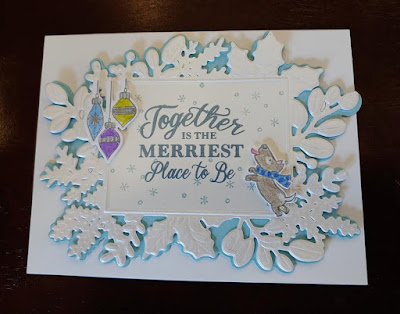
Here is my greeting card, as I said earlier, I just couldn't use one suite or bundle from Stampin' Up!'s July  - December 2021 mini catalog.

SUPPLIES:
  • Merriest Moments Bundle
  • Whimsical Trees Stamp Set
  • Seasons of Fun Stamp Set
  • Basic White Card Stock (5 1/2" x 8 1/2"; scraps)
  • Balmy Blue Card Stock (4 1/4" x 5 1/2") 
  • Shimmer White Card Stock (4 1/4" x 5 1/2") 
  • Momento Black Ink
  • Misty Moonlight Ink
  • Colored Pencils 

Step - By - Step

This was an easy card to put together.

  1. First I die cut the more solid frame out of balmy blue card stock.  Then the more detailed frame I die cut out of shimmer white card stock.  In the center of the shimmer white frame, I stamped the sentiment in Misty Moonlight ink.  I also randomly stamped snowflakes in the frame.  This stamp came from the Seasons of Fun stamp set. I adhered these two together with stampin' seal and added it to the card front with dimensionals.
  2. Using the ornament bundle image from Whimsical Trees, I stamped them onto scraps of basic white card stock.  I colored them in using colored pencils.  I then die cut it out, with the coordinating die.  I adhered this to the upper left hand corner of the the frame.
  3. Lastly, I stamped the dog image from Seasons of Fun stamp set on basic white card stock with momento black ink.  For him, I also colored with colored pencils, however, I did have to fussy cut him out.  Once cut out, I adhered him to the lower right hand corner of the frame.
 
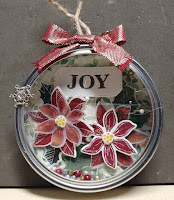
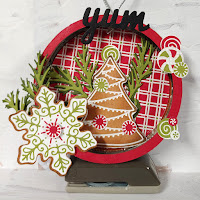
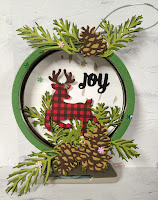
 My project for this month is all about ornaments.  I just LOVE ornaments and the cool thing about them, you can leave them hanging around your home all year long!  This year my hand made ornaments are made by using wide mouth mason jar lids.  You may have used these in the past, but this is my first time and am blown away by all the options that you can come up with to decorate these lids!


 SUPPLIES:

  • Wide Mouth Mason Jar Lids
  • Acetate
  • Vellum
  • Painted Christmas Suite
  • Merriest Moments Bundle
  • Gingerbread and Peppermint Suite

Step - By - Step

Here is a quick step-by-step for the ornaments.

  1. To make the shaker card version, I hot glued a piece of acetate to the top of the jar lid.
  2. I covered the metal insert with DSP on one side and coordinating card stock on the other.  Be sure to cut the circle for this bigger than the actual lid.  This is what you will use to secure the shaker pieces.
  3. You will decorate the side of the insert that has the DSP on it.  In my ornament I used the flowers from the Merriest Moments bundle.  Instead of just stamping the images on basic white card stock, I also used vellum.
  4. My shaker material is some foam balls I found at the dollar tree that came in silver, gold and red glitter toned.  Yeah, if you find these be careful, they just love everything.  I was finding them all over my house and of course all over my cats!
  5. To fill the ornament, I placed the lid face down (acetate down), I put the shaker material inside the lid.  I then used hot glue to secure the decorated lid insert.
  6. To finish off the ornament, I adhered a loop made out of cording to the top, and covered the sloppy hot glue residue with a bow made from Cherry Cobbler & Gold ribbon.
I couldn't believe how easy it was to make this shaker ornament.  If you have never tried, I highly recommend you do TODAY!
If want to make an ornament a little less messy, then the other two samples you see is the way to go.
  1. To make the regular ornament, same as the shaker, I first covered the lid insert with DSP on one side and coordinating card stock on the other.  For this type of ornament, the DSP and card stock must be the same size as the lid insert. 
  2. I then hot glued the lid insert inside of the lid. The DSP should be on the inside of the lid.  This will create a "frame" to decorate the way you chose.
  3. I decorated one of my ornaments using the Gingerbread and Peppermint Suite.  This is such a fun suite...for me it was a must have.  The second ornament I used the new deer punch along with the Christmas Pine Cone dies.
  4. Lastly, I adhered a adhered a loop made out of jute to the top.
  5. To cover the edge of the lid, I cut a thin circle wider than the lid and hot glued it in place.
Easy Peasy right?? I thought so and can't wait to make more to sell at my craft fairs the first weekend in December!

I hope you enjoyed my celebrate the season card and project!  It was a fun year of blogging and hope to be able to do this with you again next year!!  Comments of any kind (well hopefully nice ones, lol) are greatly appreciated. When you are done here be sure to hop on over to the next blogger on the list!

See you in 2022!

Did you know you save 10% when you purchase bundles.  Check out the bundles that were used in my projects below.


Thursday, November 19, 2020

Stampin Friends November Blog Hop - Happy Holidays/Winter

 Welcome to the Stampin Friends Blog Hop!

Well we’ve made it through a whole year of blogs…the end this wonderful journey today’s blog will be about Winter/Holiday.  If you are following along the hop, you have arrived from Steph Jandrow’s blog. Be sure to read through my blog, comment below and continue to Lisa Ann Bernard’s blog. If you get lost along the way, you can find a list of Blog Hoppers at the end of each Blog. ENJOY!


Wow, what a year it has been!  I am excited that I was able to participate in this fun and amazing Blog Hop!  I can’t wait for next year to start the journey once again.  I know it is only November, but we’ve decided to take a break in December so we can gather our creative ideas for 2021.  With this being our last month, we are focusing this month’s theme to Holidays/Winter.  I have done a little of both.  My card feature’s a retired Stampin’ Up! stamp set that I never got around to using.  My project, on the other hand uses a plethora of stamps, dies, paper, ink etc.  I’ve decided to jump out of my comfort zone and tackle a Winter Sampler frame, YIKES!  Please continue on to see the details of my card and projects!

As mentioned earlier, I decided to use a retired stamp set for this card.  When “Christmas in the Making” first came out, I just had to have it.  Then as with most of my ‘have to have’ stamps it sat and then the Holidays were over.  So, I decided to bust it out and have fun with it. (that was another thing I was trying to accomplish this year, use sets I have used before). OK, enough rambling, let’s get to some stampin’ fun!


Christmas in the Making Greeting Card

INGREDIENTS

Stamp Set: Itty Bitty Christmas; Christmas in the Making (r)

Paper: Whisper White CS (8 1/2”x5 1/2”); Real Red CS (4”x5 ¼”); Heart Warming Hugs Designer Series Paper (DSP)(3”x3” & Scraps); Shimmer White CS (4 ¼” x 5”, ¾ ”x2 ¼” ) Whisper White CS(large enough to stamp image on)

Ink: Mossy Meadow, Black Momento

Tools/Accessories: Stylish Stripes Embossing Folder; Frosted Frames Thinlits; Clear Embossing Powder; Heatt Gun; Big Shot; Dimensionals; Rhinestones; Colored Pencils

  1. Dry emboss the real red cs with the stylish stripes embossing folder and adhere this to the front of the card base.
  2. Layer onto the card base, the 3”x3” DSP in the upper right hand corner.  
  3. Die cut the frosted frame out of the shimmer white cs. Adhere this in the center of the card base overlapping the dsp.
  4. Stamp one of the images of the women, and using the scraps of dsp paper piece either all of her clothing or just part of it.  In my card, I only paper pieced the lower portion of her dress.  Color the rest of the image and adhere to the frosted frame with dimensionals.
  5. Lastly, stamp your “holiday” phrase in mossy meadow ink onto a piece of scrap shimmer white cs.  Cover with clear embossing powder and heat set. Trim down to your desired length.  This keeps the phrase from smudging since we are stamping a colored ink onto a shimmery cs.
  6. Now the very last thing (which I do not recall stating in any of my other posts) be sure to stamp the back of your greeting card with a personalized stamp.  Another must, is to stamp your envelope with a coordinating stamp.  It doesn’t have to be anything big, just enough so you are not sending out naked envelopes!

It was fun to do some paper piecing, I always forget about some of these simple yet amazing techniques!!  


Now onto showing you my project for the month!  As stated in the beginning, I struggle with these and hope you like what I have come up with.  I used a 12”x12” frame with a 10”x10” opening. I’ll also try my best to include EVERYTHING I used, but if you see that I missed something, please leave a comment.


Winter Sampler Frame

INGREDIENTS

Stamp Set: Spirited Snowmen (r); Playful Penguins (r); Scentsational Season (r); Warm Hugs; Poinsettia Petals

Paper: Pool Party CS (10”x10”); Holiday Fancy Foil DSP (10”x10”); Smoky Slate CS (7 ½”x7 ½” & scraps ); Whisper White CS (2-2 ¼”x 2 ¼”; 1 ¾”x 4 ¾” ; 2 ¼” x 2 ¾” ); Petal Pink CS (2 ¼”x 2 ¼); Crumb Cake CS (2 ¼”x 4 ¾”); Pear Pizzaz CS (2 ¼”x 2 ¼”); White Glitter, Old Olive, Soft Suede, Brightly Gleaming Specialty DSP (scraps)

Ink: Black Momento; Gray Granite; So Saffron; Smoky Slate; Early Espresso; Mossy Meadow

Tools/Accessories: Winter Snow Embossing Folder; Subtle 3D Embossing Folder; Wooden Planks Embossing Folder; Sleigh Ride Edgelits; Alpine Sports Thinlits; Perfect Pines Framelits; Playful Alphabet Dies; Pointsettia Dies; Holiday Collection Framelits; Beaded Pearls, Wink of Stella; Basic Pearls (colored with a red sharpie); Silver Embossing Powder


Wow, that’s a lot of things!!  I won’t bore you with details, but I will show you an image of how I brain stormed and went about putting this frame together.  When you have a ton of stampin’ supplies, it can quickly get overwhelming with deciding what to use on your frame.  The key is to decide what type of sampler you are trying to achieve.  For this frame, I did not want to have anything Christmas related.  I want to have this hanging up all Winter long, so finding things that wasn’t Christmas related was quite difficult.  Another thing to keep in mind was color scheme.  Once, I decided on the background, I tried to find coordinating card stock.  For this frame I did not want monotone (something that is very difficult for me to do on such a large scale).


Here it is without the frame to see it better.

I hope you enjoyed my projects throughout the year and especially this months!  I had a lot of fun participating in this Blog Hop and sharing my creativity with you all. I would really appreciate a comment of any kind (well hopefully a nice one, lol) and then when you are done be sure to hop on over to the next blogger on the list!


Steph Jandrow (US)

Tiziana Milano (US) – You Are Here

Lisa Ann Bernard - Queen B Creations (US) –

Katja Ettig (GER) -

Teri Pocock

Sue Vine - MissPinksCraftSpot (Australia) –

Jean Bolen Beaulieu

Kim Lamos

Heidi Collins (US)

Kim Quade (US)

Maureen Rauchfuss (US)

Barbara Welch (US)

Anne Marie Hile (US)

Melissa Thomas (US)