Friday, February 25, 2022

Stampin Friends February 2022 Blog Hop - Fabulous Fun Folds & 3D Projects!


Welcome to another month of Stampin Friends Blog Hop! This month we are focusing on fun fold cards and 3D projects! If you are following along the hop, you have arrived from Jean’s blog. Be sure to read through my blog, comment below and continue to Melissa’s blog. If you get lost along the way, you can find a list of Blog Hoppers at the end of each Blog.
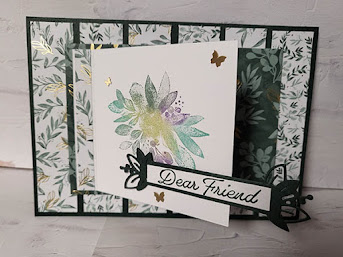


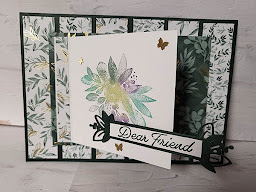
I thought I would challenge myself by combining the two and oh my word…I really love how it came out!  My fun fold card and 3D project includes the Pyramid Card by Kristeen Gill.  Full color instructions with pictures can be found on SplitcoastStampers.com.  I did tweak it a little, so my instructions are listed below.  And just an FYI, this you can also be made as two separate items.  Let’s get started, shall we.

MATERIALS NEEDED:

  • Evening Evergreen Cardstock and Ink
  • Soft Succulent Cardstock
  • Basic White Cardstock
  • Scraps of Basic White and Evening Evergreen Cardstock
  • Eden’s Garden DSP (I thought this was still available, so and DSP will work for this card)
  • Eden Die Set
  • Eden’s Garden Stamp Set
  • Brushed Brass Butterflies
  • Polished Dots

As I was making this project I decided to personalize it so I can give it as a gift after the blog hop goes live. So now it is a 3D luminaire, fun fold, scrapbook card. Enjoy.

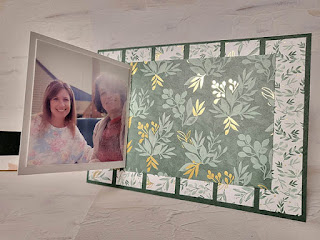
The card itself is larger than a standard letter half  folded to 4 1/4” x 5 1/2”. This card 5”x7” folded.  It began as regular card but as I went along added some fun features.

Card Front
Here are the measurements for the card:

  • Base: Evening Evergreen:10” x 7”: Scored at 5”.
  • First Layer: Eden’s Garden DSP - 6 pieces of 4 3/4” x 1” (two designs)
  • Second Layer: Eden’s Garden DSP - 1 piece of 5 1/4” x 3 3/4”
  • Third Layer: Basic White Cardstock 4” x 3 1/2” (scored at 3/8”); Eden’s Garden DSP - 1 piece go 3/8” x 3 1/2”
Instructions
  1. Fold the evening evergreen in half to create the card base.
  2. The first layer will be the 6 pieces of DSP adhered at equal distance between each piece.
  3. The second layer is the larger rectangle piece adhered to the center of the card front with dimensionals.
  4. I used a fun technique to add color to the larger floral stamp from Eden’s Garden stamp set.  Instead of just using one ink, I used sponge daubers to add a couple of colors to the stamp.  I then huffed on the stamp, to reactivate the ink and stamped!  I am pretty impressed as to how it came out.  This idea came from Anna Helman.
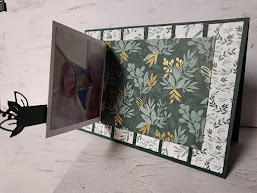
  5. Here comes the fun part, with the third layer, I scored the basic white cardstock at 3/8” and adhered just the flap to the third layer leaving an even margin at the top, bottom and left hand side.  This way it will flip open to reveal a hidden picture and a sentiment (which I have not added yet).  I then adhered the strip of DSP to the left hand side.
  6. Using scraps of evening evergreen die cut a banner from the Eden Die set. Adhered this to the flap with dimensionals.  My sentiment “Dear Friend” is stamped in evening evergreen ink onto a piece of basic white card stock measuring 3/8” x 2 3/4”.
  7. Lastly, I embellished the front with brushed brass butterflies and polished dots.

Card Inside & 3D Luminaire
Here are the measurements for the inside of the card:
  • Left side: Soft Succulent 4 1/4” x 6 1/4” (used for the picture mat)
  • Right side: Eden’s Garden DSP - 5 1/4” x 4”; 8” x 4”; 4” x 4”, tiny strip of matching DSP.

The left side of the inside card is pretty simple, I just matted a picture onto the soft succulent cardstock and adhered it with snail. 
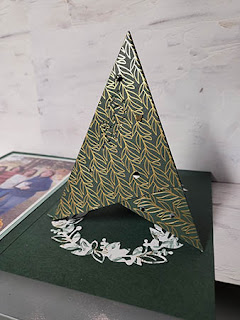


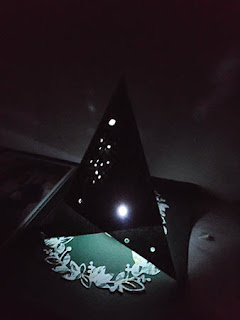
The right side is where the 3D project comes to life.  I used the pyramid card design to create my luminaire but the catch is, it stays attached in the card.  The recipient just folds it into a pyramid and it adheres together with a mini velcro circle.  Below are some simple instructions, but you can find more detailed instructions on the pyramid card on Splitcoaststampers under tutorials. My version uses one 8” x 4” and one 4” x 4” piece of DSP, versus 3 pieces of 3 3/4” pieces.

Instructions

  1. Score the 8” x 4” at 4”, then at a diagonal from the 4” score to the outside corner.  Do this on both sides going from the center.  Then, score the 4” x 4” on a diagonal.
  2. Next adhere the 4” square to the middle of the 8” x 4”, so the scored point lines up with the 4” score line.
  3. Then, I randomly punched holes on this DSP so light from an electric tea light will show through, once the pyramid is built.
  4. Fold all the score lines to create a three sided pyramid, one side will overlap, this is where I added the velcro.  Towards the corner.
  5. When the pyramid is folded up, there will be three points, at one of the points I scored a then strip of matching DSP. I adhered half to the inside of the card and the other half to the inside of the pyramid, be sure the score is not directly at the point.
  6. When you undo the velcro, the pyramid will fold down into almost a square, so the card is mailable.  The only catch is this should be mailed in a padded envelope if you are including the battery operated tea light.
  7. To cover up the small strip of DSP, I die cut the 5 1/4” x 4” DSP using the largest frame and adhered it to the left hand side of the card. 
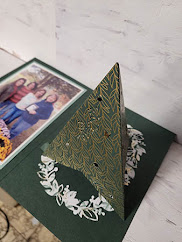
These instructions seem very confusing, but hopefully the pictures will help.  If not feel free to ask any and all questions and I will try to explain it further.

I hope you enjoyed my Fun Fold, 3D project!  Don’t forget, comments of any kind (well hopefully nice ones, lol) are greatly appreciated. When you are done here be sure to hop on over to Melissa’s Blog.
See you next month!


______________________________________________________________________
Evening Evergreen Cardstock (155574 | $8.75) and Ink (155576 | $7.50)
Soft Succulent Cardstock (155776 | $8.75)
Basic White Cardstock (159276 | $9.75)
Eden’s Garden Stamp Set (157823 | $23.00)
Eden Dies (157831 | $35.00)
Brushed Brass Butterflies (158136 | $10.00)
Polished Dots (158134 | $7.50)


Monday, February 7, 2022

Stampin w/Tiziana February 2022 News


Stampin w/Tiziana February 2022 News
Love is in the air…..
Well the love for stampin’, creatin’ and sharin’!!!
I don’t know about you, but boy January was one for the record in this house hold!  I do not ever want a repeat of it, lol.  I am hoping for a better February with lots more stampin’, creatin’ and of course sharin’!  How about you?

Feb Hostess Code.jpg

February's Hostess Code!!
Always looking for the hostess code?? Here’s a quicker way to be sure you are using the Hostesses code all the time when you want to place an order.  Just click this link https://www.stampinup.com?hostcode=CRNYF62D and it will automatically have you shopping under me with February’s Hostess Code.
 Be sure to use this code at checkout if your order is less than $150.
This will put you in the Hostess Rewards Raffle at the end of the month!
Speaking of Hostess Winner, Congratulations to Kris R for being January’s Hostess Code Winner!!
Happy Shopping!

Screen Shot 2022-01-31 at 10.37.32 PM.png

All Together early release Suite!
Loving hands and heartfelt words are the best way to show you care. With hand designs that illustrate coming together in friendship and solidarity, the All Together Collection will help you create cardmaking and paper crafting projects that reflect the people you know and love. 
The All Together Collection includes early-release products from the 2022–2023 Annual Catalog—an exciting new range of natural Stampin’ Blends—and exclusive products you can’t get anywhere else! Come together to create projects inspired by you.  
See attached PDF for all products included in this Suite.

Screen Shot 2022-01-31 at 10.34.36 PM.png

January-June 2022 Mini Catalog!
If you haven’t received your copy of the Mini catalog or the Sale-A-Bration brochure, please let me know and I will get one out to you ASAP. If you are new to me and would like one, send me a request and I will get one in the mail to you.


20220130_202713.jpg     20220130_222531.jpg

Sunday, February 6th @ 2pm
Home Decor & Card Class - RSVP February 4th
Come and make a lovely Valentine wall decor, along with 4 greeting cards!
For this class the cards will be made using the In The Moment Stamp Set.

Class Cost: $25.00

PLEASE NOTE: Please pay ahead to guarantee your spot. You are not registered for this class until I receive payment.
Following payment options accepted:
Paypal: stampintiz@gmail.com (friends and family please)
Venmo: @stampintiz
Check: (I can pm you the information)
Please bring your SNAIL or double sided tape.
**************************************************************************************
If you need a SNAIL for class please add $10 to class fee. This is yours to keep.
If you need a refill please add $5 to class fee. This is yours to keep.
If you come without one there will be a $3 fee to rent one.


Feb PaperPumpkin_0222_safcel.jpg

February 10th - Last Call to sign up for Paper Pumpkin
February 10th is the last day to sign up for the Kisses & Hugs Kit!
Did you see that? It’s a mischievous monkey swinging from tree to tree! What about that elephant marching through the mud? Can you catch an antelope galloping in the grass? Grab your binoculars, buckle up, and hop into our off-road truck—there’s so much to see on this safari!
Answer the call of the wild—and your creativity—with the Safari Celebration Paper Pumpkin Kit. This playful, party-themed kit includes all the goodies and gear you need to create nine cards and coordinating envelopes in safari-inspired shapes and patterns you’ll go wild for! Make every occasion a celebration with this month’s amusing animals, beautiful botanicals, and celebratory sentiments.
Don’t monkey around and miss this amazing adventure! Unleash your creativity with February’s wildly fun kit. To explore what’s inside, keep reading!

Details:
  • This month’s kit contains enough elements to create 9 cards—3 each of 3 designs—and 9 coordinating envelopes. This all-inclusive kit includes printed card bases, die-cut paper pieces, embellishments, adhesive, and more!
  • The Safari Celebration Paper Pumpkin Kit includes a Rich Razzleberry Classic Stampin’ Spot!
  • This kit’s stamp set is an uplifting one! Make every occasion a celebration with sentiments that say “yay!”, “fantastic!”, and other fun phrases.
  • Explore each of our current In Color collections with this colorful kit! Discover designs and paper pieces in Bumblebee (a 2020–2022 In Color), Fresh Freesia (a 2021–2023 In Color), and Soft Succulent (a 2021–2023 In Color).
  • Card size: 4-1/4" x 5-1/2" (10.8 x 14 cm)
  • Envelope size: 4-1/2" x 5-3/4" (11.4 x 14.6 cm)
  • Coordinating colors: Bumblebee, Fresh Freesia, Pear Pizzazz, Rich Razzleberry, Soft Succulent, Soft Suede
Sign up here!
************************************************************

Sunday, February 20th @ 2pm
S.O.S. (stamp out stress) Christmas Card Class - RSVP February 18th
In my S.O.S Christmas Card Class we will be getting a jump on our Christmas Cards! Yes, you are seeing this correctly! You will make 9 cards, three of three designs. These cards will make wonderful Christmas Cards or cards with a winter theme to them to use for any occasion. Your class fee includes all materials to make your cards along with envelopes.

Class Cost: $25.00

PLEASE NOTE: Please pay ahead to guarantee your spot. You are not registered for this class until I receive payment.
Following payment options accepted:
Paypal: stampintiz@gmail.com (friends and family please)
Venmo: @stampintiz
Check: (I can pm you the information)
Please bring your SNAIL or double sided tape.
**************************************************************************************
If you need a SNAIL for class please add $10 to class fee. This is yours to keep.
If you need a refill please add $5 to the class fee. This is yours to keep.
If you come without one there will be a $3 fee to rent one.


Screen Shot 2022-01-31 at 10.44.36 PM.png

Light the CANDLES
Kits Collection by Stampin’ Up! is the perfect program for new customers and beginner crafters with its variety and all-inclusive projects. They will continue to strengthen that variety by regularly adding new kits to the offering. With that, they are excited to announce the latest Kits Collection addition, Light the Candles kit. A birthday card kit you’ll be using all year! This kit features bright colors, sparkly embellishments, and a simple peek-through technique that will make you want to party. These cards are perfect for wishing the happiest of birthdays, or to use as invitations to an exciting birthday bash! Now is the perfect time to stock up on birthday cards to use throughout the year.  Available Now!


Details
  • Kit contains enough supplies to create 8 cards—4 each of 2 designs—and 8 coordinating envelopes.
  • Includes printed card bases, printed die cuts, adhesive, embellishments, and a clear block.
  • Includes an exclusive stamp set and a Coastal Cabana Classic Stampin’ Spot.
  • Finished card size: 5-1/2" x 4-1/4" (14 x 10.8 cm)
  • Coordinating colors: Coastal Cabana, Daffodil Delight, Magenta Madness, Mango Melody, Night of Navy

You can find me kits here, https://www.stampinup.com?demoid=2020232

_________________________________________________________________________________________

Let me know what types of classes you are looking for!
This year I would love to expand my class offerings.  If you are looking for particular classes, please let me know.  Things I do have in mind are the following:
Christmas Cards every other month (great way to get them all done way before December)
Seasonal Sampler Class
Smash Books
Scrapbook Layouts
Another idea, is to do more large group events.  What are your thoughts?  Would you love to do full day events or weekend events, or both?
Your input is greatly appreciated!

Welcome to February!
Tiziana

Friday, January 28, 2022

Stampin Friends January 2022 Blog Hop - Life's Occasions

Welcome to another year of Stampin Friends Blog Hop! We are starting the year off with Life’s Special Occasions. If you are following along the hop, you have arrived from Jo’s blog. Be sure to read through my blog, comment below and continue to Barb’s blog. If you get lost along the way, you can find a list of Blog Hoppers at the end of each Blog.

The Life’s Special Occasion I choose to create for, for this Hop is Wedding Anniversaries!  Here are the projects I created, ENJOY!


MATERIALS NEEDED:
  • Gray Granite Cardstock and Ink
  • Melon Mambo Cardstock and Ink
  • Soft Seafoam Cardstock
  • Basic White Cardstock
  • Window Sheets
  • Sweet Talk DSP
  • Bloom Where You’re Planted DSP
  • Gold Foil Sheet
  • Floral Heart Die Set
  • Always in My Heart Stamp Set
  • Iridescent Rhinestone Basic Jewels

The card I made is a fancy fold card called, Step Fold.  My version has and extra “step”.
 
Here are the measurements for the card:
  • Base: Basic White: 4 1/4” x 8 1/2”: 
    • Score this at 1/2”; 1 1/2”; 3” & 4”
  • Step Piece: Basic White: 2 1/2” x 4 1/4”: 
    • Score this at 1/2” and 1 1 /2”
  • Back of Card: Bloom Where You’re Planted DSP 4” x 4 1/4”
  • Other Pieces: Bloom Where You’re Planted DSP 2 7/8” x 4”:  DSP 2 1/2” x 2 1/4”:  DSP 3/4” x 4”
  1. Once you cut and score the card base, fold the score lines so that it creates  a rectangle.  Adhere the smaller flap to the back of the card base.
  2. Fold the step piece and adhere this to the card front by adhering the smaller flap to the back of the card base. With the longer piece at the front of the card, only adhere the lower half.
  3. I then added the DSP to the spaces that correspond with the measurements. You know you have the correct piece when there is an 1/8” of an inch margin around the edges.
  4. Lastly, I decorated the card using mostly the Floral Heart Die with Sweet Talk DSP and Melon Mambo card stock.

The neat thing about this card design, is how it all pops out, including the banner with “Happy Anniversary” on it.  The best thing about this card design, it will fold down flat (including the banner) and fit in an envelope!


I thought a neat gift card holder would work really well for this occasion, so here is my little gift box that also holds a “key” to LOVE! I hid the gift card under the piece of card stock with the poem.  Be sure to really read the little poem that is included, lol.  (Update: Not sure if you can actually read the poem, however, this is what it says.  "The Key to Happiness is LOVE and the ability to open  a bottle." The key is a bottle opener also.

Here are the measurements for the box:
  • Base: Gray Granite: 4 1/4” x 6”: Score this at 1/2” & 1” on all four sides
  • Cover: Window Sheet: 3 1/8” x 4 7/8”:  Score this at 1/2” on all four sides.
  •  Bloom Where Your Planted DSP: 1 3/4” x 4 1/4”
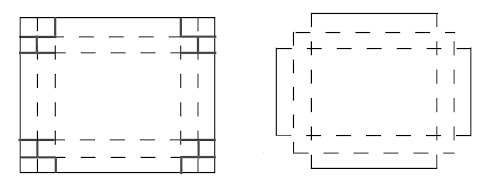
  1. The best way to explain how I made the box was to draw you a diagram.  See the image as to where you should cut on the score lines.  There is an image for the card base, which will be made out of the gray granite card stock.
  2. For the cover, I used a window sheet and instead of it fitting on the outside of the box, it gets tucked inside the box.  Also, check out the diagram as to how to cut and fold.
  3. I then decorated the box cover with some Bloom Where You’re Planted DSP and more die cut pieces from the Floral Heart Dies.  However, on the heart for this I did some stamping also.
  4. The insert for the box is a piece of basic white card stock 2 1/8” x 3 3/4” and a punched a half circle on one end, so that the gift card peeks through.

Box Cover: Dotted lines = score  |  Solid lines - cut 

Box Base: Dotted lines = score  |  Solid lines = cut

I hope you enjoyed my Life’s Special Occasion projects!  Don’t forget, comments of any kind (well hopefully nice ones, lol) are greatly appreciated. When you are done here be sure to hop on over to Barb’s Blog.
See you next month!


_______________________________________________________________________________________
Gray Granite Cardstock (146983 | $8.75) and Ink (147118 | $7.50)
Melon Mambo Cardstock (115320 | $8.75) and Ink (147051 | $7.50)
Soft Seafoam Cardstock (146988 | $8.75)
Basic White Cardstock (159276 | $9.75)
Window Sheets (142314 | $5.00)
Sweet Talk DSP (157616 | $11.50)
Bloom Where You’re Planted DSP (155696 | $11.50)
Gold Foil Sheet (132622 | $5.00)
Floral Heart Die Set (154306 | $38.00)
Always in My Heart Stamp Set (158183 | $18.00)
Iridescent Rhinestone Basic Jewels (158130 | $7.50)

Saturday, January 1, 2022

Stampin' w/Tiziana January 2022 News & Events


Stampin' w/Tiziana January 2022 News
firework-new-year-2022-greeting-card_5a86f.jpg

HAPPY, HAPPY NEW YEAR!!!!
Wow another year gone…but that only means another wonderful year starts!  If you’re a resolutions type of person, start getting those lists together!!  The only resolution I have is to get more stampin’ done!  I feel like I never put enough time in stampin’ for myself…so I will try again this year.  And this year better be the year for it to happen!  I have many scrapbooks to get started…with a much older nephew and two much younger nephews, plus a god daughter there are plenty of pictures to be scrapped!


JanHostess2022.jpg

January's Hostess Code!!
Always looking for the hostess code?? Here’s a quicker way to be sure you are using the Hostesses code all the time when you want to place an order.  Just click this link and it will automatically have you shopping under me with January’s Hostess Code. https://www.stampinup.com?hostcode=9G4RWJMZ.
 Be sure to use this code at check out if your order is less than $150.
This will put you in the Hostess Rewards Raffle at the end of the month!
Happy Shopping!


MKTL_SHR_1_NA_1221_LAST_CHANCE_PRODUCTS.jpg

Last Chance For Real!
January 3rd is the last day to order from the July - December 2021 Mini Catalog!  Get those Holiday stamps and supplies you have been eying before it is too late!
 

Screen Shot 2022-01-01 at 10.42.19 PM.png

January-June 2022 Mini Catalog!
By now, you should have received the new mini catalog to start the new year off with.  If you haven’t received it, please let me know and I will see where it is. If you are new to me and would like one, send me a request and I will get one in the mail to you asap.


Sunday, January 14th @ 6pm
Calendars and Cards - RSVP January 9th
Keep track of 2022 with some neat desk top calendars. We will be making four calendars (2 of 2 different designs) and two cards. 
This class is now a zoom class.  Look for an email with a zoom link a couple of days before the class.  You will also receive pdf instructions in case you can not make the zoom meeting.

Class Fee - $25

PLEASE NOTE:
Please pay ahead to guarantee your spot. You are not registered for this class until I receive payment.

Following payment options accepted:
Paypal: stampintiz@gmail.com (friends and family please)
Venmo: @stampintiz
Check: (I can pm you the information)
Please bring your SNAIL or double sided tape.
**************************************************************************************
If you need a SNAIL for class please add $10 to class fee. This is yours to keep.
If you need a refill please add $5 to class fee. This is yours to keep.
If you come without one there will be a $3 fee to rent one.


01.22_SHAREABLE1_KISSESHUGS_JANPP.jpg

January 10th - Last Call to sign up for Paper Pumpkin
January 10th is the last day to sign up for the Kisses & Hugs Kit!
We all know that roses are red and violets are blue—it’s time that love-themed cards got an upgrade! The Kisses & Hugs Paper Pumpkin Kit will help you express that forever kind of love with heart-shaped cards that would make Cupid jealous. 
The Kisses & Hugs kit is not bound to just Valentine’s Day, it works for all love occasions year-round like anniversaries, weddings, birthdays, or those “just because” days. Check out the teaser video below to get a taste of what’s included.

Details:
  • Kit contains enough supplies to create 10 cards—5 each of 2 designs—and 10 coordinating envelopes
  • Kit features an exclusive Two-Step photopolymer stamp set
  • Kit includes a Gray Granite Classic Stampin’ Spot
  • Card size: 4-1/2" x 4-1/4" (11.4 x 10.8 cm) heart-shaped cards; folded
  • Coordinating colors: Blushing Bride, Flirty Flamingo, Gray Granite, Very Vanilla
Add-on Kit:
Name: Kisses & Hugs Mini Treat Boxes 
Item number: 160147 | $10.00
Details:
  • Contains 20 mini treat boxes and 20 heart tags
  • Gold cord: 10-1/2" yards (9.6 m)
  • Finished size: 1-3/4" x 1-3/4" x 1-3/4" (4.4 x 4.4 x 4.4 cm)
  • Printed with gold foil
  • These coordinated treat boxes are not included in this month’s kit and are only available for purchase separately as an add-on online starting 25 January. You must be a Paper Pumpkin subscriber to purchase and they are only available while supplies last.


Screen Shot 2022-01-01 at 10.37.57 PM.png    Screen Shot 2022-01-01 at 10.39.29 PM.png

Sunday, January 23rd @ 2pm
S.O.S. (stamp. out. stress.) Card Class - RSVP January 21st

In my S.O.S Card Class you will make 9 cards, three of three designs. Your class fee includes all materials to make your cards along with envelopes.
In this class, we will be using the stamp sets "Count on Me" and "Flowering Fields Suite" (this is from the new mini catalog)!
Class Fee: $25.00
PLEASE NOTE: Please pay ahead to guarantee your spot. You are not registered for this class until I receive payment.
Following payment options accepted:
Paypal: stampintiz@gmail.com (friends and family please)
Venmo: @stampintiz
Check: (I can pm you the information)
Please bring your SNAIL or double sided tape.
**************************************************************************************
If you need a SNAIL for class please add $10 to class fee. This is yours to keep.
If you need a refill please add $5 to class fee. This is yours to keep.
If you come without one there will be a $3 fee to rent one.

__________________________________________

Let me know what types of classes you are looking for!
This year I would love to expand my class offerings.  If you are looking for particular classes, please let me know.  Things I do have in mind are the following:
1 Christmas Cards every other month (great way to get them all done way before December)
2 Seasonal Sampler Class
3 Smash Books
4 Scrapbook Layouts

Another idea is to do more large group events.  What are your thoughts?  Would you love to do full day events or weekend events, or both?
Your suggestions are greatly appreciated!

Happy-New-Year-2022-2-749x445.jpg

--
If you're not stampin', you should be!
Tiziana
Tiziana Milano - Stampin' Up! Independent Demonstrator - 401.413.9129 

Check out my facebook page, it's full of wonderful ideas and product!

Do you follow blogs??  Who has one?  This girl! 

Friday, November 26, 2021

Stampin Friends November Blog Hop - Celebrate the Season

WELCOME to Stampin' Friends November Blog Hop!!  It's been such a fun year being part of this Hop! If you are following along the hop, you have arrived from Jo’s blog. Be sure to read through my blog, comment below and continue on to Teri’s blog. If you get lost along the way, no worries, you can find a list of Blog Hoppers at the end of each Blog.

For our last month of hopping our theme is all about Celebrating the Season!  This can be anything you celebrate at this time of year.  One Celebration I learned about this year is Diwali which is celebrated in India. Diwali is a festival of lights and one of the major festivals celebrated by Hindus, Jains, Sikhs and some Buddhists, notably Newar Buddhists. The festival usually lasts five days and is celebrated during the Hindu lunisolar month Kartika. Although my projects do not include this Holiday, I just thought I would share what I learned. And you never know, my next project just might focus on this, the festival of lights!

Unto my projects, my projects do showcase one of the biggest Holiday's that is celebrated here in the States...Christmas!! My Stampin' Up! products get the most use at this time of year.  From July to December at least one of my craft classes has to do with making Christmas cards.  I send out about 150 holiday cards to all my family and friends. Lastly, I also participate in about 5 craft fairs from October to December selling all the cool things I make! Phew...that's a lot of Christmas.

Let's get started, shall we!  It was hard for me to use just one stamp set or bundle for this blog so I used a couple, lol.

Here is my greeting card, as I said earlier, I just couldn't use one suite or bundle from Stampin' Up!'s July  - December 2021 mini catalog.

SUPPLIES:
  • Merriest Moments Bundle
  • Whimsical Trees Stamp Set
  • Seasons of Fun Stamp Set
  • Basic White Card Stock (5 1/2" x 8 1/2"; scraps)
  • Balmy Blue Card Stock (4 1/4" x 5 1/2") 
  • Shimmer White Card Stock (4 1/4" x 5 1/2") 
  • Momento Black Ink
  • Misty Moonlight Ink
  • Colored Pencils 

Step - By - Step

This was an easy card to put together.

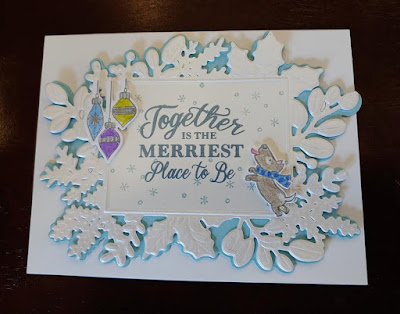
  1. First I die cut the more solid frame out of balmy blue card stock.  Then the more detailed frame I die cut out of shimmer white card stock.  In the center of the shimmer white frame, I stamped the sentiment in Misty Moonlight ink.  I also randomly stamped snowflakes in the frame.  This stamp came from the Seasons of Fun stamp set. I adhered these two together with stampin' seal and added it to the card front with dimensionals.
  2. Using the ornament bundle image from Whimsical Trees, I stamped them onto scraps of basic white card stock.  I colored them in using colored pencils.  I then die cut it out, with the coordinating die.  I adhered this to the upper left hand corner of the the frame.
  3. Lastly, I stamped the dog image from Seasons of Fun stamp set on basic white card stock with momento black ink.  For him, I also colored with colored pencils, however, I did have to fussy cut him out.  Once cut out, I adhered him to the lower right hand corner of the frame.
 
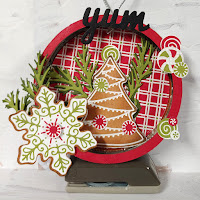
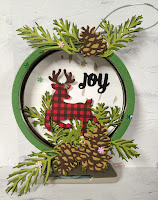
 My project for this month is all about ornaments.  I just LOVE ornaments and the cool thing about them, you can leave them hanging around your home all year long!  This year my hand made ornaments are made by using wide mouth mason jar lids.  You may have used these in the past, but this is my first time and am blown away by all the options that you can come up with to decorate these lids!


 SUPPLIES:

  • Wide Mouth Mason Jar Lids
  • Acetate
  • Vellum
  • Painted Christmas Suite
  • Merriest Moments Bundle
  • Gingerbread and Peppermint Suite

Step - By - Step

Here is a quick step-by-step for the ornaments.

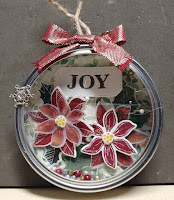
  1. To make the shaker card version, I hot glued a piece of acetate to the top of the jar lid.
  2. I covered the metal insert with DSP on one side and coordinating card stock on the other.  Be sure to cut the circle for this bigger than the actual lid.  This is what you will use to secure the shaker pieces.
  3. You will decorate the side of the insert that has the DSP on it.  In my ornament I used the flowers from the Merriest Moments bundle.  Instead of just stamping the images on basic white card stock, I also used vellum.
  4. My shaker material is some foam balls I found at the dollar tree that came in silver, gold and red glitter toned.  Yeah, if you find these be careful, they just love everything.  I was finding them all over my house and of course all over my cats!
  5. To fill the ornament, I placed the lid face down (acetate down), I put the shaker material inside the lid.  I then used hot glue to secure the decorated lid insert.
  6. To finish off the ornament, I adhered a loop made out of cording to the top, and covered the sloppy hot glue residue with a bow made from Cherry Cobbler & Gold ribbon.
I couldn't believe how easy it was to make this shaker ornament.  If you have never tried, I highly recommend you do TODAY!
If want to make an ornament a little less messy, then the other two samples you see is the way to go.
  1. To make the regular ornament, same as the shaker, I first covered the lid insert with DSP on one side and coordinating card stock on the other.  For this type of ornament, the DSP and card stock must be the same size as the lid insert. 
  2. I then hot glued the lid insert inside of the lid. The DSP should be on the inside of the lid.  This will create a "frame" to decorate the way you chose.
  3. I decorated one of my ornaments using the Gingerbread and Peppermint Suite.  This is such a fun suite...for me it was a must have.  The second ornament I used the new deer punch along with the Christmas Pine Cone dies.
  4. Lastly, I adhered a adhered a loop made out of jute to the top.
  5. To cover the edge of the lid, I cut a thin circle wider than the lid and hot glued it in place.
Easy Peasy right?? I thought so and can't wait to make more to sell at my craft fairs the first weekend in December!

I hope you enjoyed my celebrate the season card and project!  It was a fun year of blogging and hope to be able to do this with you again next year!!  Comments of any kind (well hopefully nice ones, lol) are greatly appreciated. When you are done here be sure to hop on over to the next blogger on the list!

See you in 2022!

Did you know you save 10% when you purchase bundles.  Check out the bundles that were used in my projects below.


Friday, September 24, 2021

Stampin Friends September Blog Hop - Say it with Sentiments


This month our blog hop is about focusing on sentiments to create your card and project.   

All I can say is YIKES!  I’m not good at just using sentiments, I kind of do not understand the concept, but I gave it a shot.  I hope you do not find my card to simple or tacky, but I thought it would be a great card for one of the many little ones in my family.  I have two nephews that are 4 and 3, and then a god daughter that just turned 1.  I think this card is just perfect for kids at these ages.


Time to grab your favorite apple cider drink (it is apple season after all) and sit back and check out this month’s projects in Stampin Friends Blog Hop.  If you are following along on the hop, you may have arrived from Steph’s blog. Be sure to read through my blog, comment below and continue to Jo’s blog.  If you get lost along the way, no worries, you can find a list of Hoppers at the end of each Blog.


Let’s get started, shall we…again I geared my card for very young kids and of course my theme had to be Halloween.  I just need to make two more and I will be done with gifts for Halloween!

For the card, I tried to give the ghost the same shape as the stamp from the Cute Halloween Suite.  It is not your normal 4 ¼”x5 ½” card.  This is a full sheet of paper folded in half.  


Materials you will need for the card:

Basic White Card Stock (cs)

Momento Black Ink

Smoky Slate Ink

Cutest Halloween Bundle


Basic Instructions:

1.    I started with 8 ½”11” basic white cs as my base.  This is folded in half.  With a pencil I lightly drew the shape of the ghost image from the stamp set Cutest Halloween.  I made sure when I got to the folded side to draw off of the card stock.  That way it will open like a card.

2.    Cut out the ghost image to make the card base.  I then stamped the words “Hey, Boo” in smoky slate, by stamping off first, this way it is a lighter shade of gray.  I filled up the whole card front with the same words, off setting them but filling up the whole card front.

3.    I made eyes using ½” circle punch, and the mouth is just a 2” circle punched twice to get a small semi-circle.  I then trimmed it as shown.

4.    On a piece of basic white cs scrap, stamp the ghost image, along with the cute face that corresponds with it. Either fussy cut it out or use the punch. Set aside

5.    Then on a piece of basic white card cs (approximately 5/8”x 3 ½”) stamp the sentiment “Have a Fa(boo)lous Halloween.  I then banner cut one side and layered this on a piece of black cs about an 1/8” larger.

6.    Lastly, I adhered the banner on with dimensionals, along with the ghost to the front of the card base.

Easy peasy and I think it will be perfect for kids ages 1 to 5


In keeping with the Halloween theme, I went with the coffin treat box. Although it is made with a retired item, I have noticed there are a ton of templates out there to make them.


Materials you will need for the box:

Coffin Treat Box (retired) or template

Cutest Halloween Bundle

Cobweb 3D embossing Folder

Cute Halloween 6”x6” DSP

Black & White Gingham Ribbon

Note Tag Punch (retired)

Gorgeous Grape Ink

Momento Black Ink

Window Sheet 


Basic Instructions:

1.    First, I covered the exposed bottom pieces with DSP from Cute Halloween.  I then, glued together the coffin together to make the bottom part.

2.    For the cover of the coffin, I applied DSP just to the top, not the sides.

3.    I decorated the top with a note tag, stamped with the sentiments “Trick or Treat”.  After this, I ran it through the Big Shot using the cobweb 3D embossing folder.  To give it some dimension I also sponged the edge.

4.    To finish off the coffin cover, I cut a slit on either side of the note tag.  Then I ran the black and white gingham ribbon and secured It to the cover.

5.    The neat thing I added to this, is when you open the coffin some ghosts “pop” out at you.  I did this by cutting a piece of window sheet 4 ¼”x 1”.  I scored it at the 1 ½” mark and gave it a light fold.  I adhered the smaller panel inside the coffin and added the ghosts to the longer.  NOTE: Be sure to keep the ghosts just slightly wider than the window sheet.  If not, they will get stuck in the coffin.  Then you can add to treats under the window sheet.


I hope you enjoyed my Say it with Sentiments projects!  I hope I accomplished what was asked of me!!  If not, I think you still got some cool ideas! 
 

Don’t forget, comments of any kind (well hopefully nice ones, lol) are greatly appreciated. When you are done here be sure to hop on over to the next blogger on the list.


See you next month!


Jo Blackman (UK)
Barb Pfeffer
Katja Ettig
Jean Beaulieu
Teri Pocock (UK)
Melissa Thomas (USA)
Stephanie Jandrow (USA)
Tiziana Milano (USA)