Friday, January 26, 2024

Stampin Friends January 2024 Blog Hop - Life’s Special Occasions


Welcome to Another Year of Stampin Friends Blog Hop! 

Happy HAPPY NEW Year!!!!

Welcome All to 2024!!

I can’t believe it is time to start hopping again!  I have so much doing this every month and I hope you enjoy hopping along with us!  This year, as in past years, we will have a new theme each month.  Some months we will be showcasing cards and other months we will have a greeting card along with a 3D item.  So lets….GeT…..ReADy..tO…CREATE!!!!

If you are following along the hop, you have arrived from Steph’s blog. Be sure to read through my blog, comment below and continue to Maureen’s blog.

If you get lost along the way, no worries, you can find a list of Blog Hoppers at the end of each Blog. ENJOY!

This month we are showcasing cards that are about celebrating Life’s Special Occasions.  The Occasion I chose was celebrating the birth of a new baby!  I found it’s never a bad idea having a few baby cards on hand. The greatest thing about this card, the stamp set and Designer Series Paper (DSP) used was FREE!  Right now Stampin’ Up! is having their Sale-A-Bration sale, so for every $50 you spend in product and can select a FREE item from their Sale-A-Bration Catalog, win, win!

MATERIALS NEEDED

Stamp Set: Cradled in Love

Paper: Basic White CS (4 1/4x11”) scored at 5 ½” and 6 ½”

Shimmer White CS (scraps)

Flight & Airy 12”x12” DSP (4 ¼” x 4” and 4 ¼” x 1”)

Ink: StazOn; Calypso Coral Light & Dark Stampin’ Blends

Tools/Accessories: Deckled Circle Dies; Purple Fine Shimmer Gems; Classic Label Punch; Calypso Coral Ribbon; Wobbles 

INSTRUCTIONS

  1. I used the book fold technique for this card. The card base is basic white folded in half, then it gets folded the opposite way at the second score line.  I adhered the 1” section between the center score and 1” score line together.  This now gives me a square(ish) section to work with for my major image.  NOTE: If you make your second score at 6 ¾” you will have a perfect square).
  2. I adhered the 1” strip to the left of the card front and the 4 ¼” x 4” piece of DSP to the “square” section.
  3. I then died cut a circle ring out of shimmer white card stock using the deckled circle die that measured 3 ¼” and the second circle after that which was just under 4”.  I adhered this to the center.
  4. I stamped the crib image on shimmer white card stock with StazOn.  I then colored it in with calypso coral stampin’ blends.
  5. I fussy cut it out and adhered it to the center of the circle using a wobble.  Believe it or not, this is the first time I have ever made a card with a wobble.  So Much Fun!
  6. I then stamped the sentiment also on shimmer white card stock and punched it out with the Classic Label Punch.  I adhered this to the card front with dimensionals.
  7. Lastly, I embellished the card front with purple fine shimmer gems.


I hope you enjoyed my first project of year!  I can’t wait to share a lot more with you this coming year!!  Be sure to check back regularly.  My hopes are to share a lot more projects with my stampin’ friends!  Comments of any kind (well hopefully nice ones, lol) are greatly appreciated.  When you are done, be sure to hop on over to Maureen’s page!!

See you next month!


Tuesday, January 2, 2024

STAMPIN' W/TIZIANA JANUARY 2024 NEWS

Happy New Year!!!

2024 will be the greatest yet!  
Thank you all for being a part of my Stampin’ UP! life and my life in general!  This year I have so much more in store…some being more online/live interaction; different technique classes; and much more!

Friday, November 24, 2023

Stampin Friends November 2023 Blog Hop - Tags, Boxes and Bags!


Welcome to the Stampin Friends Blog Hop!

If you are in the U.S.A, Happy Thanksgiving!!  Yesterday, we stuffed ourselves until we couldn’t move and had to unbutton our pants, lol.  (Did you?) And today we are at our end of this years Blog Hop!  It’s always a sad day, but even it went into December, I would be too busy to contribute!


This month’s Blog Hop is all about tags, bags and boxes, just in time for all the December Holidays where most of us will be giving lots of gifts. I can’t wait to share with you the Pop-In Zoom Class I just had on this exact topic.  The class was called Tags & More and we made 4 different giftcard holders and 10 tags using to of the Christmas Tag kits available through Stampin’ Up!

So…if you are following along the hop, you have arrived from Maureen’s Blog. Be sure to read through my Blog, comment below and continue to Jo’s Blog. If you get lost along the way, no worries, you can find a list of Blog Hoppers at the end of each Blog. ENJOY!


MATERIALS USED – Giftcard Holders

Kit: Love, Santa Tag Kit  |  158375  |  $22.00 

Cardbase: Basic White 7” x 5”

DSP Layer: 3.5” x 5”

Envelope: 2 5/8” x 3 5/8”

Cardstock Layer: 2 5/8” x 3 1/4”

Tools/Accessories: Baker Twine and Ribbon, Rhinestones, etc

Ink: Polished Pink, Bumblebee, Just Jade, Poppy Parade, Night of Navy, Momento Black


INSTRUCTIONS:

1.  Adhere the 3.5” x 5” DSP to the cardbase front.

2.  Trim the long edge of the envelopes to 3 1/4” and seal them. This will be the pocket for the giftcard.

3.  You can run them through with an embossing folder (see GC 1 and 3) or cover with cardstock (see GC 2). Adhere to card front.

4.  Place tag piece over the envelope and accessorize.

5.  For image 4, I cut a slit towards the top of the tag.  I then used strips of foam tape around the edge of the tag and adhered it to the cardbase.  This enables the tag to pop off the card front and a giftcard can slide through the slit but not fall out the sides or bottom.  For this card I also used gold accent pieces that did not come from the kit but it is/was a Stampin’ UP! product.


MATERIALS USED – Tags

Kit: Festive Tags Kit  |  162485  |  $13.00

Ink: Polished Pink, Lost Lagoon, Just Jade, Real Red, Poppy Parade, Flirty             Flamingo, Night of Navy

Dies: Celebrate with Tags and Bonanza Dies


INSTRUCTIONS:

1.  These tags are designed to have three layers.  To show you how to extend these amazing kits and get a better bang for your buck, I separated most of the two base layers. I then created the second layer out of coordinating cardstock, velum and DSP.


2.  Here are all the tags I created.  There are a total of 10 different tags. So, with this kit and some cardstock or DSP you have laying around, you can triple the kit and make 30 tags!!!  You do not need to buy new things achieve this, any holiday stamp set, and paper will do! 


3.  The following images, show the pieces that each tag used.


So, this ends our Blog Hop for the year!  Get ready for new and exciting things to come in 2024!  And of course thanks for taking this Blog Hop journey with me!  Comments of any kind (well hopefully nice ones, lol) are greatly appreciated.  When you are done be sure to hop on over to the next blogger, Jo, on the list!

See you in 2024!


Wednesday, November 1, 2023

Stampin’ w/Tiziana November 2023 News


You blinked didn’t you…I told you NOT to blink….Happy November…let the festivities begin!!!!

I do not have many classes scheduled for the next two months, but I do hope you can come to one or two that I do have going on!


NOVEMBER HOSTESS
CODE -
GGGBP7F9!!


Here is November's Hostess Code – GGGBP7F9 or use this link https://www.stampinup.com/?hostcode=GGGBP7F9for all orders under $50! If they are over $150 please take advantage of all the freebies you are entitled too. (tiziana.stampinup.net)


I NEED TO SEND OUT A GREAT BIG THANK YOU TO THE FOLLOWING:

   First, TO ALL THAT HAVE PLACED ORDERS WITH ME

   Second, TO ALL THAT COME TO MY CLASSES

   Lastly, TO ALL THOSE THAT HOST CLASSES/WORKSHOPS WITH ME (Katie!)

Without you all I would not be able to keep doing what I love…and let me tell you I really LOVE WHAT I DO with Stampin’ Up! 

I would love to bring back some things that we as demonstrators would do all the time and that is bringing back Hosting Parties!  See below for how this works, and if you are interested or want more information, send me an email.  They are a lot of fun especially for GIRLS NIGHT OUT because Paint Nite is soo overrated, lol!  Oh and no need to be creative or have creative friends, anyone can take part!


HOW TO BE A HOST (IT’S EASY!)

STEP 1: Tell me you want to host a party. (I’ll be excited. Trust me!)
STEP 2: Let’s set a date and make a plan.

Want to hold a party in your home? What kind of project would you like to create? Many hosts prefer to make cards, but we can also have fun putting together gift packaging, tags, scrapbook pages, and more. Like pre-designed kits? In addition to our Paper Pumpkin kits, Stampin’ Up! catalogs always feature kits with cards and projects that are precut and ready to assemble.
Just tell me what works for you. I can walk you through the options and we’ll create your party plan together!

STEP 3: Invite your friends.

I would be happy to help you decide how to get the word out and what to say. Use whatever method works best for you: postcards, social media, email, calls, or texts.

STEP 4: Get the party started!

Here’s the best part. Have fun with your guests making beautiful projects.

STEP 5: Enjoy your rewards.

As a host you can earn free products, get discounts, and order exclusive products (only available for our hosts) with our Stampin’ Rewards program. For example, if your party sales are $150, you’ll have $15 to spend on whatever you’d like. It’s Stampin’ Up!’s way of saying thank you.

STEP 6: Keep crafting
If you had fun, why not start planning your next party right away? Or—if you’d like to enjoy even more benefits—purchase a Starter Kit to sign up as a Stampin’ Up! demonstrator. You can even use your Stampin’ Rewards to help you purchase your kit.

 
NEW ONLINE EXCLUSIVES Get ready for some NEW Online Exclusives, the future of shopping. And a great opportunity for new experiences! You won’t find these products in any catalog, which means we can keep up with the times and release new items regularly to match the times.  Ordering begins November 7th!  See attached PDF for some of the items that will be available…but keep in mind there will be a lot more! 


RUSTIC CHRISTMAS COUNTDOWN

163114  |  $19.00


The rustic Christmas Countdown Kit has all you need to make a rustic, 25-day paper advent calendar! What a great way to bring a classic, cozy Christmas feeling to your home this season!


DETAILS:

This kit includes: 

  • Enough supplies to create 25 individual envelopes
  • Printed die cuts, printed labels, adhesive, embellishments, clothespins, and twine
  • Folded envelope size: 4” x 3”
  • Coordinating colors: Cherry Cobbler, Crumb Cake, Mossy Meadow, Old Olive


PAPER PUMPKIN MONTHLY SUBSCRIPTION

November 10th | Last day to sign up for November’s Paper Pumpkin – Warm Wishes!


Light up the Christmas season with boxed surprises full of love!

Light up the Christmas season with this month’s Paper Pumpkin kit!  With traditional home designs and warm Christmas wishes, spread the light of Christmas with a gift box.  Plus, you can get the Warm Wishes Cards & Envelopes Add-On to take your Christmas crafting even further (available while supplies last).

This month’s kit coordinates with the October Home for the Holidays Paper Pumpkin Kit!

This kit includes:

  • 8 boxes, 4 each of 2 designs
  • A Mossy Meadow Stampin’ Spot
  • Iridescent glitter accents on paper
  • Precut paper pieces
  • Linen thread
  • Treat bags
  • Warm Wishes photopolymer stamp set

Completed box size: 4 ¼” x 4 ½” x 1 ½”  and   4 ¼” x 3 ¾” x 1 ½”

Coordinating Stampin’ Up! colors: Balmy Blue, Blueberry Bushel, Cherry Cobbler, Crushed Curry, Daffodil Delight, Lemon Lolly, Mossy Meadow, Night of Navy, Old Olive, Pecan Pie, Real Red


ADD-ON DETAILS
Warm Wishes Cards & Envelopes

Available for purchase October 11th.

Item# 163985   |   $14.00

Add-on includes:

  • 20 Cards & Envelopes
  • Iridescent Glitter Accents on Paper
  • Folded card size: 5” x 7”

SIGN UP HERE!


JOIN MY TEAM, CREATIVE PAWS!

LOVE TO CRAFT?

Do you love helping others discover the joy of crafting?  When you join Stampin’ Up! as an independent demonstrator, you join a supportive community of others who feel the same.  Join ow and you can select $125 of products for only $99 (plus free shipping).   


DEMONSTRATOR BENEFITS

  • Get 20%–25% off all Stampin' Up! products.
  • Exclusive early access to new products.
  • The opportunity to earn a modest supplemental income based on your sales.
  • Support through online training resources, events, and a demonstrator-only online community with thousands of project ideas.
  • Access to regular promotions.
  • Learn creative tips and techniques, share ideas, and come into contact with new friends and teammates who love paper crafting as much as you do!
Click here to join today!


NOVEMBER EVENTS 2023


POP-IN ZOOM CARD CLASS – RSVP NOVEMBER 6th

WEDNESDAY | NOVEMBER 15 | 7 pm – 8 pm


Back by popular demand!

What's this all about??


You've heard of Pop-Up Stores and Restaurants....well, this is a Pop-In (your home) Zoom Class. You will be making all kinds of Holiday tags & more using the Love Santa Tag Kit and Festive Tags Kit!

Please let me know by Nov. 6th if you will be participating. This way you will receive your packets, with all necessary material to create your cards, in time (FINGERS CROSSED) for the actual Zoom class.


CLASS FEE: $20 - RSVP Nov. 6th


PLEASE NOTE!!!!
The Class itself will be held Via Zoom! You do not need to have a Zoom account, just the app needs to be loaded on the device you will be using.
_______________________________________________
If you are interested, please send payment via...
check
paypal: stampintiz@gmail.com (friends and family option please)
venmo: @stampintiz (friends and family option please)
_______________________________________________

Till then, happy stampin! Also, if there is time, I would love for you all to do a show and tell.

** You can still sign up for this class even if you cannot make the Zoom class. Printed instructions are included in your packet!


BLACK FRIDAY ALL DAY CRAFT DAY!

FRIDAY | NOVEMBER 24 | 10am – 9 pm | RSVP NOV. 19TH

Seekonk Rod & Gun Club, 61 Reed Street, Rehoboth, MA


Today is the day to get all your Holiday or non-Holiday crafting done!

Option 1: All Day Crop: $40

Option 2: 2024 Calendar Class @ 1 pm or 6 pm: $30

Option 3: All Day Crop & Class $65 (save $5)


PS: I will have all my retired stuff this day!  Any retired items you purchase, you will be able to spend half the cost in the NEW catalog, win-win for you!


PSS: I will try and have a better FREE swap table this time around as well.


2024 CALENDAR CLASS!

FRIDAY | NOVEMBER 24 | 6 pm | RSVP NOV. 19th

Seekonk Rod & Gun Club, 61 Reed Street, Rehoboth, MA


Sign up today for this fun 2024 calendar class!


This class is the same class that will be held at 1pm, however, I thought I would offer a second class for those that have to work   or cannot make it in the afternoon.


Class fee: $30


INTELLECTUAL PROPERTY INFRINGEMENT ACTIONS


Just an FYI: Stampin’ Up! continually battles theft of our intellectual property in the form of knock-off stamp sets being sold through various online platforms. Thus far in 2023 our ongoing efforts have resulted in 73,398 infringing stamp sets being removed from various e-commerce sites.

We also recently became aware that Dollar Tree is selling stamp sets created using our copyrighted artwork in their retail shops in the United States and Canada, and we have commenced aggressive legal action to stop them from selling these counterfeit products.

We are grateful for your ongoing help in identifying counterfeit products, including those found at Dollar Tree or any other physical retail location, and reporting them to us at infringements@stampinup.com.

Friday, October 27, 2023

Stampin Friends October 2023 Blog Hop - Thankful for You

Welcome to the Stampin Friends Blog Hop!

So sad that there is only one more month of hoping after this month!  I’ve had an incredible journey and hope you have too.  With that said, this month is about being Thankful and I am especially Thankful for You!

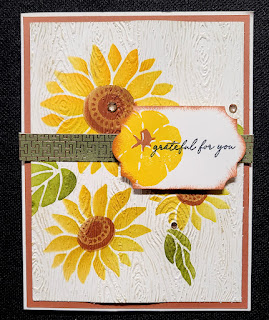
For my project this month I decided to work out of the box.  Every month I select a stamp set or bundle (sometimes the same bundle) as my focus, this month I went with the Abundant Beauty Decorative Masks and September’s Paper Pumpkin.

So…if you are following along the hop, you have arrived from Steph’s Blog. Be sure to read through my Blog, comment below and continue to Barb’s Blog. If you get lost along the way, no worries, you can find a list of Blog Hoppers at the end of each Blog. ENJOY!


MATERIALS NEEDED

Stamp Sets: September Paper Pumpkin

Paper: Very Vanilla: 5 ½” x 8 ¼”, scored at 4 ¼”, card base; 3 7/8 x 5 1/8”; scraps

Copper Clay: 4 1/8” x 5 3/8”

All About Autumn Designer Series Paper (DSP): 4 ¼” x 1/2”

Ink: Daffodil Delight, Crushed Curry, Pumpkin Pie, Old Olive, Mossy Meadow, Pecan Pie, Copper Clay, Crumb Cake, Momento Black

Tools/Accessories: Abundant Beauty Decorative Masks, Timber 3D Embossing Folder, Blending Brushes. The Gems and Punch used are retired, but can be substituted with Natural Adhesived Back Sequins and Lasting Label Punch.

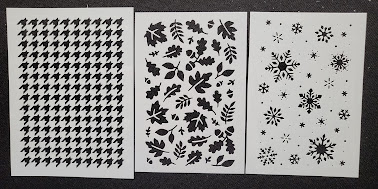
I am not sure how many people have tried using Stampin’ Up!’s decorative masks, but if YOU haven’t boy are you missing out!!  I tried these in a current class and my guests were amazed by their versatility and ease of use!  In my class we made a total of three cards, using different techniques.  The first technique used one mask and a couple of color inks.  The second technique was also using one mask but with shimmer paste.  Lastly, the final technique and the one I will showcase on this blog, used four layering masks.  With this, each mask adds another layer to make a complete image. I will add pictures to the end of the blog of the other two cards.

INSTRUCTIONS:

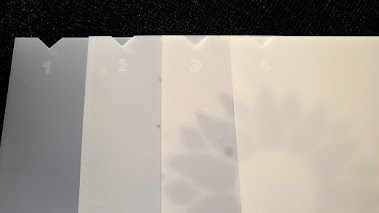
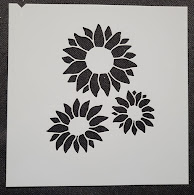
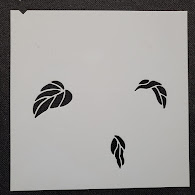
In the Abundant Beauty Decorative Masks, there are four mask that make up sunflowers.  Each mask is numbered and should be used in order.  The cool thing about these masks, there is also a notch where the number is.  The mask is made this way so that you know how to align all the masks as you are building the image.


Just an FYI, the other three masks do not have notches, these are meant to be used by themselves.
 

  1. For the first mask, I put a piece repositionable tape on my grid paper and placed my 3 7/8” x 5 3/8” very vanilla card stock down.  I then layed mask #1 down and found the position I liked best.  When the mask is down, I traced the notch next to the number on the grid paper.  Now I will line up the other mask in the same position (easy peasy). For this mask, using a blending brush, pick up some of the daffodil delight colored ink and rub in the open spaces of the masks.  The more times you go over the same spot, the darker the color gets.  So with one ink you can achieve different shades.
  2. The second mask was the leaves.  Using the same technique as the previous step fill in the open spaces first with old olive ink and then I gave it some shading with mossy meadow.
  3. The thirds mask is the center of the sunflower.  I used pecan pie ink for this.
  4. The fourth mask is also the center of the sunflower, but it has more detail.  For this, I used copper clay ink.
  5. I then ran this piece of card stock through the Stampin and Emboss machine using the timber 3D embossing folder. To bring out more of the detail, I used a dauber and brumb cake ink and lightly ran it over the entire card.
  6. I added a thin strip of All About Autumn DSP above the middle mark of the card.
  7. My sentiment and pumpkin image came from September’s Paper Pumpkin.  For this I used memento black ink, along with crushed curry for the pumpkin and copper clay for the stem.
  8. The card gets put together by first adding the layer of copper clay with adhesive.  I also attached the sunflower piece and strip of DSP with adhesive.  The sentiment however, is added to the card front with dimensionals.
  9. Lastly, I added some gems.

So, there you have it, my “Thankful for You” card!  I hope you enjoyed this month’s blog post!!  Comments of any kind (well hopefully nice ones, lol) are greatly appreciated.  When you are done be sure to hop on over to the next blogger, Barb, on the list!

See you next month!