
WELCOME to Stampin' Friends November Blog Hop!! It's been such a fun year being part of this Hop! If you
are following along the hop, you have arrived from Jo’s blog. Be sure
to read through my blog, comment below and continue on to Teri’s blog.

Unto my projects, my projects do showcase one of the biggest Holiday's that is celebrated here in the States...Christmas!! My Stampin' Up! products get the most use at this time of year. From July to December at least one of my craft classes has to do with making Christmas cards. I send out about 150 holiday cards to all my family and friends. Lastly, I also participate in about 5 craft fairs from October to December selling all the cool things I make! Phew...that's a lot of Christmas.
Let's get started, shall we! It was hard for me to use just one stamp set or bundle for this blog so I used a couple, lol.
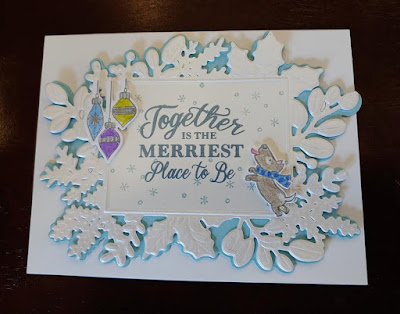
Here is my greeting card, as I said earlier, I just couldn't use one suite or bundle from Stampin' Up!'s July - December 2021 mini catalog.
- Merriest Moments Bundle
- Whimsical Trees Stamp Set
- Seasons of Fun Stamp Set
- Basic White Card Stock (5 1/2" x 8 1/2"; scraps)
- Balmy Blue Card Stock (4 1/4" x 5 1/2")
- Shimmer White Card Stock (4 1/4" x 5 1/2")
- Momento Black Ink
- Misty Moonlight Ink
- Colored Pencils
Step - By - Step
This was an easy card to put together.
- First I die cut the more solid frame out of balmy blue card stock. Then the more detailed frame I die cut out of shimmer white card stock. In the center of the shimmer white frame, I stamped the sentiment in Misty Moonlight ink. I also randomly stamped snowflakes in the frame. This stamp came from the Seasons of Fun stamp set. I adhered these two together with stampin' seal and added it to the card front with dimensionals.
- Using the ornament bundle image from Whimsical Trees, I stamped them onto scraps of basic white card stock. I colored them in using colored pencils. I then die cut it out, with the coordinating die. I adhered this to the upper left hand corner of the the frame.
- Lastly, I stamped the dog image from Seasons of Fun stamp set on basic white card stock with momento black ink. For him, I also colored with colored pencils, however, I did have to fussy cut him out. Once cut out, I adhered him to the lower right hand corner of the frame.
SUPPLIES:
- Wide Mouth Mason Jar Lids
- Acetate
- Vellum
- Painted Christmas Suite
- Merriest Moments Bundle
- Gingerbread and Peppermint Suite
Step - By - Step
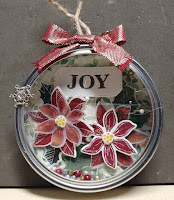
Here is a quick step-by-step for the ornaments.
- To make the shaker card version, I hot glued a piece of acetate to the top of the jar lid.
- I covered the metal insert with DSP on one side and coordinating card stock on the other. Be sure to cut the circle for this bigger than the actual lid. This is what you will use to secure the shaker pieces.
- You will decorate the side of the insert that has the DSP on it. In my ornament I used the flowers from the Merriest Moments bundle. Instead of just stamping the images on basic white card stock, I also used vellum.
- My shaker material is some foam balls I found at the dollar tree that came in silver, gold and red glitter toned. Yeah, if you find these be careful, they just love everything. I was finding them all over my house and of course all over my cats!
- To fill the ornament, I placed the lid face down (acetate down), I put the shaker material inside the lid. I then used hot glue to secure the decorated lid insert.
- To finish off the ornament, I adhered a loop made out of cording to the top, and covered the sloppy hot glue residue with a bow made from Cherry Cobbler & Gold ribbon.
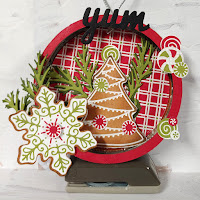
- To make the regular ornament, same as the shaker, I first covered the lid insert with DSP on one side and coordinating card stock on the other. For this type of ornament, the DSP and card stock must be the same size as the lid insert.
- I then hot glued the lid insert inside of the lid. The DSP should be on the inside of the lid. This will create a "frame" to decorate the way you chose.
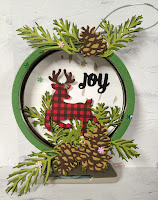
- I decorated one of my ornaments using the Gingerbread and Peppermint Suite. This is such a fun suite...for me it was a must have. The second ornament I used the new deer punch along with the Christmas Pine Cone dies.
- Lastly, I adhered a adhered a loop made out of jute to the top.
- To cover the edge of the lid, I cut a thin circle wider than the lid and hot glued it in place.
I hope you enjoyed my celebrate the season card and project! It was a fun year of blogging and hope to be able to do this with you again next year!! Comments of any kind (well hopefully nice ones, lol) are greatly appreciated. When you are done here be sure to hop on over to the next blogger on the list!
See you in 2022!
Did you know you save 10% when you purchase bundles. Check out the bundles that were used in my projects below.


Love the ornaments idea, very clever and well done!
ReplyDeleteAwesome
ReplyDeletewell done
Very nice - I love the mason jar ring ornaments.
ReplyDeleteBeautiful projects! I love your ornaments!
ReplyDeleteGorgeous projects, especially the ornaments, thank you for sharing x
ReplyDeleteWow, your ornaments are just so, so beautiful! What a gorgeous idea! Thank you so, so much for sharing!
ReplyDeleteWow! That's a lot of craft fairs! I did only one this year. Merry Christmas from Montana! I am definitely putting your ornamant idea in my craft fair idea file. Love them!
ReplyDeleteThis comment has been removed by a blog administrator.
ReplyDelete