Friday, November 26, 2021

Stampin Friends November Blog Hop - Celebrate the Season

WELCOME to Stampin' Friends November Blog Hop!!  It's been such a fun year being part of this Hop! If you are following along the hop, you have arrived from Jo’s blog. Be sure to read through my blog, comment below and continue on to Teri’s blog. If you get lost along the way, no worries, you can find a list of Blog Hoppers at the end of each Blog.

For our last month of hopping our theme is all about Celebrating the Season!  This can be anything you celebrate at this time of year.  One Celebration I learned about this year is Diwali which is celebrated in India. Diwali is a festival of lights and one of the major festivals celebrated by Hindus, Jains, Sikhs and some Buddhists, notably Newar Buddhists. The festival usually lasts five days and is celebrated during the Hindu lunisolar month Kartika. Although my projects do not include this Holiday, I just thought I would share what I learned. And you never know, my next project just might focus on this, the festival of lights!

Unto my projects, my projects do showcase one of the biggest Holiday's that is celebrated here in the States...Christmas!! My Stampin' Up! products get the most use at this time of year.  From July to December at least one of my craft classes has to do with making Christmas cards.  I send out about 150 holiday cards to all my family and friends. Lastly, I also participate in about 5 craft fairs from October to December selling all the cool things I make! Phew...that's a lot of Christmas.

Let's get started, shall we!  It was hard for me to use just one stamp set or bundle for this blog so I used a couple, lol.

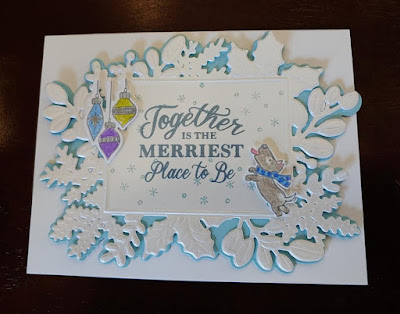
Here is my greeting card, as I said earlier, I just couldn't use one suite or bundle from Stampin' Up!'s July  - December 2021 mini catalog.
SUPPLIES:
  • Merriest Moments Bundle
  • Whimsical Trees Stamp Set
  • Seasons of Fun Stamp Set
  • Basic White Card Stock (5 1/2" x 8 1/2"; scraps)
  • Balmy Blue Card Stock (4 1/4" x 5 1/2") 
  • Shimmer White Card Stock (4 1/4" x 5 1/2") 
  • Momento Black Ink
  • Misty Moonlight Ink
  • Colored Pencils 

Step - By - Step

This was an easy card to put together.

  1. First I die cut the more solid frame out of balmy blue card stock.  Then the more detailed frame I die cut out of shimmer white card stock.  In the center of the shimmer white frame, I stamped the sentiment in Misty Moonlight ink.  I also randomly stamped snowflakes in the frame.  This stamp came from the Seasons of Fun stamp set. I adhered these two together with stampin' seal and added it to the card front with dimensionals.
  2. Using the ornament bundle image from Whimsical Trees, I stamped them onto scraps of basic white card stock.  I colored them in using colored pencils.  I then die cut it out, with the coordinating die.  I adhered this to the upper left hand corner of the the frame.
  3. Lastly, I stamped the dog image from Seasons of Fun stamp set on basic white card stock with momento black ink.  For him, I also colored with colored pencils, however, I did have to fussy cut him out.  Once cut out, I adhered him to the lower right hand corner of the frame.
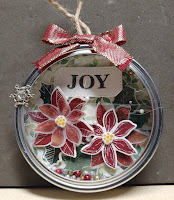
 
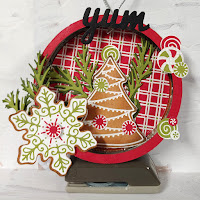
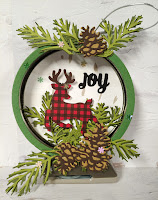
 My project for this month is all about ornaments.  I just LOVE ornaments and the cool thing about them, you can leave them hanging around your home all year long!  This year my hand made ornaments are made by using wide mouth mason jar lids.  You may have used these in the past, but this is my first time and am blown away by all the options that you can come up with to decorate these lids!


 SUPPLIES:

  • Wide Mouth Mason Jar Lids
  • Acetate
  • Vellum
  • Painted Christmas Suite
  • Merriest Moments Bundle
  • Gingerbread and Peppermint Suite

Step - By - Step

Here is a quick step-by-step for the ornaments.

  1. To make the shaker card version, I hot glued a piece of acetate to the top of the jar lid.
  2. I covered the metal insert with DSP on one side and coordinating card stock on the other.  Be sure to cut the circle for this bigger than the actual lid.  This is what you will use to secure the shaker pieces.
  3. You will decorate the side of the insert that has the DSP on it.  In my ornament I used the flowers from the Merriest Moments bundle.  Instead of just stamping the images on basic white card stock, I also used vellum.
  4. My shaker material is some foam balls I found at the dollar tree that came in silver, gold and red glitter toned.  Yeah, if you find these be careful, they just love everything.  I was finding them all over my house and of course all over my cats!
  5. To fill the ornament, I placed the lid face down (acetate down), I put the shaker material inside the lid.  I then used hot glue to secure the decorated lid insert.
  6. To finish off the ornament, I adhered a loop made out of cording to the top, and covered the sloppy hot glue residue with a bow made from Cherry Cobbler & Gold ribbon.
I couldn't believe how easy it was to make this shaker ornament.  If you have never tried, I highly recommend you do TODAY!
If want to make an ornament a little less messy, then the other two samples you see is the way to go.
  1. To make the regular ornament, same as the shaker, I first covered the lid insert with DSP on one side and coordinating card stock on the other.  For this type of ornament, the DSP and card stock must be the same size as the lid insert. 
  2. I then hot glued the lid insert inside of the lid. The DSP should be on the inside of the lid.  This will create a "frame" to decorate the way you chose.
  3. I decorated one of my ornaments using the Gingerbread and Peppermint Suite.  This is such a fun suite...for me it was a must have.  The second ornament I used the new deer punch along with the Christmas Pine Cone dies.
  4. Lastly, I adhered a adhered a loop made out of jute to the top.
  5. To cover the edge of the lid, I cut a thin circle wider than the lid and hot glued it in place.
Easy Peasy right?? I thought so and can't wait to make more to sell at my craft fairs the first weekend in December!

I hope you enjoyed my celebrate the season card and project!  It was a fun year of blogging and hope to be able to do this with you again next year!!  Comments of any kind (well hopefully nice ones, lol) are greatly appreciated. When you are done here be sure to hop on over to the next blogger on the list!

See you in 2022!

Did you know you save 10% when you purchase bundles.  Check out the bundles that were used in my projects below.



Friday, September 24, 2021

Stampin Friends September Blog Hop - Say it with Sentiments


This month our blog hop is about focusing on sentiments to create your card and project.   

All I can say is YIKES!  I’m not good at just using sentiments, I kind of do not understand the concept, but I gave it a shot.  I hope you do not find my card to simple or tacky, but I thought it would be a great card for one of the many little ones in my family.  I have two nephews that are 4 and 3, and then a god daughter that just turned 1.  I think this card is just perfect for kids at these ages.


Time to grab your favorite apple cider drink (it is apple season after all) and sit back and check out this month’s projects in Stampin Friends Blog Hop.  If you are following along on the hop, you may have arrived from Steph’s blog. Be sure to read through my blog, comment below and continue to Jo’s blog.  If you get lost along the way, no worries, you can find a list of Hoppers at the end of each Blog.


Let’s get started, shall we…again I geared my card for very young kids and of course my theme had to be Halloween.  I just need to make two more and I will be done with gifts for Halloween!

For the card, I tried to give the ghost the same shape as the stamp from the Cute Halloween Suite.  It is not your normal 4 ¼”x5 ½” card.  This is a full sheet of paper folded in half.  


Materials you will need for the card:

Basic White Card Stock (cs)

Momento Black Ink

Smoky Slate Ink

Cutest Halloween Bundle


Basic Instructions:

1.    I started with 8 ½”11” basic white cs as my base.  This is folded in half.  With a pencil I lightly drew the shape of the ghost image from the stamp set Cutest Halloween.  I made sure when I got to the folded side to draw off of the card stock.  That way it will open like a card.

2.    Cut out the ghost image to make the card base.  I then stamped the words “Hey, Boo” in smoky slate, by stamping off first, this way it is a lighter shade of gray.  I filled up the whole card front with the same words, off setting them but filling up the whole card front.

3.    I made eyes using ½” circle punch, and the mouth is just a 2” circle punched twice to get a small semi-circle.  I then trimmed it as shown.

4.    On a piece of basic white cs scrap, stamp the ghost image, along with the cute face that corresponds with it. Either fussy cut it out or use the punch. Set aside

5.    Then on a piece of basic white card cs (approximately 5/8”x 3 ½”) stamp the sentiment “Have a Fa(boo)lous Halloween.  I then banner cut one side and layered this on a piece of black cs about an 1/8” larger.

6.    Lastly, I adhered the banner on with dimensionals, along with the ghost to the front of the card base.

Easy peasy and I think it will be perfect for kids ages 1 to 5


In keeping with the Halloween theme, I went with the coffin treat box. Although it is made with a retired item, I have noticed there are a ton of templates out there to make them.


Materials you will need for the box:

Coffin Treat Box (retired) or template

Cutest Halloween Bundle

Cobweb 3D embossing Folder

Cute Halloween 6”x6” DSP

Black & White Gingham Ribbon

Note Tag Punch (retired)

Gorgeous Grape Ink

Momento Black Ink

Window Sheet 


Basic Instructions:

1.    First, I covered the exposed bottom pieces with DSP from Cute Halloween.  I then, glued together the coffin together to make the bottom part.

2.    For the cover of the coffin, I applied DSP just to the top, not the sides.

3.    I decorated the top with a note tag, stamped with the sentiments “Trick or Treat”.  After this, I ran it through the Big Shot using the cobweb 3D embossing folder.  To give it some dimension I also sponged the edge.

4.    To finish off the coffin cover, I cut a slit on either side of the note tag.  Then I ran the black and white gingham ribbon and secured It to the cover.

5.    The neat thing I added to this, is when you open the coffin some ghosts “pop” out at you.  I did this by cutting a piece of window sheet 4 ¼”x 1”.  I scored it at the 1 ½” mark and gave it a light fold.  I adhered the smaller panel inside the coffin and added the ghosts to the longer.  NOTE: Be sure to keep the ghosts just slightly wider than the window sheet.  If not, they will get stuck in the coffin.  Then you can add to treats under the window sheet.


I hope you enjoyed my Say it with Sentiments projects!  I hope I accomplished what was asked of me!!  If not, I think you still got some cool ideas! 
 

Don’t forget, comments of any kind (well hopefully nice ones, lol) are greatly appreciated. When you are done here be sure to hop on over to the next blogger on the list.


See you next month!


Jo Blackman (UK)
Barb Pfeffer
Katja Ettig
Jean Beaulieu
Teri Pocock (UK)
Melissa Thomas (USA)
Stephanie Jandrow (USA)
Tiziana Milano (USA)

Friday, August 27, 2021

Stampin Friends August Blog Hop - All About the Paper!


Oh My…it is the end of August, where has the Summer gone???   On another note…who doesn’t like patterned paper, or Designer Series Paper???  I for one am a paper hoarder. Yes, I will happily admit it, I have a patterned paper obsession!  So, when this month’s topic appeared I wanted to make something and use up some paper.  I also wanted to make something I haven’t really seen before, and I had never made!  What I ended up finding is a party favor from Qbees Quest!.  She made this back in 2011…so yeah I hadn’t really seen something like this lately.


Now, grab a drink and a snack and sit back and check out this projects in Stampin Friends Blog Hop.  As you are following along on the hop you may have arrived from Steph’s blog. Be sure to read through my blog, comment below and continue on to Melissa’s blog.  If you get lost along the way, no worries, you can find a list of Blog Hoppers at the end of each Blog.


Sorry for using the same paper in this project, as in a previous project, but when something is that awesome, it is really hard not to go to it often.


For my card, I CASE’d from Chasing Joy Boutique.  I ordered this bundle because I fell in love with the dies…then I realized I still haven’t used the dies nor the stamp set.  How many of you have done this?  I know this isn’t my first time, and I won’t even mention how many of my stamps or dies are still brand new!


Materials you will need for the card:

Hippo Happiness Stamp Set

Hippo & Friends Dies

Basic White Card Stock (cs)

Hand-Penned DSP

Mint Macaron Ink

Soft Sea Form Ink

Momento Black Ink


Basic Instructions:

1.    I started with 8 ½”x5 ½” basic white cs as my base.  I layered a 4”x5 ¼” piece of Hand-Penned DSP to the card base.

2.    Next using the two smallest “circular” label dies, I cut the smallest out of basic white cs and the next size up out of DSP.  I layered these on the card base with dimensionals.

3.    I stamped the cute hippo with soft sea foam and mint macaron ink.  I die cut him out and adhered him to the center of the white circular label die.

4.    Next, I stamped the sentiment in mint macaron ink onto a piece of ½” x 3” basic white cs.  Then I banner cut the edges.


I think this is one of the easiest cards I’ve made in quite some time!  Next, still fairly easy, but a few more steps, is the really neat umbrella party favor!  Isn’t it so freakin’ cute!  I’ve put together a few baby showers lately and now I can’t wait for the next one to make these!


Materials you will need for the favor

Love of Leaves Stamp Set

Hippo & Friends Dies

4 ½” Scallop Circle Punch or Die

Extra Large Oval Punch

Misty Midnight Card Stock (cs)

Hand-Penned DSP

Mint Macaron Ink

Soft Sea Form Ink

Momento Black Ink


Basic Instructions:

1.    First, we will make the handle.  Lucky for us Qbees Quest has a pdf file with five handles printed on it.  You can do one of two things, either print the page on cardstock and trim out.  Or print the page on white paper/card stock to create a template.  Here is the link for the template.

2.    Next is the Umbrella: Cut a piece of DSP with a scallop circle die or punch that measures about 4 ½”.  (I used the very old circle scallop chunky die).  Cut the circle in half.

3.    Use a 2” oval punch to punch three pieces out of the flat part of the circle.  (I used the retired extra large oval punch for this).

4.     Next, I made the box out of a 6”x3” piece of dsp.  If I were to make these for favors, I would use card stock for this.  It will make the favor box sturdier.  Then, on the 6” side, score at 2 ¼” and 3 ¾”. On the 3” side, score in ½” on both sides.

5.     Cut along the scored lines on both of the long sides, just until you reach the first score
line going in the opposite direction.  Angle cut the corners. (as in image).


6.     Place sticky strip on all six tabs. Make sure middle tab has sticky strip close to the edge (otherwise some of the adhesive will show through).

7.     Remove the lining of the sticky strip on the middle tab. Adhere the scallop circles as shown. Make sure the decorated side is facing up.  Remove the rest of the sticky strip liner and adhere edges to form box.


8.    Adhere the handle to the inside of the box with sticky strip.

9.    Then I made a tag to go with the favor box, by using the two smallest “rectangle” label dies from the Hippo & Friends Die set.  The larger label was die cut out of DSP.  For the smaller label I used basic white cs.  I stamped the words “thank you” is mint macaron ink.  The sentiment came from Love of Leaves stamp set.

10. I adhered the tag to the umbrella handle and also added a cute little hippo to it.


This was my way of showcasing Stampin’ Up!’a one of a kind DSP!  If you haven’t purchased their DSP paper before, don’t start now (lol).  If you do, you will become a paper hoarder JUST LIKE ME!


I hope you enjoyed my All About Paper card and project!  It’s always fun to make something you have never made before!  I am looking forward to sharing a lot more with you the rest of this year!!  Comments of any kind (well hopefully nice ones, lol) are greatly appreciated. When you are done here be sure to hop on over to the next blogger on the list.


See you next month!

Jo Blackman (UK)

Maureen Rauchfuss (USA)

Katja Ettig (GER)

Jean Beaulieu (USA)

Teri Pocock (UK)

Steph Jandrow (USA)

Tiziana Milano (USA) - You are here!

Melissa Thomas (USA)


Wednesday, August 4, 2021

Stampin' w/Tiziana August 2021 News

 Stampin w/Tiziana August 2021 News

Happy AUGUST 2021!!!!

Wow, can you believe, the last full month of Summer has arrived!  Here are some fun things that are going on with Stampin’ w/Tiziana this month!


August's Hostess Code!!

MSSDTYTR

Here's August's Hostess code...be sure to use this code at check out if your order is less than $150.

This will put you in the Hostess Rewards Raffle at the end of the month!

Happy Shopping!


August-December Mini Catalog and Sale-A-Bration!

Yes, Sale-A-Bration again!  Can you believe it???

August 3rd the Mini Catalog and Sale-A-Bration went live! 

There are some great products in both, so be sure when placing an order, spend at least $50, that way you can pick an item from the Sale-A-Bration catalog for FREE!!


06.21_SHAREABLE_2_SAB_ENG.jpg
 
Join Stampin’ Up! During Sale-A-Bration
  • If you want to join my Stampin’ Up! team “Creative Paws” as an independent demonstrator, you’ll be able to add a bundle from the July–December 2021 Mini Catalog to your Starter Kit for free!
  • The cost to sign up? $99. You will receive $125 in product along with a business material to get your business going from the start. And there’s more…
  • There are twelve bundles from the July–December 2021 Mini Catalog you can choose from. Once you initiate the Independent Demonstrator Agreement, your options will appear after you’ve added items to your Starter Kit and proceeded to checkout. To see the list of options, take a look at the last page of the Sale-A-Bration Brochure!
  • Click this link to sign up today!


Aug 10th – Paper Pumpkin

The last day to sign up for August's Paper Pumpkin, HOPE BOX

Empower yourself and others with the Hope Box Paper Pumpkin Kit! Created from the heart and soul of Stampin’ Up! cofounder, Shelli, the Hope Box Paper Pumpkin Kit reminds us why life is precious. This month’s Paper Pumpkin kit includes supplies to create nine encouraging cards and coordinating envelopes in an inspiring color palette, and a specially designed Hope Box!

The Hope Box is designed to be a keepsake box—keep mementos of cherished memories or reminders of what’s yet to come. Collect treats and trinkets that represent what hope means to you in your Hope Box and look inside for inspiration or share it with a friend who could use some uplifting!

What will you put in your Hope Box? Letters, song lyrics, inspiring quotes, and photographs are powerful reminders of hope and connection—and great additions to a Hope Box.

SIGN UP HERE!

Details:

  • Kit contains supplies to create nine cards and coordinating envelopes and comes in a special box!
  • The box is specially designed to turn into a Hope Box—a keepsake box full of cherished items to add hope to your life or in the lives of others.
  • Includes an exclusive stamp set and a Classic Stampin’ Spot
  • Card size: 4-1/4" x 5-1/2" (10.8 x 14 cm)
  • Envelope size: 4-1/2" x 5-3/4" (11.4 x 14.6 cm)
  • Coordinating colors: Bermuda Bay, Blackberry Bliss, Bumblebee, Melon Mambo, Petal Pink, Pool Party, Poppy Parade


August 13th @7pm – SOS Card Class – RSVP Aug. 6th

At my SOS (Stamp Out Stress) Card class you will make 9 cards, three of three designs. Your class fee includes all materials to make cards with envelopes.

We will be using the Art In Bloom and Butterfly Brilliance stamp set and dies for this class.

Class Cost: $25.00 

PLEASE NOTE: RSVP here.  Please pay ahead to guarantee your spot. You are not registered for this class until I receive payment.

Following payment options accepted:
Paypal: stampintiz@gmail.com (friends and family please)

Venmo: @stampintiz

Check: (I can email you the information)

Please bring your SNAIL or double sided tape.
**************************************************************************************
If you need a SNAIL for class please add $10 to class fee. This is yours to keep.
If you need a refill please add $5 to class fee. This is yours to keep.
If you come without one there will be a $3 fee to rent one.


20210802_230020.jpg     20210802_230009.jpg

August 16th @ 7pm (RSVP Aug. 6th) – Pop-In Zoom Card Club - $15

When you sign up for my Pop-In Zoom Card Class, you will receive enough material to make four cards, two cards of two different designs. 

In this class we will be using the Art In Bloom and Butterfly Brilliance stamp set and dies.

PLEASE NOTE: RSVP here. We will be making two of the SAME cards as in my August 13th IN PERSON class!!

PLEASE RSVP by Aug 6th if you will be participating, this ensures you will receive your packets in the mail in time for the class date.

Class Fee: $15

Basic supplies need for class:
Your preferred adhesive
Snips/Scissors
Bone Folder
Liquid Glue
Other supplies needed will be listed under "Discussion" and in the mailer with your packet.

The Class itself will be held via a Zoom meeting. You do not need to have a Zoom account, just the app needs to be loaded on the device you will be using.

You can still sign up for this class even if you cannot make the Zoom class. The day of I will email a pdf with instructions.

If you are interested, please send payment via
CHECK
PAYPAL: stampintiz@gmail.com (friends and family option please)
VENMO: @stampintiz

Also, please send me your most current email address and postal address.

Till then, happy stampin!


StampinFriendsBlogHop2021Logo.jpg

August 27th @ 8am –Stampin Friends Blog Hop

August’s theme is All About Paper

Who doesn’t L O V E beautiful, patterned paper!

In this BLOG HOP we will be sharing projects where the Paper is the focus!


______________________________________________________________

August 27th @ 7pm (RSVP Aug. 20th) – Technique/Punch Art Class – $25

At my Tech/Punch card class you will make 9 cards, three of three designs. Your class fee includes all materials to make cards with envelopes. There is an added bonus to this class, you will learn either a new technique or punch art!!

Class Cost: $25.00

PLEASE NOTE: RSVP here. Please pay ahead to guarantee your spot. You are not registered for this class until I receive payment.

Following payment options accepted:
Paypal: stampintiz@gmail.com (friends and family please)

Venmo: @stampintiz

Check: (I can email you the information)

Please bring your SNAIL or double sided tape.
**************************************************************************************
If you need a SNAIL for class please add $10 to class fee. This is yours to keep.
If you need a refill please add $5 to class fee. This is yours to keep.
If you come without one there will be a $3 fee to rent one.


 ______________________________________________________________

August 30th @ 7pm (RSVP Aug. 20th) – Pop-In Zoom Technique/Punch Art Class – $15

When you sign up for my Pop-In Zoom Tech/Punch Card Class, you will receive enough material to make four cards, two cards of two different designs. There is an added bonus to this class, you will learn either a new technique or punch art!!

PLEASE NOTE: RSVP here. We will be making two of the SAME exact cards as in my August 27th IN PERSON class!!

PLEASE RSVP by Aug 20th if you will be participating, this ensures you will receive your packets in the mail in time for the class date.

Class Fee: $15

Basic supplies need for class:
Your preferred adhesive
Snips/Scissors
Bone Folder
Liquid Glue
Other supplies needed will be listed under "Discussion" and in the mailer with your packet.


The Class itself will be held via a Zoom meeting. You do not need to have a Zoom account, just the app needs to be loaded on the device you will be using.

You can still sign up for this class even if you cannot make the Zoom class. The day of I will email a pdf with instructions.

If you are interested, please send payment via
CHECK
PAYPAL: stampintiz@gmail.com (friends and family option please)
VENMO: @stampintiz

Also, please send me your most current email address and postal address.

Till then, happy stampin!


 ____________________________________________________________

September 10th - Paper Pumpkin

The last day to sign up for September's Paper Pumpkin.  Sign Up Here!


--
If you're not stampin', you should be!
Tiziana
Tiziana Milano - Stampin' Up! Independent Demonstrator

Check out my facebook page, it's full of wonderful ideas and product!

Do you follow blogs??  Who has one?  This girl!