

Welcome to Stampin Friends Blog Hop! This month we are featuring cards and projects with lots of layers. This is a good way to use up all those pieces of scrap Designer Series Paper (DSP).
If you are following along the hop, you have arrived from Sue’s blog. Be sure to read through my blog, comment below and continue to Teri’s blog. If you get lost along the way, you can find a list of Blog Hoppers at the end of each Blog.
ENJOY!
If you are following along the hop, you have arrived from Sue’s blog. Be sure to read through my blog, comment below and continue to Teri’s blog. If you get lost along the way, you can find a list of Blog Hoppers at the end of each Blog.
ENJOY!
MATERIALS NEEDED:
Basic White Cardstock
Bermuda Bay Yardstick
DSP of your choice (I used Sunshine & Rainbows 6”x6” DSP from the Jan0Jun 2022 Sale-A-Bration brochure)
Momento Black Ink
Party Puffin Stamp Set
Stitched Rectangle Dies
Colored Pencils
White Twine
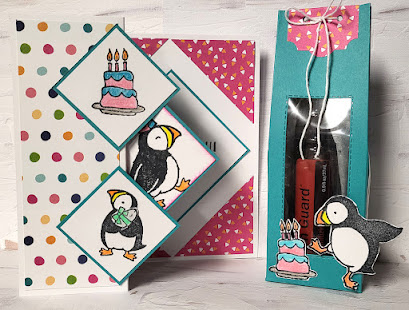
Have you all seen this freakin’ cute stamp set, Party Puffin in Stampin’ Up!’s Annual Catalog?? I just love it! I’ve had it for a bit and finally decided to use it for this Hop. I hope you love it as much as I do after seeing what I was able to make with it!

For my card, I find that now I love doing fancy folds. So today I have another fancy fold card for you, along with lots of layers. This fancy fold card is called Fold Back Pop-Up card. Full instructions can be found on splitcoaststampers.com by Robyn Rasset.
Here are the sizes of cardstock and DSP used. It is best to coordinate and prepare these pieces ahead of time.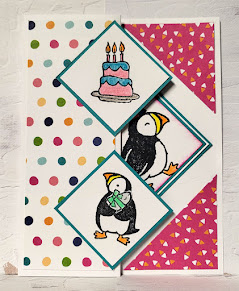
The following instructions were taken right from splitcoaststampers.

To go along with the card, I created a gift pouch to hold a bottle of doTerra hand sanitizer. I think the one thing this pandemic has instilled in us, is the use of hand sanitizer to keep germs away. This cute pouch has a window so you can see the contents and it is very easy to open, without destroying the packaging. Did I mention, these make great end of year or beginning of year teacher gifts too!
- Cardstock base: 8 1/2" x 5 1/2", scored at 2 1/8" and 4 1/4"
- Patterned paper #1: 2 pieces 5 1/4” x 1 7/8”
- Patterned paper #2: 2 pieces 2”x 2” cut in half diagonally
- White cardstock: 2 pieces 1 5/8” x 1 5/8”
- White cardstock: 2 pieces 2 5/8” x 2 5/8”, cut 1 in half diagonally
- Coordinating cardstock: 2 pieces 1 3/4”x 1 3/4”
- Coordinating cardstock: 2 pieces 2 3/4" x 2 3/4”, score 1 on the diagonal and cut off 1” of tip parallel to scoreCard base is basic white cardstock, 8 1/2” x 5 1/2”, folded in half to become 4 1/4” x 5 1/2”.
The following instructions were taken right from splitcoaststampers.
- Open the card flat and adhere patterned paper #1 to the left side, centered between score lines. Adhere the patterned paper triangles to the corners on the right side.
- Adhere the 2 3/4” cardstock square centered between the triangles.
- Stamp the images onto the white cardstock with the squares in diamond orientation.
- Color the images and prepare any other embellishments for your design.
- Adhere the colored images to cardstock layers.
- Adhere greeting layer to card.
- Without adhering, lay the images in place as a test for placement.
- Add strong adhesive to the scored tab. Hold in position. Close card onto the adhesive.
- Position the tip of the first small square at the corner of the patterned paper on the front. Add adhesive only to the left side. Repeat with the bottom square, lining up with the bottom corner of the patterned paper.
To go along with the card, I created a gift pouch to hold a bottle of doTerra hand sanitizer. I think the one thing this pandemic has instilled in us, is the use of hand sanitizer to keep germs away. This cute pouch has a window so you can see the contents and it is very easy to open, without destroying the packaging. Did I mention, these make great end of year or beginning of year teacher gifts too!
Measurements for the pouch are as follows.
- 8 1/2” x 7 1/2” cardstock
- 2, 1 1/4” x 5 3/4” DSP
- 1 7/8” x 3 1/2” acetate.

Here are some quick instructions on how to put your pouch together.
- Score the 8 1/2” x 7 1/2” piece of cardstock at 2”, 3 1/2”, 5 1/2”,7”, then score 1 1/2” on the other side. (see image)
- Snip all of the score line up to the 1 1/2” score. Then trim off the last square that measures 1 1/2” x 1 1/2”.
- Add tear tape to the flap where you removed the square. (see image) Be sure to put a piece close to the score line and the edge of the cardstock. Adhere this to the other side to create a rectangle box.
- Carefully, place rectangle die in the wider center panel. Carefully fold over from the score line on top of the die. (This was the only way I could get it through my die cutting machine). It will leave an indent but this will be covered by the DSP. Using tear tape I adhered the piece of acetate to make my window.
- Adhere the 2 pieces of DSP on the 1 1/2” wide panels.
- Add adhesive the smaller flaps at the bottom to close up the box. Now you have a pouch/box that will stand up.
- To finish off the pouch, I pushed in the narrow sides and gave it small pinch so it folds.
- I punched of piece of DSP from a fancy label punch (retired, sorry). I folded this in half. I adhered half to the back of the opening. I then folded it over and punched to holes so I can string some twine to hold the pouch closed, yet making it easy to open to remove the contents.
- Lastly, I decorated the pouch by stamping a puffin and cake on scraps of white cardstock, colored, fussy cut and adhered to the front of the pouch.
I hope you enjoyed my lots of layers card and project!
Don’t forget, comments of any kind (well hopefully nice ones, lol) are greatly appreciated. When you are done here be sure to hop on over to Teri’s Blog.
See you next month!
See you next month!
___________________________________________________________
That little guy is too fun!
ReplyDeleteCute, cute, cute!!
ReplyDeleteSuper cute!
ReplyDeleteSuch beautiful projects created with super cute products! Love them!
ReplyDeleteCute Don't have the Puffins but have several other SU stamps
ReplyDelete