

Welcome to the Stampin Friends Blog Hop!
This month’s theme is about being thankful and giving thanks! If you are following along the hop, you have arrived from Kim Quade’s blog. Be sure to read through my blog, comment below and continue to Sue Vine’s blog. If you get lost along the way, you can find a list of Blog Hoppers at the end of each Blog. ENJOY!
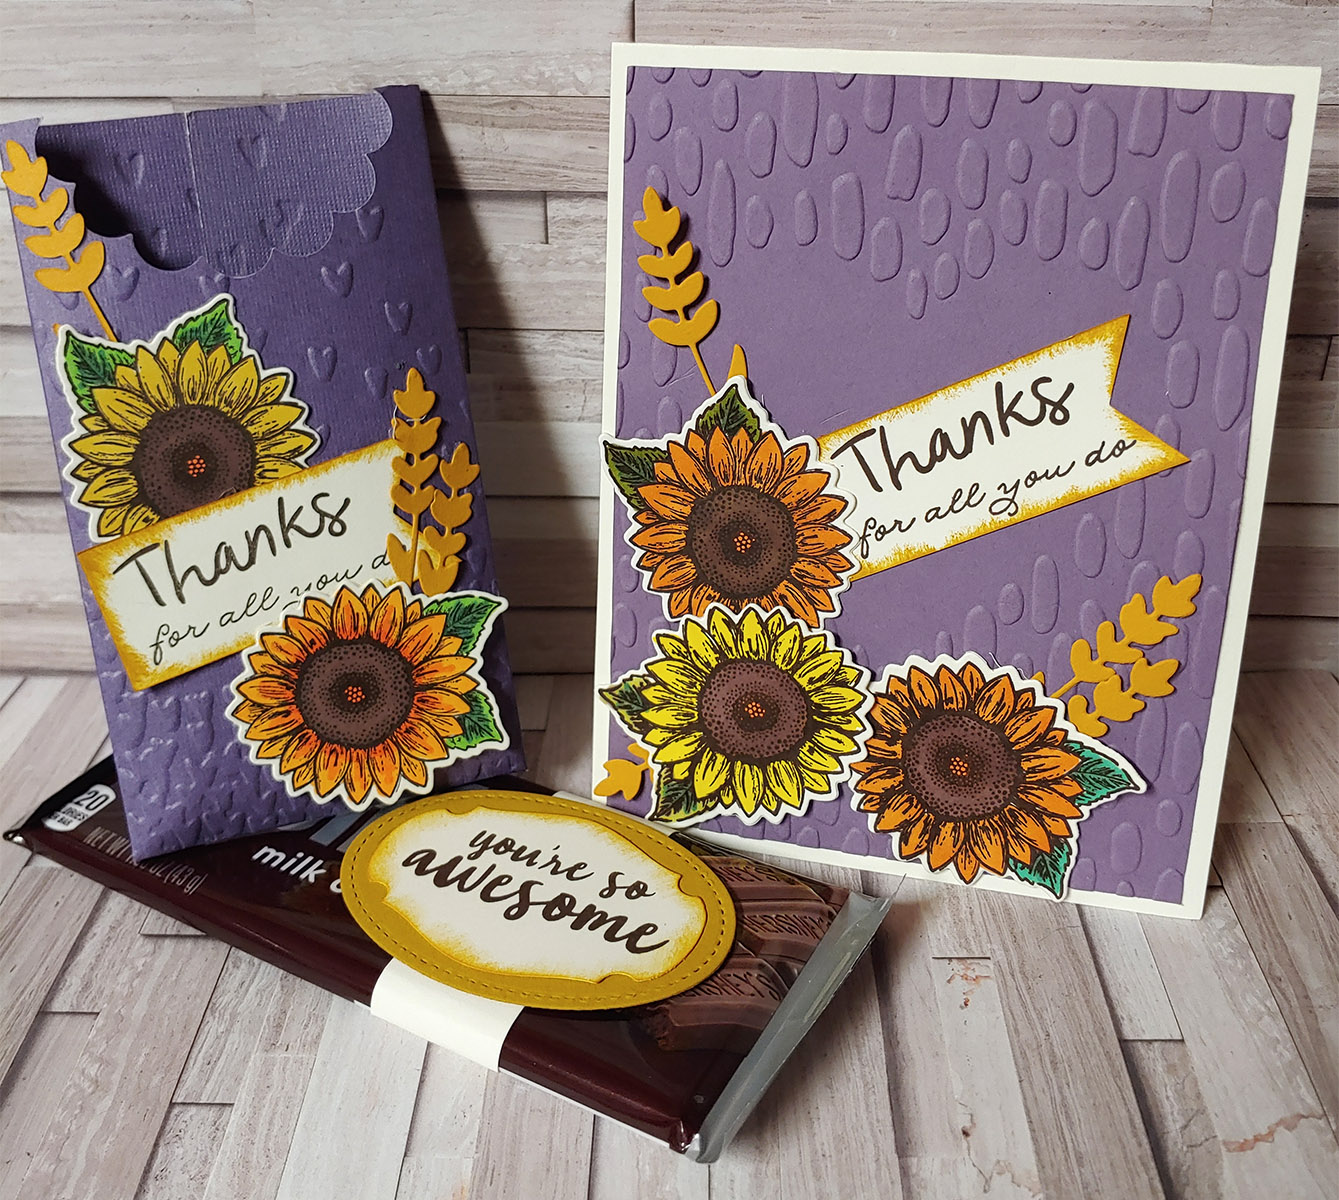
Next month, here in the States we celebrate Thanksgiving, a wonderful time of year to reflect about all the things we are Thankful for. For my projects, I actually used to thank some very important people, NICU Nurses. September was NICU Awareness Month and it just so happens my cousin gave birth to her first ever child over 2 months early. As a thank you to all the wonderful nurses (142 of them) that took care of her baby around the clock, she asked if I could make something for them. I came up with a pouch that holds a full size Hershey Bar. I had a very short turn around time because my cousin wanted to get these to the nurses by the end of the month and also the same day she got to bring her baby girl home! I then made a card to go along with the pouch (these the nurses did not get).
So let’s start with the card, since that was quick and easy. I think I used this bundle in another month of this hop, but as you can see, it is such a versatile stamp set and bundle.
Thanks for All You Do Card

INGREDIENTS:
Stamp Set: Celebrate Sunflowers; Ornate Thanks; Thankful Thoughts (r)
Paper: Very Vanilla (4 ¼”x11”, 1”x2 ½”, scraps); Highland Heather (4”x5 ¼”); Bumble Bee (scraps)
Ink: Early Espresso and Bumble Bee
Tools/Accessories: Assorted Blendibles; Sunflowers Dies; Banner Triple Punch, Sweetheart Textured Embossing Folder (r)
INSTRUCTIONS:
- Score in fold in half the very vanilla cardstock. This is the base of your card.
- Emboss the highland heather cardstock using the sweetheart textured embossing folder. Adhere this to the card base with Stampin’ Seal. Set this aside so you can work on the details of the card.
- Stamp three of the smaller sunflower images on very vanilla cardstock. I colored them using Stampin’ Up!’s Blendibles. After you are done coloring them, die cut them out and set aside.
- Die cut two of the single sprigs and one double sprigs out of bumble bee cardstock, set aside.
- On the piece of 1”x2 ½” very vanilla card stock, stamp the word “thanks” from the Thankful Thoughts stamp set in early espresso ink. Then under that stamp the words “for all you do” from the Ornate Thanks stamp set also in early espresso ink. Then punch the right side to create a banner using the Banner Triple Punch. I then sponged the edges with bumble bee ink.
- Adhere the pieces onto the card base as shown in the sample. Please note, the center flower is adhered with dimensionals.

“Thanks” Hershey Pouch and Belly Band
As mentioned in the beginning I had to make 142 of these within a week and a half time frame. Here are some of the pictures from that experience. When I have to make things in bulk like this I like to work on all the prepping one step at a time. Then I assemble also one step at a time.


At first, I had a banner on the chocolate bar, but then I decided on a belly ban. To me it resembled a cigar, and isn’t that what they used to give out when someone had a baby (oh gosh, I am showing my age!).
INGREDIENTS:
Stamp Set: Celebrate Sunflowers; Ornate Thanks; Thankful Thoughts (r); Flowering Desert
(r)
Paper: Highland Heather (6”x5 1/2”); Very Vanilla (1”x2 ½”, 1”x5 ½”scraps); Bumble Bee (scraps)
Ink: Early Espresso
Tools/Accessories: Assorted Blendibles; Sunflowers Dies; Banner Triple Punch; Falling Petals Embossing Folder; Story Label Punch; 2 ¼” Scallop Circle Punch; Stitched Shapes Dies
INSTRUCTIONS:

Belly Band
- Wrap the 1”x5 ½” very vanilla cardstock around the right hand side of the chocolate bar. Set this aside.
- Die cut a 2 ¾”x 1 7/8” oval out of bumble bee cardstock using the stitched shapes dies. Adhere this to the very vanilla cardstock on the chocolate bar.
- Stamp the words “You’re So Awesome” in early espresso ink onto very vanilla cardstock and punch out using the Story Label Punch. Sponge the edges with bumble bee ink. Then adhere this to the bumble bee oval.
“Thanks” Pouch
I thought the pouch would be hard to put together, but it actually went together quite easily. Out of one 12”x12” paper, you can actually get four pouches! Here’s what you do.

- Lay your piece of cardstock on the score so it is 6” wide. Score it at 1 5/8” and 4 3/8”. Then rotate it 90 degrees and score it at 5”.
- Next, snip first going across from the side (5 ½” side) to the score line at 1 5/8”. Do the same on the other side. Then come up so you are only snipping off ½” until you reach the other score line. Do this on both sides also. Then the small flap that is left, I cut at an angle.
- Now on the same panel where we left the flap, on the other end, I came down half way and used the scallop circle punch to make an opening.
- To put this together, be sure to use a strong adhesive, such as tear tape or Stampin Seal +, to be sure it doesn’t open. I ran some of the adhesive on the small flap and then down one side close to the edge.
- I folded up the flap first, then over lapped the panels. You now have your pouch, easy peasy.
- I then decorated the front panel, this time using two small sunflower images and some of the sprigs as in the card, along with the “Thanks, for all you do” saying as in the card.

Phew, there you have it, 142 pouches later and I was done…can you believe, I didn’t even eat one chocolate bar! Oh the insanity!!!
I hope you enjoyed my projects and story this month! I had a lot of fun (although tiring) putting them together and sharing them with you! I would really appreciate a comment of any kind (well hopefully a nice one, lol) and then when you are done be sure to hop on over to Sue's blog!
Tiziana Milano (US) – You are here!
These are gorgeous! I love the purple with the yellow and orange. And so sweet of you to make these for your sister's NICU nurses. What a lot of coloring and die-cutting!
ReplyDeleteSuch an awesome color combination! And, of course, who doesn't love dressed up chocolate?
ReplyDeleteI am always looking for ways to dress up a little gift. Your pouch is the perfect size for the chocolate bar. Thanks for sharing.
ReplyDeleteI liked the pretty pouch for gifting the candy. It is a lovely presentation. Thank you for sharing!
ReplyDeleteAwesome Tiz, so glad this all came together for you!!! Some times we do our best work when we are under pressure!!!!!! Thanks for sharing defintely goign to make up some of your pouches ...or you can come here and make them with me hahahaha
ReplyDeleteAnytime! I'm a pro at them now!
DeleteWhat a wonderful thing to do for your cousin. Those nurses do WONDERFUL things for those babies and new parents. They are truly angels on earth!
ReplyDeleteWow! I bet every one of those nurses appreciated these beautiful gifts. Such a great way to show appreciation for all of the work those amazing nurses do. I love the pop of purple you added with the sunflowers, too. I'm still in awe that you whipped up 142 of these in a week and a half. Wowza!
ReplyDeleteNot sure how I did it myself, especially after starting to put them together, I realized I only had half of the Sunflowers needed!!! Let me say, thank goodness at the time I was "working from home" from my full time job, lol.
DeleteWow! How amazing that you made 142 of these beautiful pouches for the wonderful nurses! Well done you! xx They are gorgeous and I bet the nurses really appreciated the lovely gift x
ReplyDelete