Friday, February 26, 2021

Stampin Friends February Bog Hop - Brighten Your Day!


 Welcome to the Stampin Friends Blog Hop!
Happy February, this month we are Brightening Someone’s Day.  This topic can span across many different situations, it could be sending a get well message, sympathy thoughts, a simple Just Because/Hello and lastly sending some Love.  …I guess you can say my card and project has to do with sending a Hello/Love to brighten a mans day!!!  If you are following along the hop, you have arrived from Steph’s blog. Be sure to read through my blog, comment below and continue to Maureen’s blog. If you get lost along the way, no worries, you can find a list of Blog Hoppers at the end of each Blog. ENJOY!


So let’s begin! This month I had it in my head to focus on something Masculine.  I find it soooo easy to create for women or children but often neglect the men in my life. Even with February having Valentine’s Day, all I could muster up was a card, lol.  So I pushed myself and came up with not only a card, but a tic tac toe game board.  The board was very simple, but then again, what guy would want a frilly, cutesie one.
To make my projects I used Stampn’ Up!’s designer series paper and stamp sets.  


MATERIALS NEEDED
Stamp Sets: Game On, Geared Up Garage
Paper: Smokey Slate CS (8 1/2”x5 1/2” & 2 5/8”x3 1/2”); Basic Black CS (4”x5 1/4”); In Good Taste DSP (1 5/8”x3 3/4”); World of Good Specialty DSP (3 3/8”x 3 3/4”) Basic White CS (2 3/8”x3 1/4?” and 1/2”x2 1/4")
Ink: Momento Black Ink, Smokey Slate Ink, Smokey Slate Dark Stampin’ Blends and Petal Pink Light Stampin’ Blends, Black Sharpie, Black and Saddle Brown StazOn Ink.


Lucky Me Card

Although there are many layers, this is a pretty easy layout, one that I will use over and over again, especially with stamps that do not come with dies to cut out the images, lol.
  1. First, I stamp you image on the larger basic white card stock and your sentiment on the smaller one.  Color your image if needed.  Then adhere this to the smaller piece of smokey slate card stock.
  2. Next, I adhered the different layers onto the card base.  The first layer to put down is the basic black.  Then layer the smaller DSP towards the top and the larger piece towards the bottom.
  3. Lastly, I adhered the stamped panel and the sentiment to the card using dimensionals.

Tic Tac Toe Board


  1. This is a fun way to brighten someone’s day.  A good old fashion game of Tic Tac Toe! I always love when I can use NON paper products with my stamps and inks.  
  2. For the tic tac toe board, I used a 5 ?”x5 ?’ tile.  This I found at the home improvement store.  Any type will work too.  I measured out the board into six equal portions.  I used a black sharpie to draw the lines.  
  3. Then I used Black and Saddle Brown StazOn ink to decorate the individual squares.  For this board I used the checker board image from Game On stamp set and the “You jump start my heart” phrase from Geared Up Garage stamp set. 
  4. For the game pieces, I used those flat pieces of clear glass that are used in floral vases.  These can be found at your local craft store in the floral department.  To tell the pieces apart (usually they are “X’s” and “O’s”) I have adhered coordinating dsp from the greeting card to the back of the glass pieces.
  

I hope you enjoyed this project as much as I did putting it together!  I am looking forward to sharing a lot more with you this coming year!!  Comments of any kind (well hopefully nice ones, lol) are greatly appreciated.  When you are done here be sure to check out Maureen’s blog for more fun ideas!

See you next month!


Tiziana Milano (US) – You Are Here

Friday, January 22, 2021

Stampin Friends January Blog Hop - Birthday Celebrations


Welcome to the Stampin Friends Blog Hop!

Welcome, welcome, welcome 2021…let's sing Happy Birthday to the year!!!  If you are following along the hop, you have arrived from Heidi’s blog. Be sure to read through my blog, comment below and continue on to Jean’s blog. 

If you get lost along the way, no worries, you can find a list of Blog Hoppers at the end of each Blog. 

ENJOY!


Welcome one and all to 2021, with this said lets celebrate its birthday!  That’s right January’s Blog Hop is all about Birthday Celebrations!  I don’t know about you, but I spent most of the end of last year focusing on Winter Holidays, so this is a nice change of pace.

Shall we begin? I want to preface this years Blog Hop by thanking Steph for getting me out of the rut of being a Princess of Copy, lol.  (My friend Barbara calls herself Queen of Copy, and I am just a level below her since she has been doing this a lot longer than me.)  Every month see posts a Card Challenge in a group we belong to which forces me to come it with my own designs.  I hope you enjoy this months challenge! 

My Birthday Celebration uses the fun NEW stamp set in the January – June Mini Catalog called Hey Birthday Chick.  The cool thing about this stamp set, they have added a die set and they are bringing back the retired set called “Hey Chic” and have added coordinating dies, wooo hooo!!!

Happy Birthday Dancing Chick Card

MATERIALS NEEDED

Stamp Set: Hey Birthday Chick, Pampered Pets

Paper: Very Vanilla CS (8 ½”x5 ½” & Scraps); Crumb Cake CS (4”x5 ¼” & 4 ¼” x ½”); Poppy Parade CS (2”x4”); Mango Melody (2”x4”) In Good Taste Designer Series Paper (DSP)(scraps); Cherry Cobbler CS (scraps ); Basic White CS (scraps)

Ink: Early Espresso Ink, Basic Gray Ink, Assorted Blends,

Tools/Accessories: Stitched Shapes Framlits Dies; Chick Dies; Birthday Chick Dies; All Dressed Up Dies; Tasteful Textile 3D Embossing Folder; Wrapped In Texture Embossing Folder, Mini Stampin’ Cut

  1. To put my card together, first I sponged just about everything lightly in early espresso ink to give it a dirty look. Chicks do live on farms ya know, lol
  2. I then adhered the crumb cake cs to the very vanilla card front.
  3. I used to different embossing folders for the poppy parade and mango melody cs.  I just wanted to give it some texture so it doesn’t matter which folders you use.  I adhered them to the top of the crumb cake, over lapping each other and making sure there is an even border at the top left and lower right.
  4. Next I die cut some of the fencing and adhered it to the card front on an angle.  Below the fence I added a strip of crumb cake.
  5. My focal point is the “Dancing Chicken” which I stamped on basic white cs and die cut it out using the 2” circle die from stitched shapes framelits dies. I colored her in using blends and adhered it to the center of the card with dimensionals.
  6. Lastly, I die cut the words “Happy Birthday” in basic black cs and the sac of feed using the In Good Taste DSP.

I just have to say the DSP In Good Taste is PERFECT for these dies. The wood grain works well with the fence die and sign, along with the chicken cop!


Feed Sack Gift Bag

I thought I would use the “purse” die from All Dressed Up Dies and make it look like a feed sack bag.  Hopefully, that’s what you all see, lol.  Inside the sack, you can fit all kinds of small goodies.  Since this will be a gift, I decided to add a bath bomb (can’t we all use a little pampering?).  Here’s how this comes together.

  1. I die cut the bag out of crumb cake cs and then ran it through the Stampin’ Cut using the Tasteful Texture embossing folder. Then, I lightly sponged this with early espresso ink and built the bag as is. 
  2. I die cut the straps out of cherry cobbler and sponged those as well.  Instead of adhering them from the front to the back, I adhered them from side to side.  I used the buttons to give it more of a country feel also. 
  3. I decorated the front of the sack with the chicken cop die and some fencing.


For the bath bomb, I made a simple bag topper.  

  1. I used a 3 ½”  x 3” piece of poppy parade cs, scored at 1 ½”, so when the piece folds, it is 1 ½” in height.
  2. I added more fencing to cover the staples and a sign that says “enjoy”.  The “enjoy” came from the stamp set Pampered Pets.
  3. Lastly, I added the chick eating the cupcake to decorate the bag topper.  I also used blends to color the chick in.

I hope you enjoyed my first project of year!  I am looking forward to sharing a lot more with you this coming year!!  Comments of any kind (well hopefully nice ones, lol) are greatly appreciated, of any kind and then when you are done be sure to hop on over to the next blogger on the list!


See you next month!


Heidi Collins

Tiziana Milano – you are here!

Jean Beaulieu

Katja Ettig

Jo Blackman

Teri Pocock

Steph Jandrow

Maureen Rauchfuss

Kim Lamos

Melissa Thomas


Click here to bring you to my shopping page to order all of the wonderful products used here!

Thursday, November 19, 2020

Stampin Friends November Blog Hop - Happy Holidays/Winter

 Welcome to the Stampin Friends Blog Hop!

Well we’ve made it through a whole year of blogs…the end this wonderful journey today’s blog will be about Winter/Holiday.  If you are following along the hop, you have arrived from Steph Jandrow’s blog. Be sure to read through my blog, comment below and continue to Lisa Ann Bernard’s blog. If you get lost along the way, you can find a list of Blog Hoppers at the end of each Blog. ENJOY!


Wow, what a year it has been!  I am excited that I was able to participate in this fun and amazing Blog Hop!  I can’t wait for next year to start the journey once again.  I know it is only November, but we’ve decided to take a break in December so we can gather our creative ideas for 2021.  With this being our last month, we are focusing this month’s theme to Holidays/Winter.  I have done a little of both.  My card feature’s a retired Stampin’ Up! stamp set that I never got around to using.  My project, on the other hand uses a plethora of stamps, dies, paper, ink etc.  I’ve decided to jump out of my comfort zone and tackle a Winter Sampler frame, YIKES!  Please continue on to see the details of my card and projects!

As mentioned earlier, I decided to use a retired stamp set for this card.  When “Christmas in the Making” first came out, I just had to have it.  Then as with most of my ‘have to have’ stamps it sat and then the Holidays were over.  So, I decided to bust it out and have fun with it. (that was another thing I was trying to accomplish this year, use sets I have used before). OK, enough rambling, let’s get to some stampin’ fun!


Christmas in the Making Greeting Card

INGREDIENTS

Stamp Set: Itty Bitty Christmas; Christmas in the Making (r)

Paper: Whisper White CS (8 1/2”x5 1/2”); Real Red CS (4”x5 ¼”); Heart Warming Hugs Designer Series Paper (DSP)(3”x3” & Scraps); Shimmer White CS (4 ¼” x 5”, ¾ ”x2 ¼” ) Whisper White CS(large enough to stamp image on)

Ink: Mossy Meadow, Black Momento

Tools/Accessories: Stylish Stripes Embossing Folder; Frosted Frames Thinlits; Clear Embossing Powder; Heatt Gun; Big Shot; Dimensionals; Rhinestones; Colored Pencils

  1. Dry emboss the real red cs with the stylish stripes embossing folder and adhere this to the front of the card base.
  2. Layer onto the card base, the 3”x3” DSP in the upper right hand corner.  
  3. Die cut the frosted frame out of the shimmer white cs. Adhere this in the center of the card base overlapping the dsp.
  4. Stamp one of the images of the women, and using the scraps of dsp paper piece either all of her clothing or just part of it.  In my card, I only paper pieced the lower portion of her dress.  Color the rest of the image and adhere to the frosted frame with dimensionals.
  5. Lastly, stamp your “holiday” phrase in mossy meadow ink onto a piece of scrap shimmer white cs.  Cover with clear embossing powder and heat set. Trim down to your desired length.  This keeps the phrase from smudging since we are stamping a colored ink onto a shimmery cs.
  6. Now the very last thing (which I do not recall stating in any of my other posts) be sure to stamp the back of your greeting card with a personalized stamp.  Another must, is to stamp your envelope with a coordinating stamp.  It doesn’t have to be anything big, just enough so you are not sending out naked envelopes!

It was fun to do some paper piecing, I always forget about some of these simple yet amazing techniques!!  


Now onto showing you my project for the month!  As stated in the beginning, I struggle with these and hope you like what I have come up with.  I used a 12”x12” frame with a 10”x10” opening. I’ll also try my best to include EVERYTHING I used, but if you see that I missed something, please leave a comment.


Winter Sampler Frame

INGREDIENTS

Stamp Set: Spirited Snowmen (r); Playful Penguins (r); Scentsational Season (r); Warm Hugs; Poinsettia Petals

Paper: Pool Party CS (10”x10”); Holiday Fancy Foil DSP (10”x10”); Smoky Slate CS (7 ½”x7 ½” & scraps ); Whisper White CS (2-2 ¼”x 2 ¼”; 1 ¾”x 4 ¾” ; 2 ¼” x 2 ¾” ); Petal Pink CS (2 ¼”x 2 ¼); Crumb Cake CS (2 ¼”x 4 ¾”); Pear Pizzaz CS (2 ¼”x 2 ¼”); White Glitter, Old Olive, Soft Suede, Brightly Gleaming Specialty DSP (scraps)

Ink: Black Momento; Gray Granite; So Saffron; Smoky Slate; Early Espresso; Mossy Meadow

Tools/Accessories: Winter Snow Embossing Folder; Subtle 3D Embossing Folder; Wooden Planks Embossing Folder; Sleigh Ride Edgelits; Alpine Sports Thinlits; Perfect Pines Framelits; Playful Alphabet Dies; Pointsettia Dies; Holiday Collection Framelits; Beaded Pearls, Wink of Stella; Basic Pearls (colored with a red sharpie); Silver Embossing Powder


Wow, that’s a lot of things!!  I won’t bore you with details, but I will show you an image of how I brain stormed and went about putting this frame together.  When you have a ton of stampin’ supplies, it can quickly get overwhelming with deciding what to use on your frame.  The key is to decide what type of sampler you are trying to achieve.  For this frame, I did not want to have anything Christmas related.  I want to have this hanging up all Winter long, so finding things that wasn’t Christmas related was quite difficult.  Another thing to keep in mind was color scheme.  Once, I decided on the background, I tried to find coordinating card stock.  For this frame I did not want monotone (something that is very difficult for me to do on such a large scale).


Here it is without the frame to see it better.

I hope you enjoyed my projects throughout the year and especially this months!  I had a lot of fun participating in this Blog Hop and sharing my creativity with you all. I would really appreciate a comment of any kind (well hopefully a nice one, lol) and then when you are done be sure to hop on over to the next blogger on the list!


Steph Jandrow (US)

Tiziana Milano (US) – You Are Here

Lisa Ann Bernard - Queen B Creations (US) –

Katja Ettig (GER) -

Teri Pocock

Sue Vine - MissPinksCraftSpot (Australia) –

Jean Bolen Beaulieu

Kim Lamos

Heidi Collins (US)

Kim Quade (US)

Maureen Rauchfuss (US)

Barbara Welch (US)

Anne Marie Hile (US)

Melissa Thomas (US)


Thursday, October 15, 2020

Stampin Friends October Blog Hop - Thanks/Thankful


Welcome to the Stampin Friends Blog Hop!

This month’s theme is about being thankful and giving thanks! If you are following along the hop, you have arrived from Kim Quade’s blog. Be sure to read through my blog, comment below and continue to Sue Vine’s blog. If you get lost along the way, you can find a list of Blog Hoppers at the end of each Blog. ENJOY!


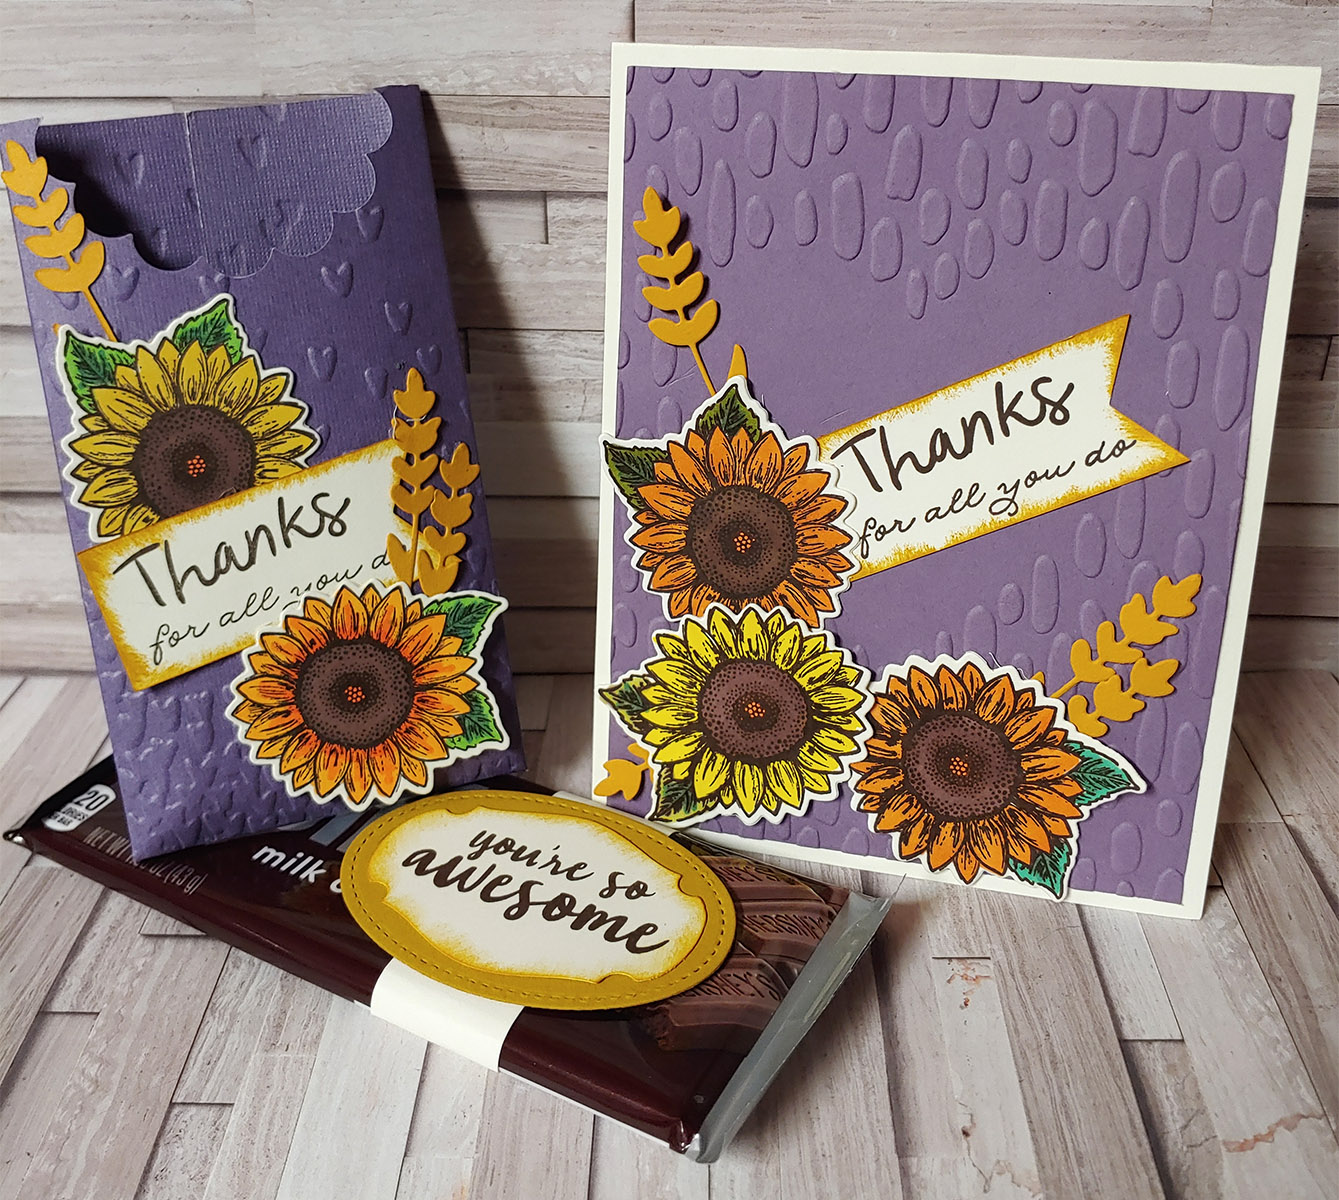
Next month, here in the States we celebrate Thanksgiving, a wonderful time of year to reflect about all the things we are Thankful for.  For my projects, I actually used to thank some very important people, NICU Nurses.  September was NICU Awareness Month and it just so happens my cousin gave birth to her first ever child over 2 months early.  As a thank you to all the wonderful nurses (142 of them) that took care of her baby around the clock, she asked if I could make something for them.  I came up with a pouch that holds a full size Hershey Bar.  I had a very short turn around time because my cousin wanted to get these to the nurses by the end of the month and also the same day she got to bring her baby girl home!  I then made a card to go along with the pouch (these the nurses did not get). 


So let’s start with the card, since that was quick and easy.  I think I used this bundle in another month of this hop, but as you can see, it is such a versatile stamp set and bundle.


Thanks for All You Do Card


INGREDIENTS:


Stamp Set: Celebrate Sunflowers; Ornate Thanks; Thankful Thoughts (r)

Paper: Very Vanilla (4 ¼”x11”, 1”x2 ½”, scraps); Highland Heather (4”x5 ¼”); Bumble Bee (scraps)

Ink: Early Espresso and Bumble Bee

Tools/Accessories: Assorted Blendibles; Sunflowers Dies; Banner Triple Punch, Sweetheart Textured Embossing Folder (r) 


INSTRUCTIONS:

  1. Score in fold in half the very vanilla cardstock.  This is the base of your card.
  2. Emboss the highland heather cardstock using the sweetheart textured embossing folder.  Adhere this to the card base with Stampin’ Seal.  Set this aside so you can work on the details of the card. 
  3. Stamp three of the smaller sunflower images on very vanilla cardstock.  I colored them using Stampin’ Up!’s Blendibles.  After you are done coloring them, die cut them out and set aside.
  4. Die cut two of the single sprigs and one double sprigs out of bumble bee cardstock, set aside.
  5. On the piece of 1”x2 ½” very vanilla card stock, stamp the word “thanks” from the Thankful Thoughts stamp set in early espresso ink. Then under that stamp the words “for all you do” from the Ornate Thanks stamp set also in early espresso ink.  Then punch the right side to create a banner using the Banner Triple Punch.  I then sponged the edges with bumble bee ink.
  6. Adhere the pieces onto the card base as shown in the sample.  Please note, the center flower is adhered with dimensionals.


“Thanks” Hershey Pouch and Belly Band


As mentioned in the beginning I had to make 142 of these within a week and a half time frame.  Here are some of the pictures from that experience.  When I have to make things in bulk like this I like to work on all the prepping one step at a time.  Then I assemble also one step at a time.


At first, I had a banner on the chocolate bar, but then I decided on a belly ban. To me it resembled a cigar, and isn’t that what they used to give out when someone had a baby (oh gosh, I am showing my age!).


INGREDIENTS:


Stamp Set: Celebrate Sunflowers; Ornate Thanks; Thankful Thoughts (r); Flowering Desert

(r)

Paper: Highland Heather (6”x5 1/2”); Very Vanilla (1”x2 ½”, 1”x5 ½”scraps); Bumble Bee (scraps)

Ink: Early Espresso

Tools/Accessories: Assorted Blendibles; Sunflowers Dies; Banner Triple Punch; Falling Petals Embossing Folder; Story Label Punch; 2 ¼” Scallop Circle Punch; Stitched Shapes Dies 


INSTRUCTIONS:


Belly Band

  1. Wrap the 1”x5 ½” very vanilla cardstock around the right hand side of the chocolate bar. Set this aside.
  2. Die cut a 2 ¾”x 1 7/8” oval out of bumble bee cardstock using the stitched shapes dies.  Adhere this to the very vanilla cardstock on the chocolate bar.
  3. Stamp the words “You’re So Awesome” in early espresso ink onto very vanilla cardstock and punch out using the Story Label Punch.  Sponge the edges with bumble bee ink. Then adhere this to the bumble bee oval. 


“Thanks” Pouch


I thought the pouch would be hard to put together, but it actually went together quite easily.  Out of one 12”x12” paper, you can actually get four pouches!  Here’s what you do. 


  1. Lay your piece of cardstock on the score so it is 6” wide.  Score it at 1 5/8” and 4 3/8”.  Then rotate it 90 degrees and score it at 5”.
  2. Next, snip first going across from the side (5 ½” side) to the score line at 1 5/8”.  Do the same on the other side.  Then come up so you are only snipping off ½” until you reach the other score line. Do this on both sides also.  Then the small flap that is left, I cut at an angle.  
  3. Now on the same panel where we left the flap, on the other end, I came down half way and used the scallop circle punch to make an opening.
  4. To put this together, be sure to use a strong adhesive, such as tear tape or Stampin Seal +, to be sure it doesn’t open.  I ran some of the adhesive on the small flap and then down one side close to the edge.
  5. I folded up the flap first, then over lapped the panels. You now have your pouch, easy peasy.
  6. I then decorated the front panel, this time using two small sunflower images and some of the sprigs as in the card, along with the “Thanks, for all you do” saying as in the card. 

Phew, there you have it, 142 pouches later and I was done…can you believe, I didn’t even eat one chocolate bar!  Oh the insanity!!!


I hope you enjoyed my projects and story this month!  I had a lot of fun (although tiring) putting them together and sharing them with you!  I would really appreciate a comment of any kind (well hopefully a nice one, lol) and then when you are done be sure to hop on over to Sue's blog!


Jo Blackman

Teri Pocock

Kim Quade (US)

Tiziana Milano (US) – You are here!

Sue Vine (Australia)

Jean Beaulieu (US)

Steph Jandrow (US)

Anne Marie Hile (US)

Lisa Ann Bernard (US)

Heidi Collins (US)


Thursday, September 17, 2020

Stampin Friends September Blog Hop - Fall/Outdoor/Halloween!


Welcome to the Stampin Friends Blog Hop!

This month’s theme is but of course Fall/Halloween/Thankful! If you are following along the hop, you have arrived from Kim Lamos blog. Be sure to read through my blog, comment below and continue to Maureen Rauchfuss blog. If you get lost along the way, you can find a list of Blog Hoppers at the end of each Blog. ENJOY!


Besides Christmas, I must say Halloween is my next favorite Holiday.  Although, it is sort of a love, hate relationship.  I love to make cards, to decorate and buy a bunch of candy to hand out, however, where ever I live I never get trick or treaters!!  The only ones that enjoy my craziness is my husband (so not thrilled) and my two black cats, Hobbes and Dexter!  So with that said, of course I picked Halloween for my projects!  I tried my hand at the new “slim” card style and I made a neat little candle box both using the NEW bundle from Stampin’ Up!’s Mini Catalog, Halloween Night Magic Bundle!


Let’s get to the spooktacular projects now, shall we!


Happy Halloween Greeting Card 

I had so much fun with the new “slim” card style.  Instead of making a size where I would have to make my own envelope, I made my card to fit a 6 ¾ (US standard size) envelope. 


INGREDIENTS

Stamp Set: Hallows Night Magic

Paper: Blackberry Bliss (7”x6 ¼”; scraps), Whisper White (6”x3 ¼”), Basic Black (4 ½’x3”), Basic Grey (3 ½”x2”)

Black Glitter Paper (6 ¼”x1”), Magic in this Night DSP (6”x3 ¼”)

Ink: Versa Mark, Basic Grey

Tools/Accessories: Halloween Magic Dies, Silver Embossing Powder, Black Embossing Powder, Heat Gun


INSTRUCTIONS


  1. Fold in half the 7”x6 1/4” blackberry bliss cs, so the folded size will be 3 ½”x61/4”. Adhere the 6”x3 ¼”, Magic in this Night DSP to the front of the card base.  Die cut two of the “fence” die out of the black glitter paper.  Adhere these to the bottom do the card making sure it touches the bottom and sides of the card base.
  2. Adhere the 6”x3 ¼” whisper white cs to the inside of the card base.  This makes your sentiment more visible.  Set this aside.
  3. Stamp the bats with basic grey ink onto the basic grey cs.  Then be sure to rub the card stock with the embossing buddy to remove any static before stamping with versa mark.
  4. Using the border image, stamp with versa mark onto the basic grey card stock.  Quickly, pour the silver embossing powder over it, lightly tap the excess powder off.  Next heat it thoroughly with the heat gun until the dull silver embossing powder becomes a nice shiny silver.
  5. On the same grey card stock, stamp the words “Happy Halloween” with versa mark in the center of the border.  Again, quickly pour black embossing powder over the top, lightly tap and heat with the heat gun until it is a shiny black.
  6. Lastly, die cut the same grey cs with the smaller frame in the Halloween Magic Dies set.
  7. Die cut the larger frame die out of basic black cs.  Adhere the grey cs to the black cs with stampin’ seal.  Then adhere this to the card base towards the top of the card base.
  8. To finish off the card, I die cut some of the bats in blackberry  bliss cs and adhered them to the left of the card front.
  9. I may not have mentioned this before, but be sure to stamp the back of your card with a personalized stamp…and definitely stamp a fun image on the envelope.  As my up-line would always say…no NAKED envelopes in the mail please!


Happy Halloween Tea Light Candle Box

As I mentioned earlier, no one comes to my house to trick or treat.  It may be because the houses in my neighborhood are not close to each other at all and my house is situated at the end of a 500 foot driveway, that goes up hill at a pretty steep angle….hmmmm….doesn’t that sound spooky now.  Maybe kids think the house is haunted up on the hill, bawahahahahaahaaa.  Sorry, got carried away there…now onto my box with “stamped” tea light candles!  I’ll start by explain how to “stamp” on tea lights.  This has been around for quite sometime, so you may even know how to do it.


INGREDIENTS for tea lights and box

Stamp Set: Hallows Night Magic

Paper: Basic Black (6”x4 ½”; 10 ¼”x1”; 10 ¾” x 1 1/8”), Blackberry Bliss (scraps), Magic in this Night DSP (3 ¼”x1 7/8”; 3 1/8” x 1 ¾” ), White Tissue Paper

Ink: Versa Mark, Black StazOn

Tools/Accessories: Halloween Magic Dies, Silver Embossing Powder, Heat Gun, plain white tea light candles


INSTRUCTIONS

Stamped Tea Lights


  1. The first thing to do is punch out 1 ½” circles out of the tissue paper.  Then punch a 1/16” hole in the center.
  2. Stamp desired image onto the tissue paper.
  3. Slip the tissue paper over the candle wick and gently heat the candle with the embossing heat gun, until the tissue paper is absorbed by the wax.
  4. That is all, and yes you can still use these candles and I have not had any issues.  However, if you do give them away, just let them know the process so they are careful with them.

Tea Light Box

  1. Start by punching out two of the larger frames from the Halloween Magic Die set.

    NOTE: I decorated only one though.
      Then stamp, with versa mark, the spider border image and quickly add silver embossing powder.  Then heat set this until it becomes shiny silver.  
  2. The two black strips will be used to make the box. Score the slightly narrower black strip at the following measurements, ¼”, 2”, 5 ¼”, 7” (bottom part of box).  Then score the long way at ¼”.  Snip down from the short edge to the score line on the ¼” side of the strip of paper.  Then snip the longer ¼” flaps on an angle. See image for example. 

  3. Add strong adhesive on the ¼” flaps and also on the ¼” extra piece on the short side.  First adhere the short side with adhesive to form a box.  Then fold down the flaps and center it on the plain frame we die cut earlier.
  4. Next, score the other black strip at the following measurements, ¼”, 2 1/8”, 5 ½”, 7 3/8” (top part of the box). Then score the long way at ¼”.  Same as the bottom part of the box you will snip in from the short edge down to the score line on the ¼” side. Then snip the longer ¼” flaps on an angle.  See image for example.

  5. Add strong adhesive on the ¼” flaps and also on the ¼” extra piece on the short side.  First, adhere the short side with adhesive to form a box.  Then place this over the bottom box.  Fold down the flaps and add the decorated cardstock frame from the beginning.  I did it this way, to be sure I will have the top and bottom frame perfectly lined up when my box is complete.
  6. Lastly, I lined the bottom and top of the inside of the box with Magic in this Night DSP (to hide my flaps) and added some small bats punched out of blackberry bliss to the top of the cover.


I hope these instructions made sense.  If not, please ask any questions you have in the comments and I will answer them as best as I can.


After this, maybe I’ll make a few to give out to my friends and family since trick or treaters won’t come to my place!  I will bring the treats to them!


I hope you enjoyed my projects this month!  I had a lot of fun putting them together and sharing them with you!  I would really appreciate a comment of any kind (well hopefully a nice one, lol) and then when you are done be sure to hop on over to the next blogger on the list!


Jo Blackman (UK)

Teri Pocock

Jean Bolen Beaulieu

Heidi Collins

Kim Quade - US

Kim Lamos

Tiziana Milano – You Are Here

Maureen Rauchfuss (US)

Barbara Welch (US)

Melissa Thomas

Steph Jandrow (US)

Katja Ettig

Lisa Ann Bernard